Deploy TheHive Flow with Docker Compose#
6.0 One
Deploy and configure TheHive Flow using Docker Compose, on a single host connected to TheHive. TheHive and TheHive Flow should run on separate hosts.
Two deployment profiles for production environments are available on a dedicated GitHub repository, beside the profiles of TheHive and Cortex. TheHive Flow isn't distributed as Linux packages: Docker Compose and Kubernetes are its only deployment methods, whatever the method used to install TheHive itself.
If you want to use only TheHive Flow Docker image, get it from Docker Hub. You'll need to install the other required services separately.
Trying out TheHive Flow?
To test TheHive Flow with TheHive and Cortex on a single host, use the testing profile of the same repository, described in Test TheHive Flow on a single host.
Before you begin
To ensure a smooth deployment process, make sure you have:
- A host that meets TheHive Flow system requirements and software requirements
- At least
sudopermissions on TheHive Flow host - A maintenance window for TheHive: upgrading it at Step 8 stops the service, and a later step requires editing TheHive configuration and restarting TheHive
TheHive and TheHive Flow on the same host
Keep TheHive and TheHive Flow on separate hosts. A TheHive running in a container on the same host as TheHive Flow can't reach the production profiles below. Docker replaces the address of its requests with the address of the Docker network gateway, which nginx never accepts. The testing profile of the repository is the exception. It runs TheHive, Cortex, and TheHive Flow on one host for functional testing, with TheHive calling TheHive Flow directly on the shared Docker network.
A single TheHive Flow instance
TheHive Flow can't run as a cluster: deploy one instance only. A TheHive cluster is supported in front of this single instance.
Architecture overview#
The stack deploys the following services on the host:
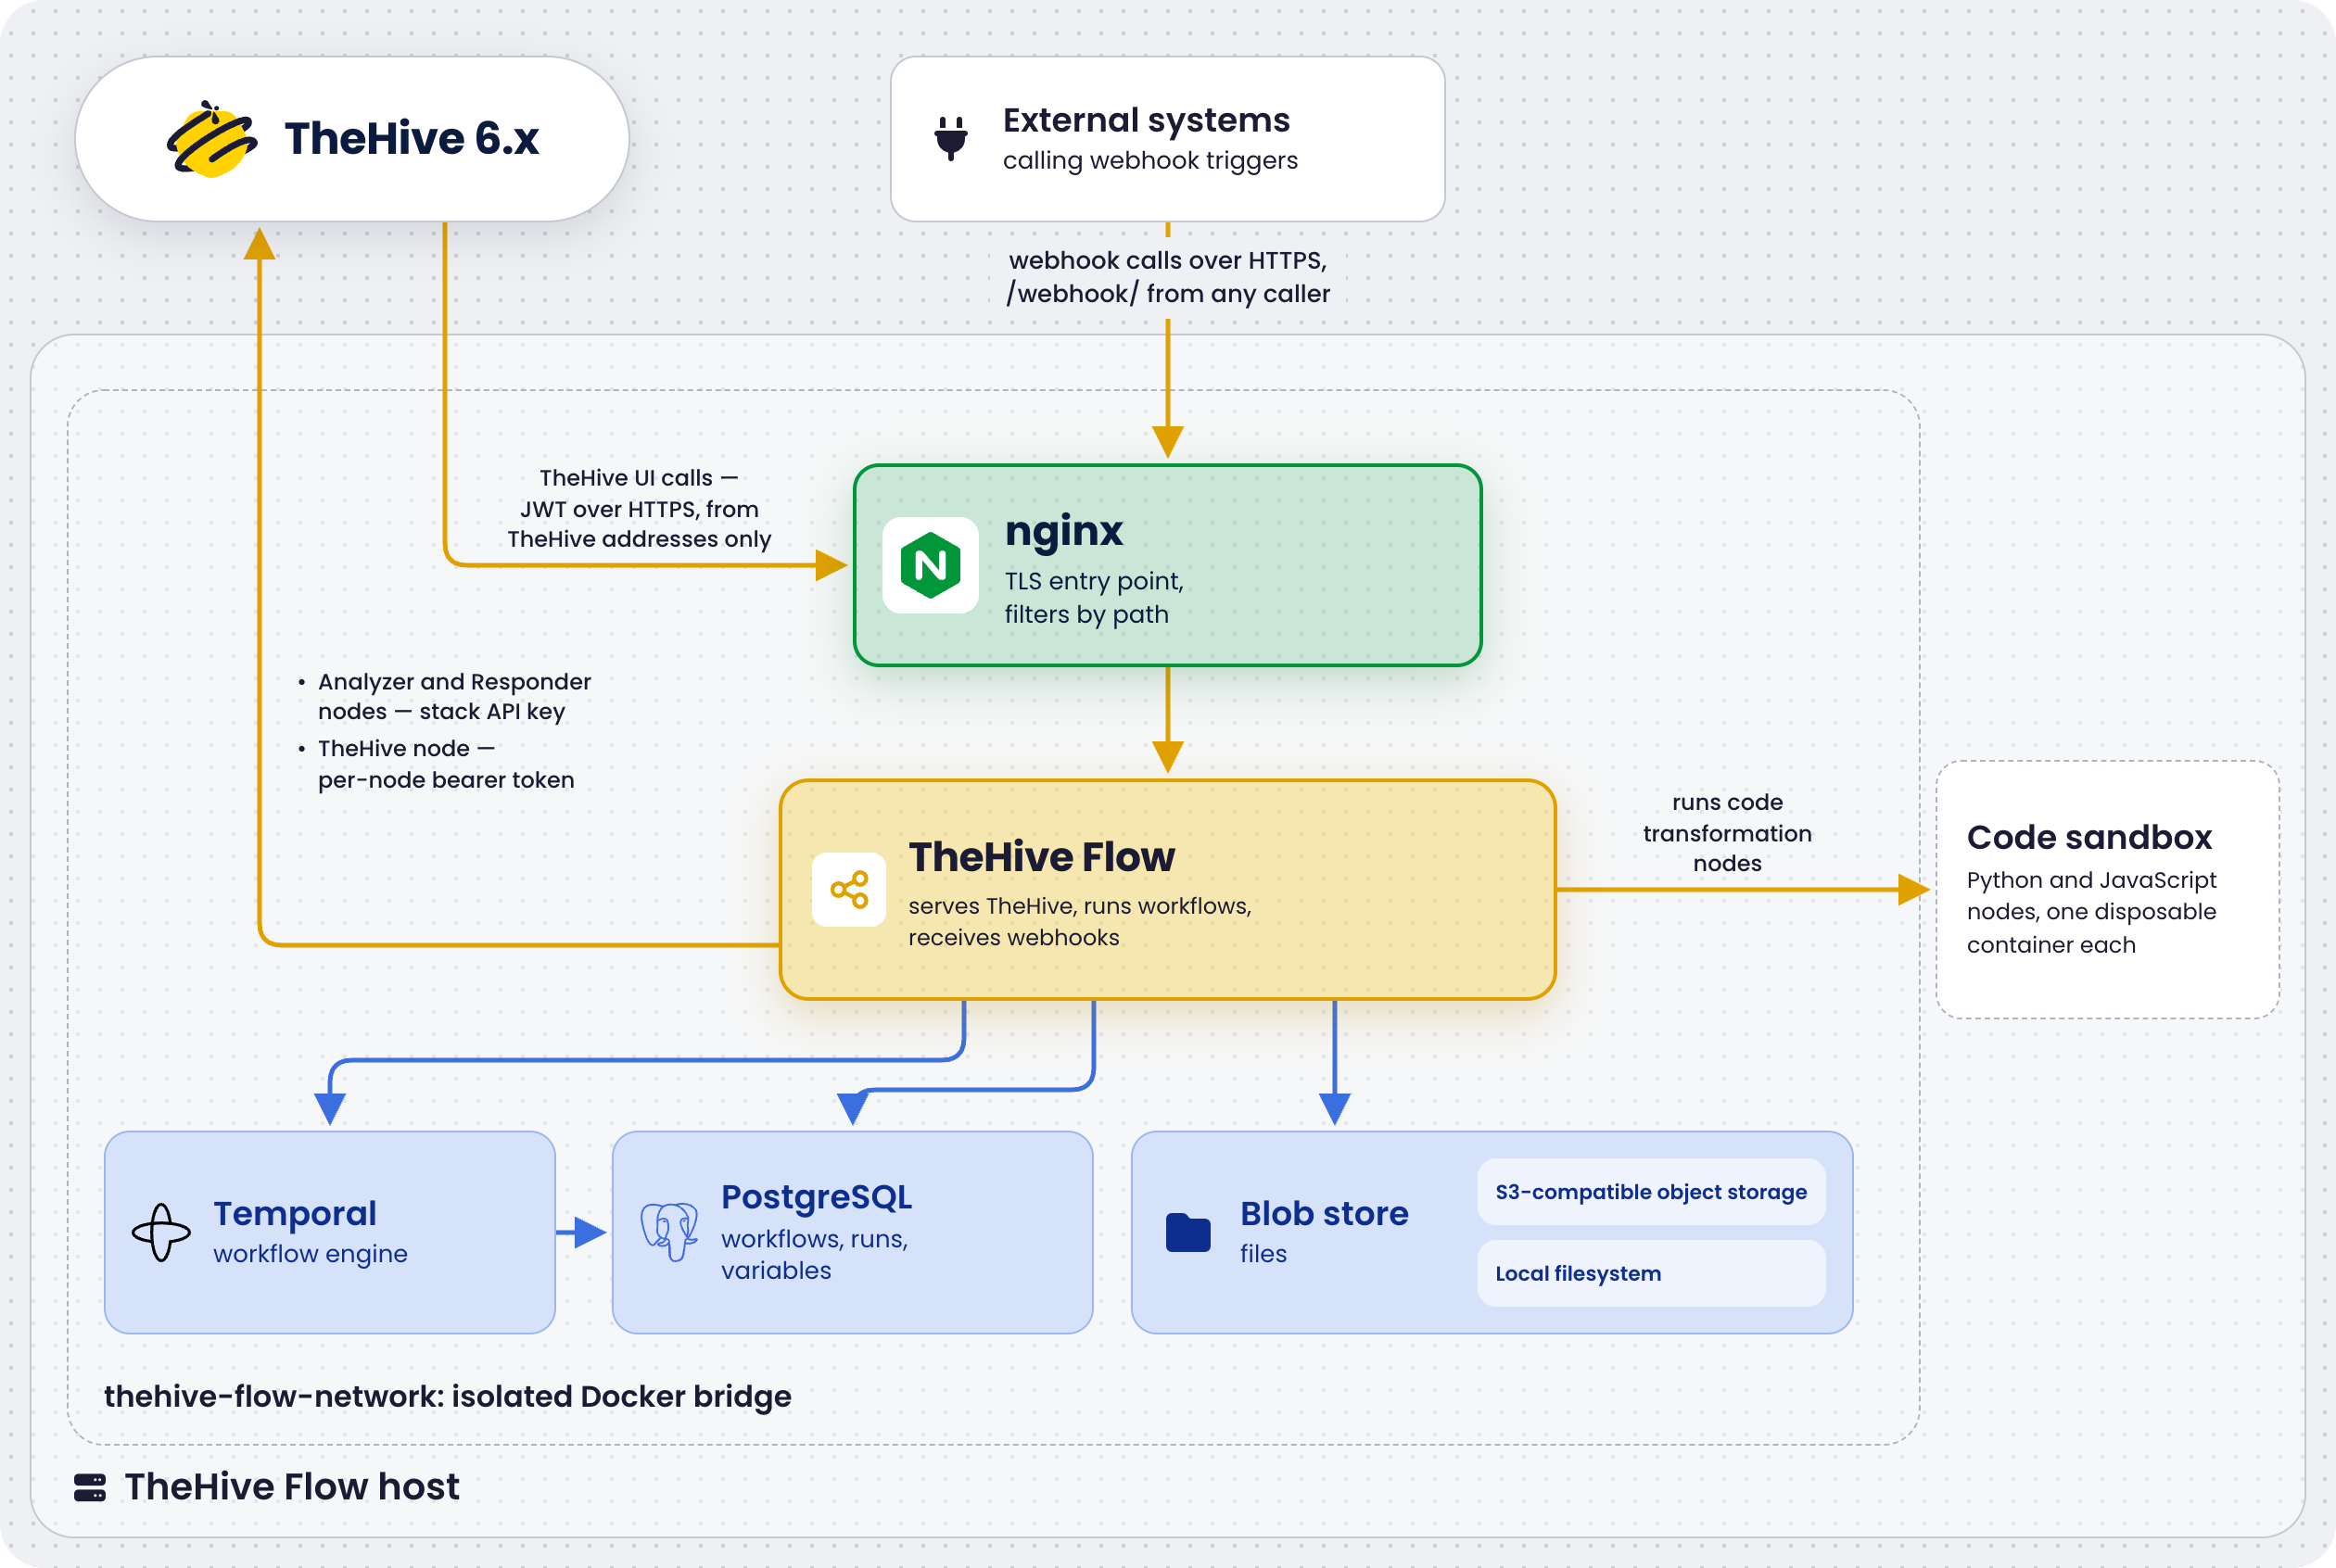
Nginx is the only service published on the network. The health endpoints of thehive-flow are published on the loopback interface only. Blue arrows mark the services TheHive Flow needs to start: Temporal, PostgreSQL, and the blob store. The yellow arrows are used at run time only, when users work in the Flow view or when workflows run.
Step 1: Install required dependencies#
Start by installing the necessary dependencies for deploying TheHive Flow with Docker Compose.
- Docker Engine: version
v23.0.15or later - Docker Compose plugin: version
v2.20.2or later - openssl, rsync, and jq, from the packages of your Linux distribution
Verify dependencies installation#
Run the following commands to ensure the dependencies are correctly installed:
- Check the Docker engine version:
docker version
- Confirm the current user can run Docker commands:
docker run hello-world
For details on post-installation steps and user permissions, see the Docker post-installation guide.
- Check the Docker Compose plugin version:
docker compose version
Step 2: Clone the GitHub repository#
Next, clone the StrangeBee Docker repository on the target host:
git clone https://github.com/StrangeBeeCorp/docker.git
The repository holds the deployment profiles of TheHive Flow alongside those of TheHive and Cortex.
Step 3: Choose your deployment profile#
Before proceeding with any commands, take a moment to choose the deployment profile that best fits your needs. Two prebuilt profiles are available for production environments. Both deploy the same services on a single host and differ only in the resources allocated to each service, listed in the system requirements.
Profile n°1: Production environment #1 (TheHive Flow)#
Single server deployment of TheHive Flow for standard production workloads.
Profile n°2: Production environment #2 (TheHive Flow)#
Single server deployment of TheHive Flow for high-performance or resource-intensive workloads.
Step 4: Review the application stack#
The Docker Compose file deploys the following components:
- PostgreSQL: Database used by TheHive Flow and Temporal
- Temporal: Workflow engine of TheHive Flow
- SeaweedFS: S3-compatible object storage holding the files
- TheHive Flow: Main application
- Nginx: HTTPS reverse proxy
Configuration and data files#
Each container has a dedicated folder for configuration and data files.
├── certificates
├── docker-compose.yml
├── dot.env.template
├── nginx
├── postgresql
├── README.md
├── s3-store
├── scripts
├── temporal
└── thehive-flow
Files and folders overview#
PostgreSQL#
postgresql
└── data
./postgresql/data: Database files, holding thethehive_flow,temporal, andtemporal_visibilitydatabases.
Don't modify
Don't manually modify these folders.
Temporal#
temporal
└── config
    ├── dynamicconfig
    │   └── production.yaml
    └── temporal-server.yaml.template
./temporal/config/temporal-server.yaml.template: Template of the Temporal server configuration.temporal-server.yamlis generated from it, with the database password filled in, when you use theinit.shscript../temporal/config/dynamicconfig/production.yaml: Temporal runtime configuration.
SeaweedFS#
s3-store
└── data
./s3-store/data: Files of the object storage.
Don't modify
Don't manually modify these folders.
TheHive Flow#
thehive-flow
├── config
│   └── thehive-flow.yml
└── secret
./thehive-flow/config/thehive-flow.yml: Application configuration../thehive-flow/secret: TheHive API key file, provisioned at Step 9.
Nginx#
nginx
├── certs
├── docker-entrypoint.d
│   └── 40-thehive-allow.sh
└── templates
    └── default.conf.template
./nginx/templates/default.conf.template: File used to initialize the nginx configuration when the container starts../nginx/docker-entrypoint.d/40-thehive-allow.sh: Script run when the container starts, writing the list of addresses nginx accepts TheHive requests from../nginx/certs: Transport Layer Security (TLS) certificate and private key, placed there by theinit.shscript.
Certificates#
This folder is empty by default. The application stack initializes with self-signed certificates.
To use your own certificates, such as certificates signed by an internal authority, create the following files with these exact filenames, as described at Step 6:
certificates
├── server.crt         ## Server certificate
├── server.key         ## Server private key
└── ca.pem             ## Certificate Authority (CA)
Scripts#
scripts
├── check_permissions.sh
├── generate_certs.sh
├── init.sh
├── output.sh
├── reset.sh
├── backup.sh
└── restore.sh
The application stack includes several utility scripts:
check_permissions.sh: Ensures proper permissions are set on files and folders.generate_certs.sh: Generates a self-signed certificate for nginx, or installs the custom one.init.sh: Initializes the application stack. See Step 7.output.sh: Displays output messages called by other scripts.reset.sh: Resets the environment. Running this script deletes all data, the secrets, and the certificates.backup.sh: Performs a cold backup of the current environment. See Back Up and Restore TheHive Flow for more details.restore.sh: Restores the environment from a previously taken backup.
Step 5: Go to the selected profile#
Go to the directory of your chosen profile. For example, to select the Production environment #1 profile:
cd docker/prod1-thehive-flow
(Optional) Step 6: Provide custom TLS certificates#
If you have certificates signed by your own certificate authority (CA), place them in the certificates directory before running init.sh. The script matches on the exact file names server.crt, server.key, and ca.pem, so rename your files as you copy them:
cp /path/to/<certificate>    ./certificates/server.crt
cp /path/to/<private_key>    ./certificates/server.key
cp /path/to/<ca_certificate> ./certificates/ca.pem
Restrict the private key to its owner:
chmod 600 ./certificates/server.key
All three files are in PEM format:
server.crt: The certificate nginx sends to clients. It must hold the server certificate first, followed by the intermediate certificates of the chain, up to but not including the root.server.key: The private key matching the server certificate, without a passphrase. Nginx can't prompt for one at container start.ca.pem: The CA certificate. Nginx uses it for OCSP stapling and client certificate verification, and never sends it to clients, so it doesn't replace the intermediates inserver.crt.
The three files work as a set. With all of them present, init.sh copies them to ./nginx/certs/ and turns on the ssl_trusted_certificate directive in the nginx configuration, which gives ca.pem to nginx. With any of them missing, the script prints a notice, ignores the files, and generates a self-signed certificate for the server name set at Step 7, valid for 365 days.
Step 7: Initialize the stack#
The init.sh script automates the following setup tasks:
1/ Checks the ownership and permissions of the files and folders, and offers to fix them.
2/ Prompts for the server name, used as the nginx host name, in the TLS certificate, and in the default public URL of TheHive Flow. The default is the system host name.
3/ Prompts for TheHive URL, as reachable from the thehive-flow container. The value is required: the script stops on an empty or malformed value.
4/ Prompts for the addresses TheHive calls from, and writes them to nginx_thehive_addresses.
5/ Installs the custom TLS certificate, or generates a self-signed one.
6/ Generates .env from dot.env.template, with random 256-bit secrets produced by openssl rand, the image versions pinned in versions.env, your user and group identifiers, and the group identifier of the Docker socket. The socket group is read from inside a throwaway container, so the detection also works where the socket group differs between the host and the containers, such as Docker Desktop.
7/ Renders temporal/config/temporal-server.yaml from its template, with the Temporal database password filled in.
8/ Starts PostgreSQL, then creates the thehive_flow and temporal roles and the thehive_flow, temporal, and temporal_visibility databases.
9/ Creates the Temporal schema in the two Temporal databases, starts Temporal, and creates its default namespace.
10/ Prints the next steps.
Run the script:
bash ./scripts/init.sh
The script asks three questions:
- Server name: press Enter to accept the default, the system host name. With a custom certificate provided at Step 6, enter a name the certificate carries, as its common name or one of its subject alternative names. TheHive calls that name in
flow.url, and the Java Virtual Machine (JVM) running TheHive rejects a mismatch. When webhook callers reach TheHive Flow through another reverse proxy, host name, path prefix, or port, setflow_public_urlin.envto that address. See Public URL. - TheHive URL: the address of TheHive host as reachable from the
thehive-flowcontainer, for examplehttp://<thehive_host>:9000. TheHive doesn't need to be running yet: set the address it will be reachable at. TheHive itself is deployed at Step 8. For anhttps://address whose certificate is signed by an internal CA, see TLS toward TheHive. When TheHive sits on a private network, the TheHive integration node and the HTTP request node can't reach it until its address range is added to the egress allowlist. - TheHive addresses: the IPv4 addresses TheHive calls TheHive Flow from, comma-separated, for example
192.168.1.10,192.168.1.11. A range in Classless Inter-Domain Routing (CIDR) notation, such as192.168.1.0/28, is also accepted. With a TheHive cluster, list every node. These are the addresses TheHive requests come from. They can differ from the address in TheHive URL, for example with a TheHive cluster behind a virtual IP address, a Network Address Translation (NAT) device, or an outbound proxy. Nginx forwards TheHive requests only from these addresses, and refuses them from every address while the list is empty. See TheHive address filtering.
PostgreSQL and Temporal stay up once the script completes. The script ends with a warning that no TheHive API key is set yet: the key is provisioned at Step 9.
Safe to run again
Running init.sh again on an initialized stack is safe. It keeps the secrets already in .env, offers the values it holds as defaults for the three questions, and only creates the databases, the Temporal schema, and the namespace when they're missing. If it fails partway, fix the cause and run it again.
One side effect: without a custom certificate in ./certificates/, each run generates a new self-signed certificate. Restart nginx to serve it, and if TheHive trusts the specific certificate as described in Option B, copy the new nginx/certs/server.crt to TheHive host again. See TLS certificate renewal.
Expected output
The transcript below is trimmed: the Docker Compose progress lines, the certificate generation details, and the next-steps text vary.
[✔] All files and folders have expected permissions.
[*] Define the hostname used to connect to this server
Server Name (default: flow-host): flow.example.com
[*] Define the TheHive URL, as reachable from the TheHive Flow container
TheHive URL, e.g. http://192.168.1.10:9000 (required): http://192.168.1.10:9000
[*] Define the addresses TheHive calls this server from (IPv4 or CIDR, comma-separated)
TheHive addresses (default: none): 192.168.1.10
[*] No custom certificate found.
[*] If you want to provide your custom certificate for the Reverse Proxy, please copy the following files in the ./certificates directory:
    * ./certificates/server.crt
    * ./certificates/server.key
    * ./certificates/ca.pem
[✔] Generating self-signed certificate...
[✔] Self-signed certificate generated for flow.example.com.
[✔] ./.env written.
[✔] ./temporal/config/temporal-server.yaml written.
[*] Starting PostgreSQL...
[✔] Databases ready.
[*] Creating the Temporal schema...
[✔] Temporal schema created.
[*] Starting Temporal...
[✔] Temporal namespace 'default' created.
[!] No TheHive API key: TheHive Flow does not start without one. Write it to ./thehive-flow/secret/thehive-api-key or set thehive_api_key in .env.
[✔] Initialisation completed.
...
- The
[!]warning about TheHive API key is expected at this point: the key is provisioned at Step 9. - With the prompt for TheHive addresses left empty, a
[!]warning follows it. The script still completes, but nginx refuses every TheHive request untilnginx_thehive_addressesis set in.envand nginx is recreated withdocker compose up -d --no-deps nginx. - With custom certificates provided at Step 6, a single
Using custom certicates found in ./certificates.line replaces the certificate lines. - On a second run,
Temporal schema already exists.andTemporal namespace 'default' already exists.replace the two creation lines, and the three prompts offer the current values as defaults. The certificate lines appear again: a new self-signed certificate is generated at each run. - A line starting with
/!\is an error: the script stops, and running it again after fixing the cause is safe.
Step 8: Deploy or upgrade TheHive#
The following steps require TheHive 6.x running and reachable from TheHive Flow stack. TheHive 6.x installs with the standard methods: Linux packages, Docker Compose, or the Kubernetes Helm chart.
Package installations: TheHive 6.x requires Java 17, Cassandra 4.0.x to 4.1.x requires Java 11
On a package installation, TheHive 6.x runs on Java 17, while Cassandra 4.0.x to 4.1.x, the database it relies on, still requires Java 11 and doesn't support Java 17. When both share a host, install the two Java versions side by side and pin each service to its own: see Run TheHive 6 and Cassandra on the Same Host. Docker and Kubernetes deployments aren't affected: the images ship their own runtime.
- For a new deployment, see TheHive Installation Methods.
- To upgrade an existing TheHive 5.x instance installed with packages or Docker Compose, see Upgrade from TheHive 5.x. For a Kubernetes Helm deployment, upgrade the release as described in Deploy TheHive on Kubernetes.
Step 9: Provision TheHive API key#
-
Sign in to TheHive with an account that has the predefined Org-Admin profile.
-
Generate a dedicated API key for a user account whose profile includes the Manage analysis and Manage actions permissions. TheHive Flow uses the key to run Cortex analyzers and responders through TheHive, from the Analyzer and Responder action nodes. Each call runs in the organization of the workflow, so the account must belong to every organization whose workflows use these nodes. The key is required even when no workflow uses these nodes: TheHive Flow doesn't start without it.
Any account type works, but a service account is recommended: it can't sign in to the UI and isn't tied to a person. See Create a User Account and Manage a User Account API Key.
-
On TheHive Flow host, store the key in the secret file, readable by its owner only:
printf '%s' '<thehive_api_key>' > ./thehive-flow/secret/thehive-api-key
chmod 600 ./thehive-flow/secret/thehive-api-key
Alternatively, set it in
.env, which is at mode 600 already:thehive_api_key=<thehive_api_key>When both are set,
thehive_api_keyin.envtakes precedence over the secret file. See the secrets inventory.
Step 10: Configure TheHive to reach TheHive Flow#
TheHive must know the address at which it reaches TheHive Flow and the JWT signing key generated by init.sh. That address is the nginx entry point: it isn't necessarily the public URL webhook callers use. Where that configuration goes depends on how TheHive is deployed.
On a package installation, everything goes in /etc/thehive/application.conf. On a Docker deployment, it depends on how TheHive container starts: check the thehive service in TheHive docker-compose.yml file for --no-config in its command, or TH_NO_CONFIG=1 in its environment. The StrangeBee Docker Compose profiles, testing, prod1-thehive, and prod2-thehive, all ship command: '--no-config --no-config-secret'.
The same logic applies to TheHive image run without Docker Compose, with docker run or another container runtime. The image entrypoint reads the same variables and files, so follow the matching Docker Compose tab and recreate the container with the commands of your runtime.
-
On TheHive Flow host, read the key from the
.envfile at the root of the profile directory:grep jwt_signing_key .env -
On TheHive host, declare the connection and activate the feature, using the key from the previous command.
The lines play two roles. The
flow.urlandflow.jwt_signing_keykeys declare the connection. Thescalligraph.modulesline loads the connector that talks to TheHive Flow, and thefeatures.Orchestrator.enabledflag displays the Flow view and opens its routes.Add the following to the
/etc/thehive/application.conffile, next to the connector lines it already holds:flow.url = "https://<flow_host>/" flow.jwt_signing_key = "<jwt_signing_key>" features.Orchestrator.enabled = true scalligraph.modules += "org.thp.thehive.connector.flow.FlowModule"With
command: '--no-config'orTH_NO_CONFIG=1, TheHive ignores theTH_*environment variables that generate configuration. All configuration goes in theapplication.conffile TheHive reads at/etc/thehive/application.conf.The StrangeBee Docker Compose profiles ship that file as
thehive/config/application.confand mount the directory at/etc/thehivein TheHive container. The file already holds thescalligraph.modulesline of TheHive Flow, commented out. Uncomment it, and add the other lines next to it:flow.url = "https://<flow_host>/" flow.jwt_signing_key = "<jwt_signing_key>" features.Orchestrator.enabled = true scalligraph.modules += "org.thp.thehive.connector.flow.FlowModule"On a deployment that provides no such file, create it and mount it in
docker-compose.yml:volumes: - /path/to/application.conf:/etc/thehive/application.conf:roTheHive Docker entrypoint reads
TH_*environment variables. Declare the connection in TheHivedocker-compose.ymlfile:environment: TH_FLOW_KEY: "<jwt_signing_key>" TH_FLOW_URL: "https://<flow_host>/"The two variables declare the connection but don't turn it on: add the feature flag and the connector module to an
application.conffile mounted at/etc/thehive/application.confin TheHive container. The entrypoint includes that file automatically in the configuration it generates.features.Orchestrator.enabled = true scalligraph.modules += "org.thp.thehive.connector.flow.FlowModule"Mount the file in
docker-compose.yml:volumes: - /path/to/application.conf:/etc/thehive/application.conf:ro -
Apply the change.
Restart TheHive:
sudo systemctl restart thehiveRecreate TheHive container. A plain
docker compose restartapplies neither the environment variables nor the new volume mount:docker compose up -d thehive
TLS with a self-signed certificate#
When init.sh generated a self-signed certificate because no custom certificate was provided at Step 6, TheHive JVM rejects the connection by default. Two options are available. Both go under flow.wsConfig, so they apply to the connection to TheHive Flow only. Cortex, Malware Information Sharing Platform & Threat Sharing (MISP), and the other connectors keep their own certificate verification.
Option A: Turn off certificate verification#
With this option, TheHive accepts any certificate from TheHive Flow without verifying it. It's the quickest to set up, but TheHive can no longer detect a server impersonating TheHive Flow host: reserve it for trusted internal networks.
Add the following line to TheHive application.conf file:
flow.wsConfig.ssl.loose.acceptAnyCertificate = true
Option B: Trust the specific certificate#
With this option, certificate verification stays on and TheHive trusts the specific TheHive Flow certificate. It's the more secure choice.
-
Copy
nginx/certs/server.crtfrom TheHive Flow host to TheHive host. -
Make it readable by TheHive at
/etc/thehive/thehive-flow-nginx.crt.Place the file directly:
sudo cp /path/to/server.crt /etc/thehive/thehive-flow-nginx.crtMount it into TheHive container in
docker-compose.yml:volumes: - /path/to/thehive-flow-nginx.crt:/etc/thehive/thehive-flow-nginx.crt:ro -
Declare it as trusted in TheHive
application.conffile:flow.wsConfig.ssl { trustManager { stores = [ { type: "PEM", path: "/etc/thehive/thehive-flow-nginx.crt" } ] } } -
Apply the change.
Restart TheHive:
sudo systemctl restart thehiveRecreate TheHive container. A plain
docker compose restartdoesn't apply the new volume mount:docker compose up -d thehive
Step 11: Start the stack#
Back on TheHive Flow host, start all services with Docker Compose:
docker compose up -d
The first start pulls the remaining images from Docker Hub.
Step 12: Verify the deployment#
On TheHive Flow host, check that all containers are running and that the health endpoints respond:
docker compose ps -a
curl -fsS http://127.0.0.1:9090/livez
curl -fsS http://127.0.0.1:9090/readyz
The -a flag also lists stopped containers, such as the one-shot init-s3-store. /livez confirms the HTTP server is up. /readyz confirms TheHive Flow can reach its database and the Temporal workflow engine, and returns 503 naming the failing check otherwise.
From a host that isn't listed in nginx_thehive_addresses, check that nginx refuses TheHive requests:
curl -sk -o /dev/null -w '%{http_code}\n' https://<nginx_server_name>/api/v1/version
The command prints 403.
Expected output
The docker compose ps -a listing, trimmed to the relevant columns:
NAME                         SERVICE         STATUS
nginx                        nginx           Up 2 minutes
thehive-flow                 thehive-flow    Up 2 minutes
thehive-flow-init-s3-store   init-s3-store   Exited (0)
thehive-flow-postgresql      postgresql      Up 2 minutes (healthy)
thehive-flow-s3-store        s3-store        Up 2 minutes (healthy)
thehive-flow-temporal        temporal        Up 2 minutes (healthy)
The thehive-flow and nginx containers define no Docker health check, so their status carries no (healthy) suffix: the two curl probes cover TheHive Flow health instead.
A healthy /livez returns 200 with an empty body. A healthy /readyz reports each check:
{"status":"ok","checks":{"db":"ok","modules":"ok","temporal":"ok"}}
In docker compose ps -a, init-s3-store shows Exited (0) and that's the expected steady state: it's a one-shot container that provisions the object storage identity and bucket, verifies both, then exits. Everything else should show a running or healthy status. Only a non-zero exit code on init-s3-store indicates a problem: see Troubleshoot TheHive Flow.
Step 13: Check the connection in TheHive#
Sign in to TheHive with an account that has the predefined Org-Admin profile, which includes TheHive Flow permissions automatically.
The health indicator at the bottom of the sidebar menu reports the connection from any view. It covers every configured connector: TheHive Flow, Cortex, MISP, and Email Intake. Its color reflects all of them at once:
- Green: every configured connector is healthy.
- Red: at least one configured connector is in error.
- Faded: no connector is configured.
Select the indicator to see the details. Its Flow section shows TheHive Flow URL and its own status, OK or ERROR. TheHive probes TheHive Flow every minute by default, so allow that long for the status to reflect a fix. Changing flow.url or flow.jwt_signing_key triggers an immediate check.
Then go to the Flow view from the sidebar menu.
- If the view displays the workflow list, empty on a fresh deployment but with the Import workflow button visible, TheHive and TheHive Flow are connected.
- If the view is missing from the sidebar, review the configuration from Step 10 and restart TheHive.
- If the view displays an error notification over an empty workflow list, TheHive can't reach TheHive Flow: run the check from TheHive host to tell a network or nginx problem from a JWT problem.
Step 14: Grant users access to TheHive Flow#
Users who don't have one of the predefined Org-Admin and Analyst profiles need TheHive Flow permissions through a custom profile: see Perform TheHive Flow Initial Setup as an Admin.
Test TheHive Flow on a single host#
Testing only
This profile must never be used in production.
One license required
TheHive Flow requires a One license. The 14-day Platinum trial that comes with the environment doesn't cover it: activate your One license in TheHive before connecting TheHive to TheHive Flow.
The testing profile of the repository deploys TheHive, Cortex, and TheHive Flow on one host, for functional testing only. The Docker demo environment describes its TheHive and Cortex side, including the sample data script and the default accounts. TheHive Flow services are the same as in the production profiles, with three differences:
- TheHive calls TheHive Flow directly on the shared Docker network, at
http://thehive-flow:8081. Nginx forwards only the/flow/webhook/path to TheHive Flow, so webhook URLs take the formhttps://<server_name>/flow/webhook/<webhook_id>. - The
init.shscript prompts for the server name only. It generates the secrets of TheHive Flow, keeps them on later runs, creates the databases, the Temporal schema, and the namespace, and writes a placeholder TheHive API key to./thehive-flow/secret/thehive-api-key. -
The profile doesn't declare the connection in TheHive configuration: add it yourself once the environment runs.
-
Deploy the environment as described in Deploy a Demo Docker Environment, from the
docker/testingdirectory. TheHive Flow services start with the rest. Check that TheHive Flow is ready:curl -fsS http://127.0.0.1:9090/readyz -
Read the JWT signing key
init.shgenerated, and add the connection to./thehive/config/application.conf, then restart TheHive:grep jwt_signing_key .envflow.url = "http://thehive-flow:8081" flow.jwt_signing_key = "<jwt_signing_key>" features.Orchestrator.enabled = true scalligraph.modules += "org.thp.thehive.connector.flow.FlowModule"docker compose restart thehive -
In TheHive, generate an API key for an account whose profile includes the Manage analysis and Manage actions permissions, as described at Step 9. Replace the placeholder with it, then restart TheHive Flow:
printf '%s' '<thehive_api_key>' > ./thehive-flow/secret/thehive-api-key docker compose restart thehive-flow -
Check the connection in TheHive, with the health indicator and the Flow view, as described at Step 13.
To apply a change to ./thehive-flow/config/thehive-flow.yml, recreate the service with docker compose up -d --force-recreate thehive-flow, as on the production profiles. To start over, bash ./scripts/reset.sh deletes all the data of the environment, TheHive Flow included.