Deploy TheHive Flow on Kubernetes#
6.0 One
Deploy and configure TheHive Flow on a Kubernetes cluster using the Helm chart published in the StrangeBee Helm chart repository, and connect it to TheHive. TheHive Flow isn't distributed as Linux packages: Kubernetes and Docker Compose are its only deployment methods, whatever the method used to install TheHive itself.
Installing the chart deploys the application and its own Temporal workflow engine, as a subchart. It doesn't deploy the PostgreSQL database and the S3-compatible object storage TheHive Flow needs: they're provisioned first, at Step 3. For testing, the deployment scenarios shipped beside the chart provide both, and the steps below use them. For production, use a PostgreSQL database and S3-compatible object storage you operate.
The application runs as a single replica: the chart enforces replicaCount: 1.
Before you begin
To ensure a smooth deployment process, make sure you have:
- A cluster that meets the software requirements and the chart sizing defaults
- A maintenance window for TheHive: upgrading it at Step 4 stops the service, and a later step requires editing TheHive configuration and restarting TheHive
A single TheHive Flow instance
TheHive Flow can't run as a cluster: deploy one instance only. A TheHive cluster is supported in front of this single instance.
The examples below use the thehive-flow namespace and the thehive-flow release name, which are the names the deployment scenarios use. Adapt them to your cluster conventions.
Architecture overview#
The chart and its deployment scenarios deploy the following on the cluster:
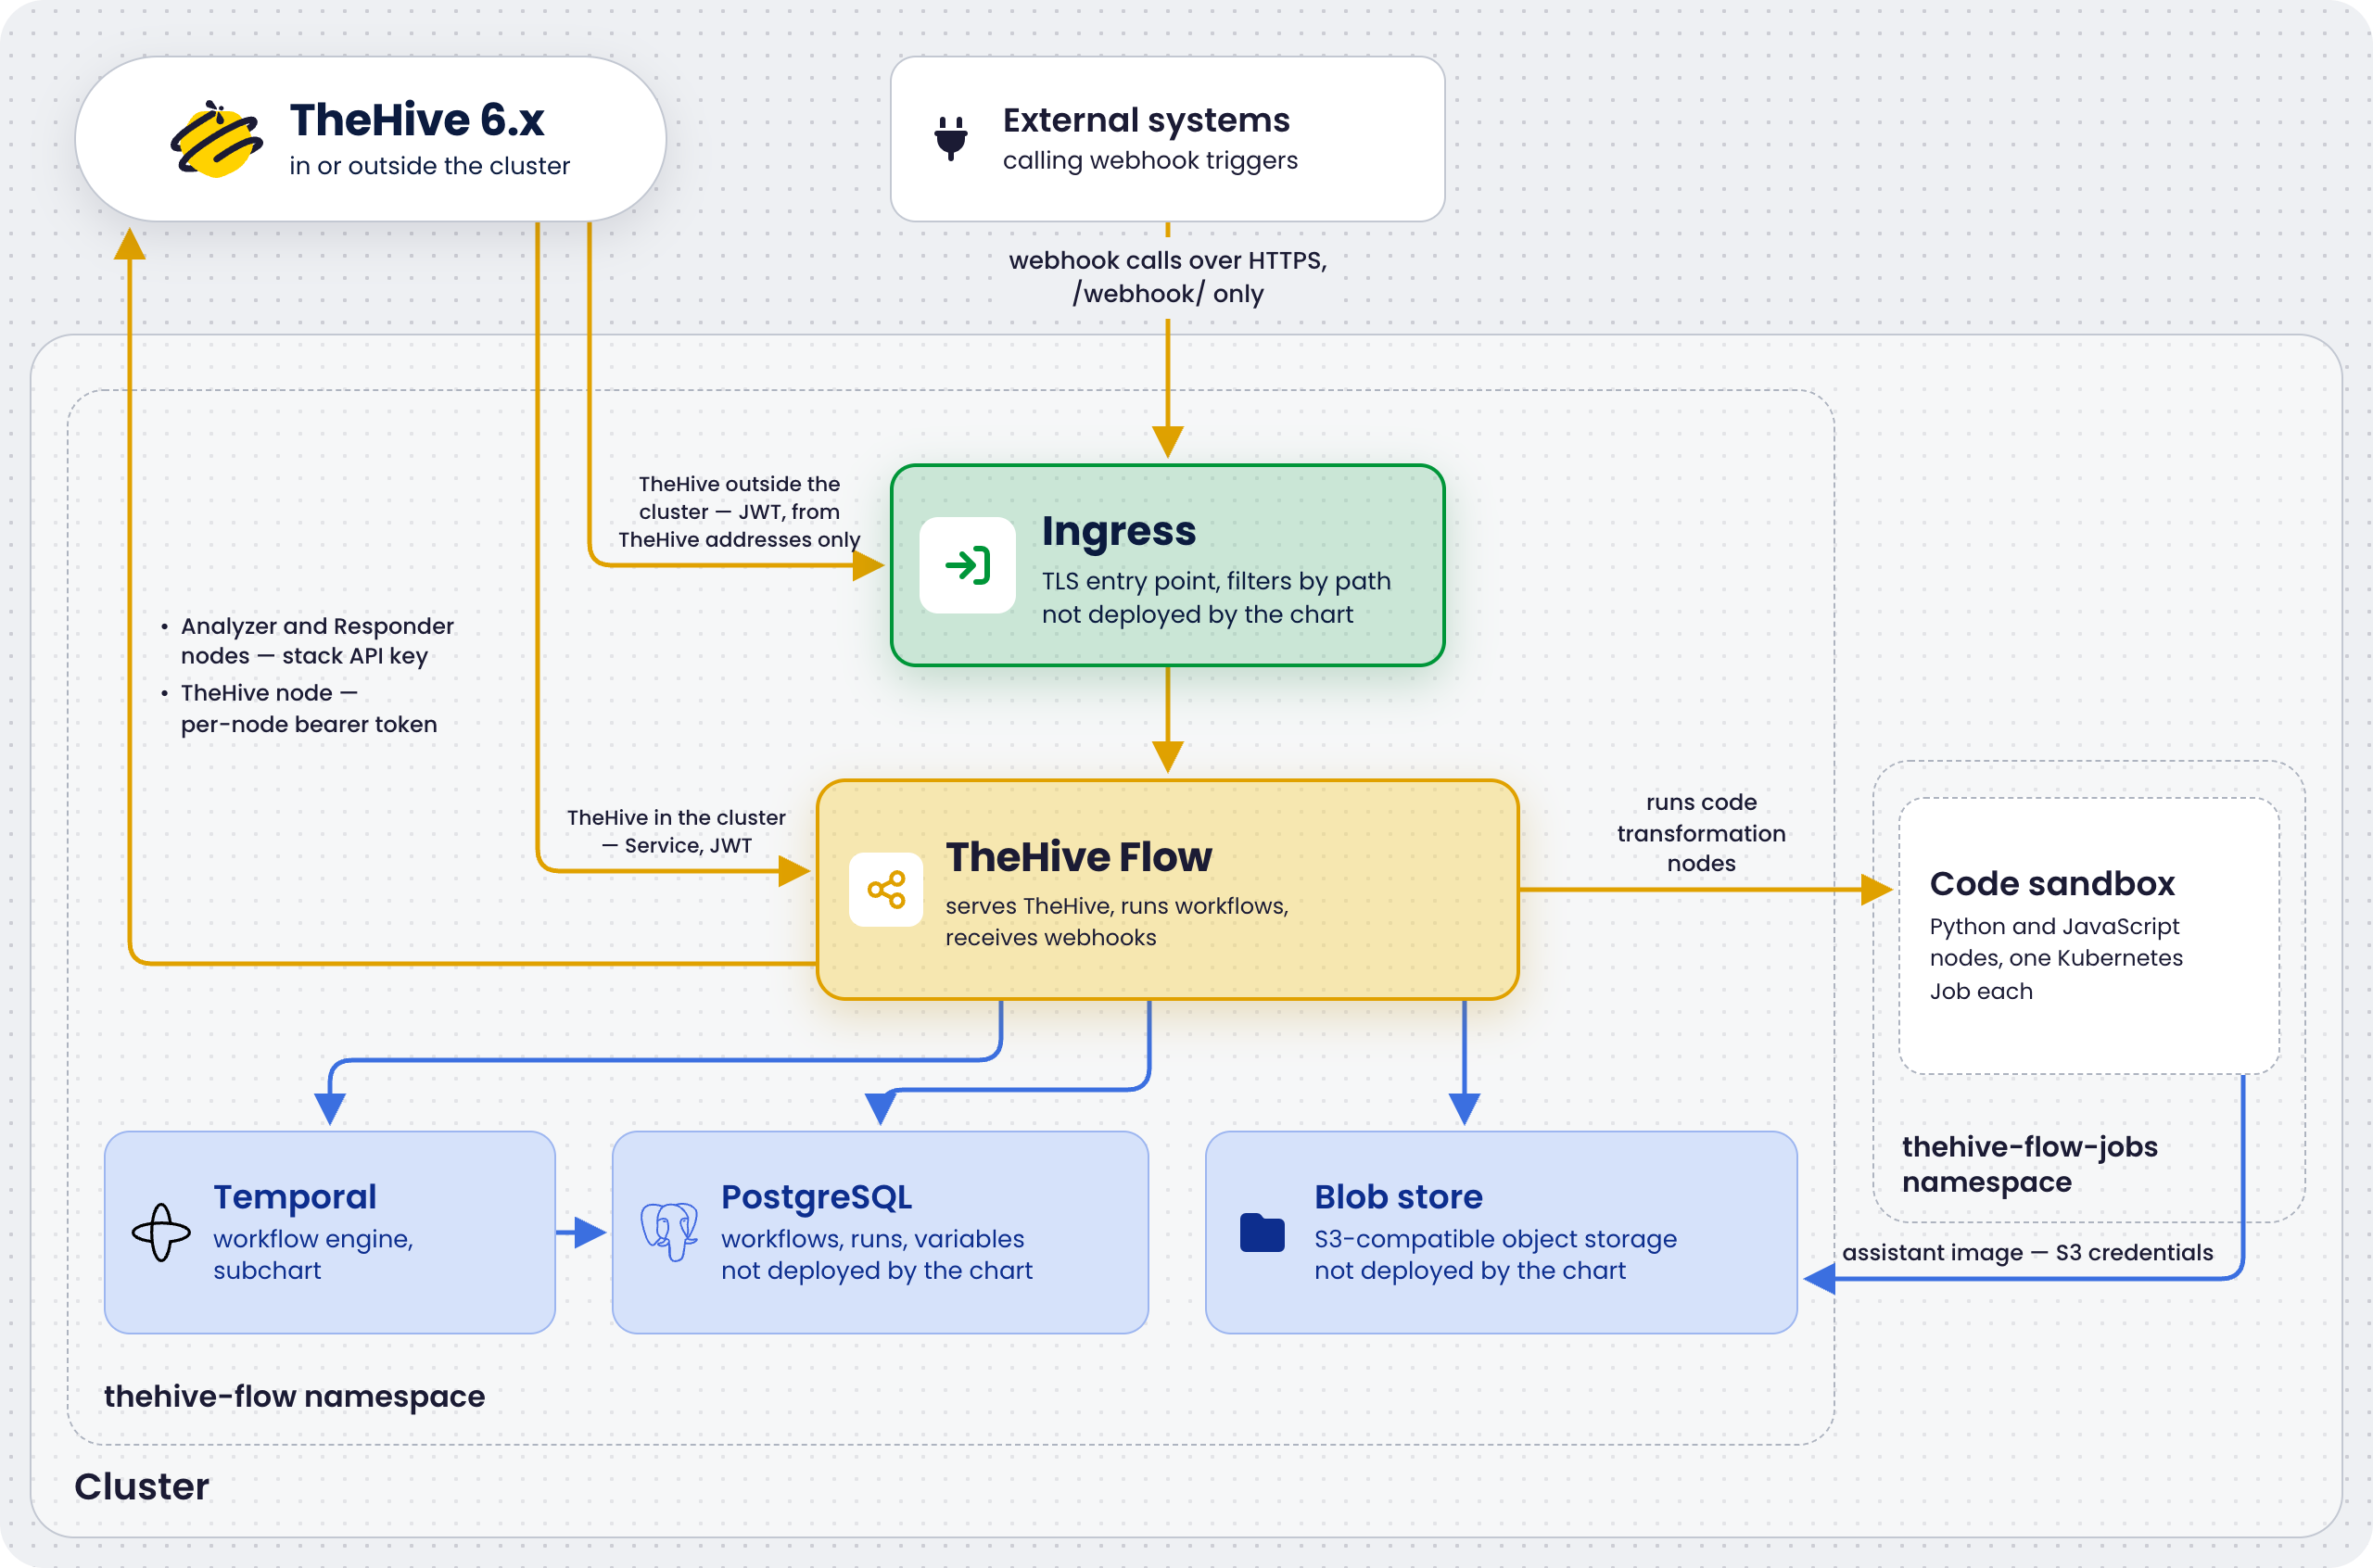
Inside the cluster, TheHive calls the thehive-flow-api Service. PostgreSQL and the S3-compatible object storage are provisioned before the chart, by the deployment scenarios for testing or by your own tooling for production. The code transformation Jobs use the assistant image to move files between the object storage and each Job. Blue arrows mark the services TheHive Flow needs to start: Temporal, PostgreSQL, and the object storage. The yellow arrows are used at run time only, when users work in the Flow view or when workflows run.
Step 1: Install required dependencies#
Start by installing the necessary tools on the machine that will run the following commands.
- Helm: version
v3.8.0or later - kubectl: version matching the cluster, within one minor version
- openssl: any version, to generate the JWT signing key
The cluster itself must run Kubernetes v1.29.0 or later. The deployment scenarios also need a default storage class for their persistent volumes.
Verify dependencies installation#
Run the following commands to ensure the tools are correctly installed and reach the cluster:
helm version
kubectl version
kubectl get nodes
Step 2: Add the Helm repository and get the scenario files#
The chart is published in the StrangeBee Helm chart repository on GitHub, under thehive-charts/thehive-flow, alongside the chart of TheHive itself.
-
Add the StrangeBee Helm repository and update your local Helm repositories:
helm repo add strangebee https://strangebeecorp.github.io/helm-charts
helm repo update
The chart is then available as
strangebee/thehive-flow. To list every value it accepts, runhelm show values strangebee/thehive-flow. -
Optional: For testing, also clone the GitHub repository to get the deployment scenarios, which hold the manifests and values files that provision PostgreSQL and the S3-compatible object storage. A production deployment that uses its own PostgreSQL and object storage doesn't need them.
git clone https://github.com/StrangeBeeCorp/helm-charts.git
cd helm-charts/thehive-charts/thehive-flow
The scenarios live in the
scenarios/directory of the chart:cnpgprovides PostgreSQL,seaweedfsprovides the object storage, andcombinedlayers both for a full installation.
Step 3: Provision PostgreSQL and the object storage#
The chart itself deploys only TheHive Flow and the Temporal subchart. The two stateful dependencies are provisioned before it, either with the deployment scenarios shipped beside the chart, or by your own tooling:
| Component | Provisioned by the scenarios | External alternative |
|---|---|---|
| PostgreSQL | A CloudNativePG cluster named thehive-flow-postgresql, with one instance and 10 GiB of storage, the thehive_flow and temporal roles, and the thehive_flow, temporal, and temporal_visibility databases. The cnpg scenario |
Any PostgreSQL reachable from the cluster, with the roles and databases described in External PostgreSQL |
| Object storage | A single-pod SeaweedFS release in its own seaweedfs namespace, with a 10 GiB persistent volume and the thehive-flow bucket, installed from the upstream SeaweedFS Helm chart. The seaweedfs scenario |
Any S3-compatible storage, set through the blobstore.s3.* values as described in External object storage |
Whichever way you provision them, first create the namespace TheHive Flow runs in:
kubectl create namespace thehive-flow
Deployment scenarios#
The scenarios run the services as single replicas, with placeholder credentials that start with ChangeThis. Change them in scenarios/cnpg/postgres-secrets.yaml for the database roles, and in both scenarios/seaweedfs/seaweedfs-s3-secret.yaml and scenarios/seaweedfs/thehive-flow-s3-secret.yaml for the object storage, which must hold the same key.
To provision the scenario defaults, run the following commands from the chart directory. The machine running them must be able to reach the CloudNativePG and SeaweedFS Helm chart repositories.
-
Install the CloudNativePG operator, then create the PostgreSQL cluster and its databases. The role Secrets come first: the cluster creates the roles from them.
helm upgrade --install cnpg cloudnative-pg \
  --repo https://cloudnative-pg.github.io/charts --version 0.29.1 \
  -n cnpg-system --create-namespace --wait

kubectl apply -n thehive-flow -f scenarios/cnpg/postgres-secrets.yaml
kubectl apply -n thehive-flow -f scenarios/cnpg/postgres-cluster.yaml
kubectl wait -n thehive-flow cluster/thehive-flow-postgresql \
  --for=condition=Ready --timeout=5m
kubectl apply -n thehive-flow -f scenarios/cnpg/databases.yaml
Check the result with
kubectl get -n thehive-flow cluster,database: the cluster reportsCluster in healthy stateand the three databasesAPPLIED: true. -
Create the object storage credentials, in the
seaweedfsnamespace for the store and in thethehive-flownamespace for TheHive Flow, then install SeaweedFS. A post-install hook creates thethehive-flowbucket.kubectl create namespace seaweedfs kubectl apply -f scenarios/seaweedfs/seaweedfs-s3-secret.yaml kubectl apply -n thehive-flow -f scenarios/seaweedfs/thehive-flow-s3-secret.yaml helm upgrade --install seaweedfs seaweedfs \ --repo https://seaweedfs.github.io/seaweedfs/helm --version 4.48.0 \ -n seaweedfs -f scenarios/seaweedfs/seaweedfs-values.yaml --waitCheck that the bucket exists:
kubectl exec -n seaweedfs deploy/seaweedfs-all-in-one -- \
  sh -c 'echo s3.bucket.list | weed shell'
The scenario values files, scenarios/cnpg/values.yaml and scenarios/seaweedfs/values.yaml, point the chart at these two services. They're passed to the chart at Step 6.
External PostgreSQL#
The chart creates no roles or databases. On a PostgreSQL server of your own, create them before the installation, with the same names the chart values use by default:
CREATE ROLE thehive_flow LOGIN PASSWORD '<thehive_flow_password>';
CREATE ROLE temporal LOGIN CREATEDB PASSWORD '<temporal_password>';
CREATE DATABASE thehive_flow OWNER thehive_flow;
CREATE DATABASE temporal OWNER temporal;
CREATE DATABASE temporal_visibility OWNER temporal;
- The
thehive_flowrole owns thethehive_flowdatabase. Ownership is all the pre-install migrations Job needs to create and alter the tables. - The
temporalrole owns thetemporalandtemporal_visibilitydatabases and carries theCREATEDBattribute, which the Temporal schema setup requires. - The two passwords go into the
thehive-flow-postgresql-thehive-flow-userandthehive-flow-postgresql-temporal-userSecrets created at Step 5. Thethehive_flowpassword is expanded into apostgres://URL, so it must be URL-safe. - The server address, port, and TLS mode are set at Step 6, where TheHive Flow and the Temporal subchart must point at the same server. To use other role or database names, set
postgresql.usernameandpostgresql.databasefor TheHive Flow, and theuseranddatabaseNamekeys of both Temporal datastores.
External object storage#
S3-compatible object storage is the only blob store supported on Kubernetes, set through the blobstore.s3.* values:
- A managed S3-compatible object storage service, such as Amazon S3 or the service of your cloud provider, for performance and resilience.
- A self-hosted S3-compatible object storage system. For example, SeaweedFS has been tested and works well with TheHive Flow: it's the one the scenario deploys, as a single pod. Whichever store you self-host, make sure its endpoint is highly available, for example through the storage platform itself or a correctly configured load balancer.
Create the bucket first: TheHive Flow checks it at startup and doesn't start if it's missing. Then point the chart at the store in the values file written at Step 6:
blobstore:
  s3:
    bucket: <bucket_name>
    region: <region>
    endpoint: <endpoint_url>
    usePathStyle: true
    accessKeyId: <access_key_id>
- The chart default for
blobstore.s3.endpointdoesn't match the scenario: always set it. Keep the full domain name of an in-cluster endpoint, such ashttp://<service>.<namespace>.svc.cluster.local:8333: the code transformation jobs run in their own namespace and use the value as is. - For Amazon S3, leave
blobstore.s3.endpointempty and setblobstore.s3.usePathStyletofalse. - The secret access key goes into the
thehive-flow-s3Secret created at Step 5, whoseAWS_ACCESS_KEY_IDkey must hold the same value asblobstore.s3.accessKeyId.
To use the AWS SDK default credential chain instead of a static key, set blobstore.s3.accessKeyId to an empty value. Its default, thehive-flow, matches the scenario object store. A deployment on AWS can then bind an IAM role to the service accounts instead of storing a static secret. Bind the application service account through serviceAccount.annotations, and the codex-jobs one, which code transformation jobs run as, through codex.kubernetes.serviceAccountAnnotations. Whichever identity you use, grant it the permissions the S3 back end needs, including the delete right.
Step 4: Deploy or upgrade TheHive#
The following steps require TheHive 6.x running and reachable from the cluster. TheHive 6.x installs with the standard methods: Linux packages, Docker Compose, or the Kubernetes Helm chart.
Package installations: TheHive 6.x requires Java 17, Cassandra 4.0.x to 4.1.x requires Java 11
On a package installation, TheHive 6.x runs on Java 17, while Cassandra 4.0.x to 4.1.x, the database it relies on, still requires Java 11 and doesn't support Java 17. When both share a host, install the two Java versions side by side and pin each service to its own: see Run TheHive 6 and Cassandra on the Same Host. Docker and Kubernetes deployments aren't affected: the images ship their own runtime.
- For TheHive in the cluster, see Deploy TheHive on Kubernetes, which also describes how to upgrade an existing release.
- For TheHive outside the cluster, see TheHive Installation Methods for a new deployment, or Upgrade from TheHive 5.x for an existing instance installed with packages or Docker Compose.
Step 5: Provision the secrets#
The chart creates no Secrets in the release namespace: it reads every secret from existing Kubernetes Secrets there, named as follows by default. The names and keys are configurable through the secrets.* values. The only Secret the chart writes is a copy of the object storage credentials in the code transformation jobs namespace, where the jobs read them.
| Secret | Key | Holds | Created by |
|---|---|---|---|
thehive-flow-jwt |
jwt-symmetric-key |
JWT signing key shared with TheHive. Generate a strong random value of at least 32 bytes, such as openssl rand -base64 32: TheHive Flow refuses to start with a shorter key. Keep it stable across upgrades: changing it invalidates every token already issued |
You |
thehive-flow-thehive |
api-key |
TheHive API key used to run Cortex analyzers and responders through TheHive | You |
thehive-flow-postgresql-thehive-flow-user |
password |
Password of the thehive_flow database role |
The cnpg scenario, or you |
thehive-flow-postgresql-temporal-user |
password |
Password of the temporal database role |
The cnpg scenario, or you |
thehive-flow-s3 |
AWS_ACCESS_KEY_ID and AWS_SECRET_ACCESS_KEY |
Object storage credentials, also copied to the code transformation jobs. AWS_ACCESS_KEY_ID must match the blobstore.s3.accessKeyId value |
The seaweedfs scenario, or you |
For the API key, sign in to TheHive with a user account that has the predefined Org-Admin profile. Then generate a dedicated key for an account whose profile includes the Manage analysis and Manage actions permissions, both in the Licensed category. TheHive Flow uses the key to run Cortex analyzers and responders through TheHive, from the Analyzer and Responder action nodes. Each call runs in the organization of the workflow, so the account must belong to every organization whose workflows use these nodes. The key is required even when no workflow uses these nodes: TheHive Flow doesn't start without it.
A service account is recommended: it can't sign in to the UI and isn't tied to a person. See Create a User Account and Manage a User Account API Key.
Create the two Secrets the scenarios don't provide:
kubectl create secret generic thehive-flow-jwt -n thehive-flow \
  --from-literal=jwt-symmetric-key="$(openssl rand -base64 32)"

kubectl create secret generic thehive-flow-thehive -n thehive-flow \
  --from-literal=api-key='<thehive_api_key>'
Scenario Secrets are placeholders
The manifests applied at Step 3 ship placeholder credentials for test clusters only. In production, manage these Secrets with your own tooling, such as sealed-secrets, External Secrets Operator, or Vault.
Secrets for external PostgreSQL and object storage#
With an external PostgreSQL and an external object storage, the scenarios create nothing. Create the three remaining Secrets too, with the passwords of the two database roles and the credentials of the object storage identity. The commands below create them directly, for a cluster where that's acceptable. With a secret management tool, give the Secrets it produces the same names and keys, or point the chart at other names through the secrets.* values.
kubectl create secret generic thehive-flow-postgresql-thehive-flow-user -n thehive-flow \
  --from-literal=password='<thehive_flow_password>'

kubectl create secret generic thehive-flow-postgresql-temporal-user -n thehive-flow \
  --from-literal=password='<temporal_password>'

kubectl create secret generic thehive-flow-s3 -n thehive-flow \
  --from-literal=AWS_ACCESS_KEY_ID='<access_key_id>' \
  --from-literal=AWS_SECRET_ACCESS_KEY='<secret_access_key>'
With the AWS SDK default credential chain, described in External object storage, the thehive-flow-s3 Secret isn't needed.
Step 6: Install the chart#
Installing the chart deploys two TheHive Flow images: the application image, docker.io/strangebee/thehive-flow, and the code transformation assistant image, docker.io/strangebee/thehive-flow-assistant. The assistant image runs as helper containers inside each code transformation job, moving the script inputs and outputs between the object storage and the job working directory. The chart defaults point at both released images, and the tag falls back to the chart appVersion, which is the released version. The cluster pulls them at install time, with no registry setup needed.
-
Write a values file pointing the chart at TheHive and setting the public URL of TheHive Flow. With the scenarios, set the two values in
scenarios/combined/values.yaml, which carries placeholders for both:config: api: public: url: <thehive_flow_public_url> modules: workers: activities: thehive: url: <thehive_url>The
config.modules.workers.activities.thehive.urlvalue is the address TheHive Flow calls TheHive at, as reachable from the cluster. The default,http://thehive:9000, assumes a Service namedthehivein the release namespace: set it whenever TheHive runs elsewhere, for examplehttp://thehive.<thehive_namespace>.svc.cluster.local:9000for a TheHive release in another namespace. An in-cluster Service or a private network address is a non-public address. The TheHive integration node and the HTTP request node can't reach it until its range is listed in the egress allowlist, in the same values file.The
config.api.public.urlvalue is the public URL at which webhook callers reach the root of TheHive Flow, such ashttps://<flow_host>behind the Ingress described below. TheHive Flow builds the URL of each Webhook trigger from it. The value has no default, and the chart refuses to render without it, or when it isn't an absolutehttporhttpsURL free of credentials, a query, and a fragment.On a cluster that can't reach the public registries, mirror the two TheHive Flow images, and the other images listed in Images pulled at first start, to a registry of your own. Use a tool that preserves the architectures, such as
skopeo copy --allorcrane. Then point the chart at the registry, with a pull secret when the registry requires one:image: repository: <registry>/<flow_image_repository> tag: 6.0.0 imagePullSecrets: - name: <registry_pull_secret> codex: kubernetes: assistantImage: repository: <registry>/<assistant_image_repository> tag: 6.0.0 imagePullSecrets: - <registry_pull_secret>- An empty or omitted
tagfalls back to the chartappVersion, which is the released version. - The
codex.kubernetes.imagePullSecretsentries are plain Secret names, without thename:key the top-levelimagePullSecretslist uses. - Point the other images at the registry through their own values:
temporal.server.image,temporal.admintools.image,temporalReadiness.image,waitContainers.image,tests.image, andcodex.languageImages.
- An empty or omitted
-
With an external PostgreSQL, align the Temporal subchart with it. TheHive Flow and Temporal share one PostgreSQL server, and the chart refuses to render when their addresses diverge. If you change
postgresql.hostorpostgresql.port, set both Temporal datastore addresses to the same<host>:<port>in the values file. Thecnpgscenario values already do so for the scenario cluster.postgresql: host: <postgres_host> port: <postgres_port> temporal: server: config: persistence: datastores: default: sql: connectAddr: "<postgres_host>:<postgres_port>" visibility: sql: connectAddr: "<postgres_host>:<postgres_port>"The chart connects to PostgreSQL with
sslmode=requireby default: the connection is encrypted, but the server certificate isn't checked. Thepostgresql.sslModevalue sets that mode, and accepts the standard PostgreSQL values:disable,allow,prefer,require,verify-ca, andverify-full. For a PostgreSQL server without TLS, set it todisable. For the strongest guarantee, set it toverify-full. The chart provides no value for the server certificate authority (CA), so the certificate must be verifiable from the trust store of TheHive Flow image, which holds the public CAs only. The Temporal subchart carries its own TLS settings undertemporal.server.config.persistence.datastores.<datastore>.sql.tls.postgresql: sslMode: disable -
Render the chart before installing. This catches the PostgreSQL mismatch above and any placeholder you missed, without touching the cluster. With the scenarios:
helm template thehive-flow strangebee/thehive-flow \
  --namespace thehive-flow \
  -f scenarios/cnpg/values.yaml \
  -f scenarios/seaweedfs/values.yaml \
  -f scenarios/combined/values.yaml > /dev/null && echo OK
With your own PostgreSQL and object storage, replace the three scenario files with
--values <values_file>. -
Install the chart, with the same values files:
helm install thehive-flow strangebee/thehive-flow \
  --namespace thehive-flow \
  -f scenarios/cnpg/values.yaml \
  -f scenarios/seaweedfs/values.yaml \
  -f scenarios/combined/values.yaml \
  --wait --timeout 10m
The installation runs a pre-install Job that applies the database migrations, then deploys the application and the Temporal Server subchart, so the first installation takes longer than later upgrades. The pre-install Job pulls TheHive Flow image, so the cluster must be able to pull the images before the installation starts. On a private mirror, the pull secret must already exist. TheHive Flow and the Temporal services may restart once while Temporal initializes its schema and namespace.
The code transformation Jobs pull the assistant image in their own namespace, thehive-flow-jobs by default. With a private mirror, image pull Secrets are namespace-scoped. Declare the Secret name through the codex.kubernetes.imagePullSecrets value at install time, then create the same Secret in the Job namespace once the chart has created that namespace.
To use an external Temporal cluster instead of the subchart, set temporal.enabled: false and fill the externalTemporal.* values. The external frontend must be reachable in-cluster or over a private network without TLS or API keys: Temporal Cloud isn't supported.
For the Temporal subchart, the temporal.server.config.persistence.numHistoryShards value is immutable once its databases exist: change it before the first installation or not at all.
Step 7: Verify the deployment#
Check that the pods are running and that the release passes its smoke test:
kubectl -n thehive-flow get pods
helm test thehive-flow -n thehive-flow --logs
The test runs a throwaway pod that calls the unauthenticated version endpoint of TheHive Flow, and passes on a 2xx response.
Expected output
The pod listing of a release installed with the scenarios, trimmed to the relevant columns. The hash suffixes vary:
NAME                                              READY   STATUS      RESTARTS
thehive-flow-7d9f6c5b8-x2k4q                      1/1     Running     0
thehive-flow-postgresql-1                         1/1     Running     0
thehive-flow-temporal-admintools-6b7c9d4f5-m8n2p  1/1     Running     0
thehive-flow-temporal-frontend-5f8d7b6c9-q4r7s    1/1     Running     0
thehive-flow-temporal-history-7c6b5d8f4-t9w3x     1/1     Running     0
thehive-flow-temporal-matching-8d7c6b5f9-v2y5z    1/1     Running     0
thehive-flow-temporal-namespace-1-7-0-1-k6j8h     0/1     Completed   0
thehive-flow-temporal-worker-9e8d7c6b5-b3c6d      1/1     Running     0
- The
thehive-flowpod and the five Temporal pods showRunningwith every container ready. thehive-flow-postgresql-1is the scenario PostgreSQL instance. It's absent with an external PostgreSQL, and the scenario object storage runs in theseaweedfsnamespace.- The namespace creation Job of the Temporal subchart stays listed as
Completed. Its name carries the subchart version and the release revision. - The database migrations Job and the Temporal schema Jobs don't appear: Helm deletes them once they succeed. A
thehive-flow-migrationspod still listed means the migrations failed: read its logs withkubectl -n thehive-flow logs job/thehive-flow-migrations. - A
RESTARTScount of 1 on thethehive-flowpod or a Temporal pod right after the installation is expected: they may restart once while Temporal initializes its schema and namespace.
The helm test command ends with the test suite result and the logs of the probe pod, which hold the response of the version endpoint:
TEST SUITE:     thehive-flow-test-api
Last Started:   ...
Last Completed: ...
Phase:          Succeeded
POD LOGS: thehive-flow-test-api
{"version":"6.0.0","dependencies":{"postgresql":"...","docker":"n/a (kubernetes backend)","temporal":"..."}}
The test pod stays listed as Completed after the run, and is replaced at the next helm test.
To check the health endpoints directly, forward the observability port and query it:
kubectl -n thehive-flow port-forward deploy/thehive-flow 9090:9090
curl -fsS http://127.0.0.1:9090/readyz
A healthy /readyz returns {"status":"ok","checks":{"db":"ok","modules":"ok","temporal":"ok"}}.
(Optional) Step 8: Expose TheHive Flow outside the cluster#
TheHive Flow needs an entry point outside the cluster when TheHive runs outside it, or when external systems call Webhook triggers, even with TheHive inside the cluster. The chart ships no Ingress and no TLS termination: expose the thehive-flow-api Service through an Ingress or a load balancer of your own.
Whatever the entry point, follow the exposure rule of TheHive Flow. TheHive is the only client of the /api/ paths, and it enforces the security of these routes. A call that reaches them without going through TheHive bypasses it, so only TheHive may reach them. The /webhook/ paths may be exposed to any caller.
TheHive Flow serves plain HTTP on port 8081. It authenticates the /api/ requests at the application level with the JWT, and the /webhook/ requests with the method of each webhook, so terminate TLS at the Ingress.
The following manifests use the ingress-nginx controller. Replace <tls_secret> with the name of a TLS Secret in the thehive-flow namespace that holds the certificate and private key for <flow_host>. Create it with kubectl -n thehive-flow create secret tls <tls_secret> --cert=<certificate_file> --key=<key_file>, or have a certificate controller of your own issue it.
The first Ingress exposes the /webhook/ paths to any caller:
apiVersion: networking.k8s.io/v1
kind: Ingress
metadata:
  name: thehive-flow-webhook
  namespace: thehive-flow
  annotations:
    nginx.ingress.kubernetes.io/proxy-body-size: 2g
    nginx.ingress.kubernetes.io/proxy-read-timeout: "600"
    nginx.ingress.kubernetes.io/proxy-send-timeout: "600"
spec:
  ingressClassName: nginx
  tls:
    - hosts:
        - <flow_host>
      secretName: <tls_secret>
  rules:
    - host: <flow_host>
      http:
        paths:
          - path: /webhook/
            pathType: Prefix
            backend:
              service:
                name: thehive-flow-api
                port:
                  number: 8081
When TheHive runs outside the cluster, the second Ingress exposes the /api/ paths on the same host to TheHive only. Replace <thehive_address_ranges> with the addresses TheHive calls from, as comma-separated ranges in Classless Inter-Domain Routing (CIDR) notation, such as 192.168.1.10/32,192.168.1.11/32. A CIDR range is an IP address followed by a prefix length. With a TheHive cluster, list every node:
apiVersion: networking.k8s.io/v1
kind: Ingress
metadata:
  name: thehive-flow-api
  namespace: thehive-flow
  annotations:
    nginx.ingress.kubernetes.io/whitelist-source-range: "<thehive_address_ranges>"
    nginx.ingress.kubernetes.io/proxy-body-size: 2g
    nginx.ingress.kubernetes.io/proxy-read-timeout: "600"
    nginx.ingress.kubernetes.io/proxy-send-timeout: "600"
spec:
  ingressClassName: nginx
  tls:
    - hosts:
        - <flow_host>
      secretName: <tls_secret>
  rules:
    - host: <flow_host>
      http:
        paths:
          - path: /api/
            pathType: Prefix
            backend:
              service:
                name: thehive-flow-api
                port:
                  number: 8081
The restriction relies on the ingress controller seeing the real address of TheHive. A load balancer in front of the controller that replaces source addresses defeats it. So does an outbound proxy or a Network Address Translation (NAT) device on TheHive side, which opens the /api/ paths to every other client of that device.
The annotations mirror the limits the nginx reverse proxy applies on the Docker Compose deployment: a 2 GB request body cap, needed for file ingestion through Webhook triggers, and 600-second proxy timeouts. On another ingress controller, set the equivalent options, and restrict the /api/ paths to TheHive addresses with its own access control.
With these manifests, the public URL of TheHive Flow is https://<flow_host>: it's the value of config.api.public.url set at Step 6.
Inside the cluster, the chart provisions no NetworkPolicy, so any pod can reach the thehive-flow-api Service on every path. To apply the exposure rule there too, add a NetworkPolicy to the thehive-flow namespace that admits traffic to TheHive Flow on port 8081 only from TheHive pods and the ingress controller.
Apply the webhook rate limit to each caller#
Each webhook accepts 120 requests per minute from a given client address. Behind the Ingress, every webhook call reaches TheHive Flow from the address of the ingress controller, so all callers of a webhook share the same limit. To apply the limit to each caller instead, list the ranges the ingress controller connects from in the values file:
config:
  api:
    public:
      trusted_proxies:
        - <ingress_controller_cidr>
For a request coming from one of these ranges, TheHive Flow reads the caller address from the X-Forwarded-For header, which the ingress controller must fill with the address of its own client. IPv6 callers outside fc00::/7 are counted per /64 network. Each entry is a CIDR range, such as 10.244.0.0/16. A bare IP address, a /0 range, or an IPv4-mapped range prevents TheHive Flow from starting. The list is empty by default.
Trusted ranges and rate limit bypass
A caller inside a trusted range can set its own address in the X-Forwarded-For header and bypass the rate limit. Behind an in-cluster ingress controller, whose pods have no fixed address, the list usually holds the pod CIDR of the cluster: every pod in that range is then trusted.
Step 9: Configure TheHive to reach TheHive Flow#
TheHive must know the URL of TheHive Flow and the JWT signing key.
-
Read the key from the
thehive-flow-jwtSecret:kubectl -n thehive-flow get secret thehive-flow-jwt \ -o jsonpath='{.data.jwt-symmetric-key}' | base64 -d -
Declare the connection and activate the feature in TheHive. The
<flow_url>value depends on where TheHive runs:- TheHive in the same cluster: use the
thehive-flow-apiService directly,http://thehive-flow-api.thehive-flow.svc.cluster.local:8081. - TheHive outside the cluster: use the address of the Ingress or load balancer set up at (Optional) Step 8, such as
https://<flow_host>/. TheHive validates the certificate of the URL it calls: a certificate signed by a public certificate authority works as is. For a certificate signed by an internal certificate authority, or self-signed, configure TheHive to trust it, with the same options as on a Docker Compose deployment. See TLS with a self-signed certificate.
The settings play two roles. The URL and the signing key declare the connection. The
scalligraph.modulesline loads the connector that talks to TheHive Flow, and thefeatures.Orchestrator.enabledflag displays the Flow view and opens its routes.Set the
thehive.flow.*values of TheHive release, and add the feature flag and the connector module to theapplication.confcontent the chart renders throughthehive.configFile. The values declare the connection but don't load the module.thehive: flow: enabled: true url: "<flow_url>" signingKey: "<jwt_signing_key>" configFile: | features.Orchestrator.enabled = true scalligraph.modules += "org.thp.thehive.connector.flow.FlowModule"To read the key from an existing Secret instead of writing it in the values, set
thehive.flow.k8sSecretNameandthehive.flow.k8sSecretKeyin place ofthehive.flow.signingKey. Then apply the change withhelm upgradeon TheHive release.Add the following to the
/etc/thehive/application.conffile, next to the connector lines it already holds, then restart TheHive:flow.url = "<flow_url>" flow.jwt_signing_key = "<jwt_signing_key>" features.Orchestrator.enabled = true scalligraph.modules += "org.thp.thehive.connector.flow.FlowModule"sudo systemctl restart thehive - TheHive in the same cluster: use the
Step 10: Check the connection in TheHive#
Sign in to TheHive with an account that has the predefined Org-Admin profile, which includes TheHive Flow permissions automatically.
The health indicator at the bottom of the sidebar menu reports the connection from any view. It covers every configured connector: TheHive Flow, Cortex, Malware Information Sharing Platform & Threat Sharing (MISP), and Email Intake. Its color reflects all of them at once:
- Green: every configured connector is healthy.
- Red: at least one configured connector is in error.
- Faded: no connector is configured.
Select the indicator to see the details. Its Flow section shows TheHive Flow URL and its own status, OK or ERROR. TheHive probes TheHive Flow every minute by default, so allow that long for the status to reflect a fix. Changing flow.url or flow.jwt_signing_key triggers an immediate check.
Then go to the Flow view from the sidebar menu.
- If the view displays the workflow list, empty on a fresh deployment but with the Import workflow button visible, TheHive and TheHive Flow are connected.
- If the view is missing from the sidebar, review the configuration from Step 9 and restart TheHive.
- If the view displays an error notification over an empty workflow list, TheHive can't reach TheHive Flow: check that the
flow.urladdress is reachable from TheHive host, then read the application logs withkubectl -n thehive-flow logs deploy/thehive-flow.
Step 11: Grant users access to TheHive Flow#
Users who don't have one of the predefined Org-Admin and Analyst profiles need TheHive Flow permissions through a custom profile: see Perform TheHive Flow Initial Setup as an Admin.
Configuration and operations on Kubernetes#
Application configuration#
The config.* Helm values set the application configuration, rendered into a ConfigMap mounted at /thehive-flow.yml. The chart exposes only a subset of the keys described in TheHive Flow Application Configuration, with the same meanings. It also exposes the SMTP settings of the email server override through config.modules.workers.activities.mailer.*, with the password in the Secret named by secrets.mailerPassword.existingSecret.
The chart sets the run retention to 168h instead of the application default of 30 days. With an external Temporal, the chart doesn't align the Temporal namespace retention, to avoid deleting histories another team owns. Set it yourself, or set config.modules.runs.syncTemporalRetention to true when the namespace belongs to TheHive Flow only.
The chart leaves the Temporal task poller counts unset, so the Temporal SDK decides them. To set them, use the config.modules.workers.workflows.max_concurrent_workflow_task_pollers and config.modules.workers.activities.max_concurrent_activity_task_pollers values, and raise them only after measuring under load. The chart refuses to render a value that isn't a whole number or is negative, and refuses 1 for the workflow task pollers.
Code transformations#
Python and JavaScript code transformations run as short-lived Kubernetes Jobs in a dedicated namespace, thehive-flow-jobs by default, so no Docker socket is needed. The chart provisions the namespace and its role-based access control. The cluster must be able to pull the transformation images: on an air-gapped cluster, mirror them to an internal registry and set codex.languageImages.
Code transformation isolation#
The script a code transformation runs is arbitrary code written by a workflow author, so every user holding the manageOrchestrator/writeWorkflows permission can run code on the cluster. The Job pod runs it with all Linux capabilities dropped, no privilege escalation, the RuntimeDefault seccomp profile, and no service account token. Root isn't forbidden, because the default images run as root. The chart provisions no NetworkPolicy and no resource limits: the script has unrestricted egress, including to the cluster's internal services, and isn't covered by the egress allowlist. The only bounds are a 2 GiB cap on the working directory and a 24-hour cap on a job's run time. Add a NetworkPolicy on the jobs namespace to restrict egress, and set codex.kubernetes.resources, codex.kubernetes.ephemeralStorage, and codex.kubernetes.activeDeadlineSeconds as listed in System Requirements. To limit how many jobs run at once, set codex.maxConcurrentActivityExecutionSize, which applies per language. A secret variable the script references is handed to it in clear, and anything the script prints lands in the execution logs without redaction.
Routine operations#
The following table lists how to run each routine operation on Kubernetes.
| Operation | On Kubernetes |
|---|---|
| Configuration change | Edit the config.* keys, described in TheHive Flow Application Configuration, in the values file written at installation time, then run helm upgrade with the same command and chart version as for an upgrade. No manual restart is needed: the Deployment carries a checksum of the ConfigMap, so a changed value rolls out new pods |
| Upgrade | See Upgrade TheHive Flow on Kubernetes |
| Backup and restore | The state lives in PostgreSQL and the object storage. Back up the scenario PostgreSQL with the CloudNativePG backup tooling, or your own database tooling for an external instance. Back up the object storage with the tooling of your storage service, or snapshot its volume: the scenario SeaweedFS keeps its files in a persistent volume claim in the seaweedfs namespace. Capture both together: the database references blobs by content hash, and restoring one without the other leaves dangling references |
| Logs | Every container logs to its standard output: read them with kubectl logs and ship them with the cluster log stack |
| Monitoring | Scrape the /metrics endpoint on port 9090 with your own Prometheus, and alert on /readyz returning non-200 |
| Troubleshooting | Check the pod state with kubectl get pods, the application logs with kubectl logs, and the health endpoints through a port forward as in Step 7 |
| Uninstall | Run helm uninstall thehive-flow -n thehive-flow. The command removes TheHive Flow, the Temporal subchart, and the thehive-flow-jobs namespace, and leaves PostgreSQL, the object storage, and the Secrets in place. To remove the scenario services too, run helm uninstall seaweedfs -n seaweedfs, delete the cluster and databases with kubectl delete -n thehive-flow -f scenarios/cnpg/databases.yaml -f scenarios/cnpg/postgres-cluster.yaml, then helm uninstall cnpg -n cnpg-system. The persistent volume claims of PostgreSQL and SeaweedFS are kept: delete them to remove the data |