Configure an Integration Node#
6.0 One
Integration nodes perform operations in TheHive or third-party products in TheHive Flow. Each integration node targets one product API and exposes its operations as dedicated actions selected within the node. Integrations tagged Beta were built from the provider's API documentation, not tested against a live environment: check them before using them in production. If you have access to a live environment, help validate the integration and share your feedback with the StrangeBee Support team.
Products hosted on a private network
Integration nodes can't reach non-public addresses: the step fails with an egress guard error. To target a product hosted on your internal network, an administrator must first add its address range to the egress allowlist.
Configure a TheHive integration node#
A TheHive integration node performs operations in TheHive through TheHive API. It can create, retrieve, update, and delete cases, alerts, tasks, and observables. It can also add, update, and delete comments, create and update task logs, merge an alert into a case, or run a custom query. Each operation is a dedicated action selected within the node. The node can target the local TheHive instance or any other reachable TheHive instance.
-
Go to the Flow view from the sidebar menu.
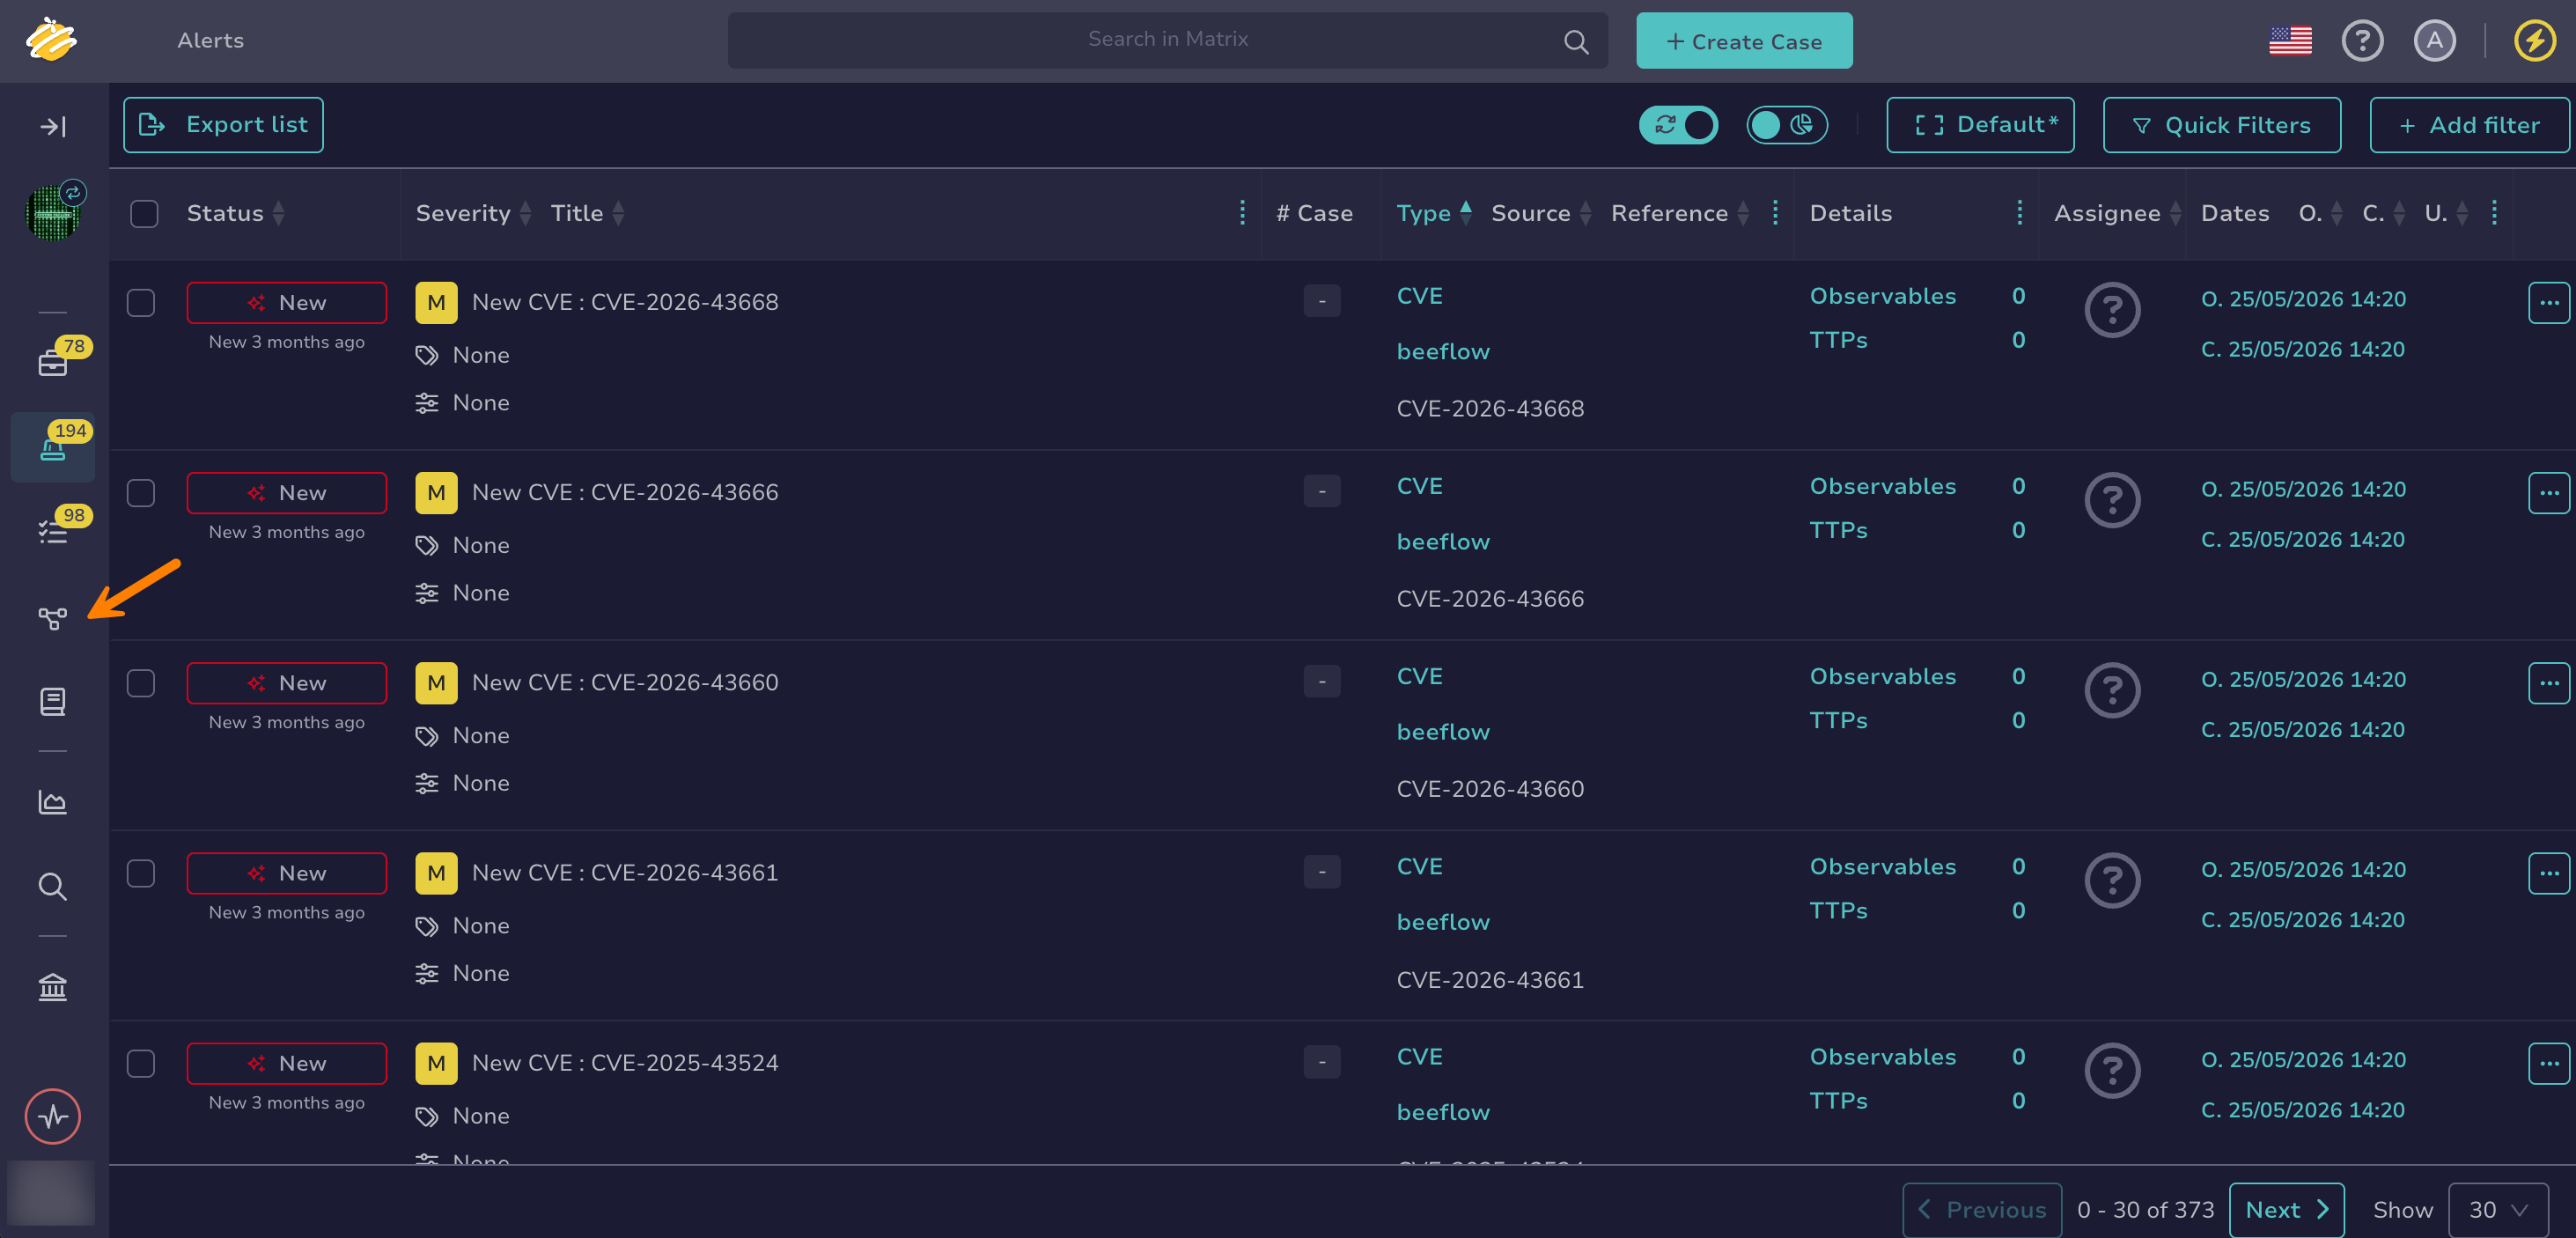
-
Select a workflow from the list.
-
Drag the previous node connector to an empty area of the canvas.
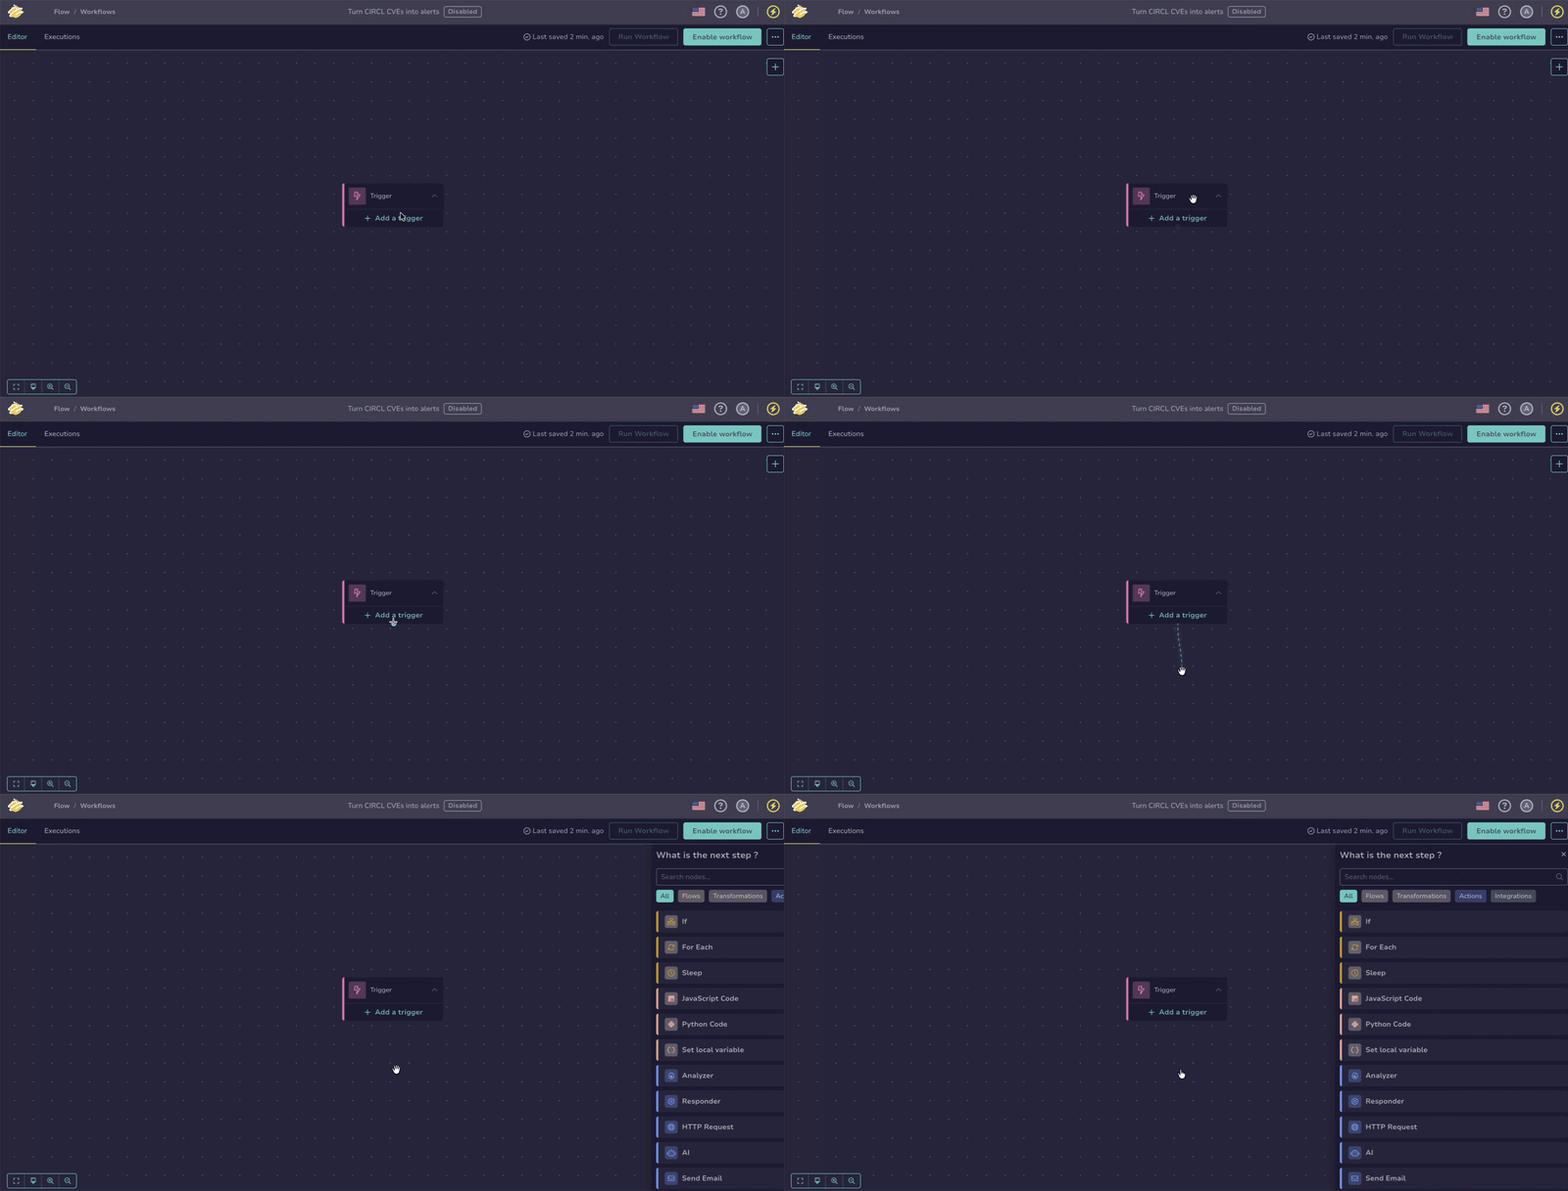
-
In the What is the next step? drawer, select Integrations.
-
Select TheHive.
-
In the TheHive drawer, enter the following information:
Variables
Insert a variable with the $var button, or enter
$and select a variable from the suggestions. To access a field, select the variable to edit its jq expression, or use the + button to insert the variable and the field together.Inside the expression, jq functions transform the value before it's inserted in the field. The whole expression stays inside the blue reference, for example:
$<node_name>.body.results[0].id: Reads the first identifier of an API response.$<node_name>.body.items | map(.name) | join(", "): Turns a list of objects into a comma-separated text.$<node_name>.body.createdAt / 1000 | todate: Formats a TheHive date, a Unix timestamp in milliseconds, as an ISO 8601 date.$<node_name>.output.title | ascii_upcase: Converts a text to uppercase.
See Jq Functions for the full list of available functions.
Fields marked with * are mandatory.
- Base URL *
The URL of TheHive instance to call, for example
https://<thehive_host>.- Authentication *
In the Authentication section, provide the API key used as a bearer token to authenticate the request.
- Organization
The organization the action runs in, sent as the
X-Organisationheader with every action. If left empty, the action runs in the default organization of the user.- Headers
Extra headers added to every request sent by the node. Select to add a header key and its value.
Header values are stored in plaintext
Header values appear in plaintext in the workflow execution history. Reference a secret global variable instead of pasting a credential directly.
- Action *
The operation to perform in TheHive. Available actions:
Family Actions Cases Create Case, Get Case, Update Case, Close Case, Delete Case Alerts Create Alert, Get Alert, Update Alert, Delete Alert, Merge Alert with Case, Escalate Alert to Case Tasks Create Task in Case, Get Task, Update Task, Delete Task Observables Create Observable in Case, Create Observable in Alert, Get Observable, Update Observable, Delete Observable Comments Create Comment in Case, Create Comment in Alert, Update Comment, Delete Comment Attachments Add Attachment to Alert, Add Attachment to Case Task Logs Create Task Log, Update Task Log Page Templates Create Case Page Template Queries Post Query Cortex Run Analyzer on Observable, Run Responder After you select an action, the drawer displays the fields specific to that action. For the meaning and format of each field, see TheHive API documentation.
Escalate Alert to Case compared to Merge Alert with Case
Escalate Alert to Case promotes an alert into a new case. Merge Alert with Case merges an alert into an existing case instead.
The Cortex actions compared to the Analyzer and Responder nodes
The Run Analyzer on Observable and Run Responder actions start a Cortex job through TheHive API. Run Analyzer on Observable requires the analyzer, Cortex instance, and observable identifiers. Run Responder requires the responder identifier and the entity's type and identifier. Both return TheHive API response rather than the Cortex report.
To pick an analyzer or a responder from a list filtered by observable or entity type, and to get the report itself as an output, use the Analyzer or Responder action node instead.
The Add Attachment to Alert and Add Attachment to Case actions
The File field takes a file reference produced by an earlier node, such as a file downloaded by an HTTP request action node or uploaded to the Webhook trigger, not literal text content. The field holds one reference and nothing else. Text around the reference or a second reference shows an inline error, because the run would fail. In this field, picking an entry from the Files group of the variable suggestions inserts the file itself, not its metadata.
- Editor mode
For actions that send a request body, select how to provide it:
- Form: Fill in one field per body parameter.
- Raw: Provide the whole request body in the Request body (raw) field.
- Query parameters
Optional query parameters sent with the request, entered as key-value pairs. Select to add a parameter. This section appears only for actions that accept query parameters.
The Post Query action
The Post Query action runs a TheHive query: an array of chained operations that search, filter, sort, and paginate data across any entity type. A pipeline starts with a primary operation that defines the initial set of entities. It can then chain a related object operation to navigate to associated entities, filter and sort steps to narrow and order the results, and a page step to paginate. Provide the pipeline in the Query field as a JSON array.
For example, this query returns the first five in-progress tasks of case
~1234, sorted by due date from earliest to latest, with the assigned case template and the total count:[ {"_name": "getCase", "idOrName": "~1234"}, {"_name": "tasks"}, { "_name": "filter", "_eq": {"_field": "status", "_value": "InProgress"} }, { "_name": "sort", "_fields": [{"dueDate": "asc"}] }, { "_name": "page", "from": 0, "to": 5, "extraData": ["caseTemplate", "total"] } ]For the full list of operations, filters, and computed fields, see Query and Export in TheHive API documentation.
-
Optional: Configure the following settings.
- SSL/TLS
Configure SSL/TLS settings for secure communication with the external service.
Use this section when the service relies on a private certificate authority (CA), requires client certificate authentication through mutual TLS, or uses a non-standard trust chain.
Field Description Client certificate (mTLS) Whether the node authenticates with a client certificate (mutual TLS). Do not use a client certificate is the default. Select Provide a client certificate and key to fill in the two fields below. Client certificate (PEM) The client certificate to present during the SSL/TLS handshake, in PEM format. Required when Client certificate (mTLS) is Provide a client certificate and key. Client certificate key (PEM) The private key associated with the client certificate, in PEM format. Required when Client certificate (mTLS) is Provide a client certificate and key. Server verification How the node verifies the identity of the server. Uses the system's pre-installed certificate authorities is the default. Provide a custom CA certificate to verify the server uses the certificate in the next field. Do not verify the server's identity (not recommended for production) exposes the connection to security risks. CA certificate (PEM) The CA certificate used to verify the identity of the server, in PEM format. Required when Server verification is set to Provide a custom CA certificate to verify the server. - Proxy
Configure how the node connects to the external service when a proxy is required.
Select a Proxy mode:
-
Do not use a proxy: No proxy is applied. All requests are sent directly. This is the default.
-
Use the platform default proxy configuration: Uses the global proxy settings defined in TheHive
application.conf. See proxy configuration in TheHive. -
Configure a custom proxy: Defines a custom proxy for this node, overriding the global configuration.
When Proxy mode is Configure a custom proxy, provide the following information:
Field Example Protocol httpsAddress * proxy.example.comPort 8080Username $global.proxy_userPassword $secret.proxy_password- Error handling
Configure whether the node fails on error responses.
By default, the node fails when the response returns a
4xxor5xxerror status code. Turn on Ignore error status codes to make the node succeed regardless of the response status code. Then handle errors in the workflow, for example with an If flow node evaluating thecodeoutput. Error responses aren't retried when the option is on.Two cases still fail the node:
- A transport failure, such as a DNS, connection, TLS, or timeout error. The node sets no output.
- A response announced as JSON that can't be parsed. The node sets the
codeandheadersoutputs but nobody, and isn't retried.
When Ignore error status codes is off, the node retries a
408,429, or5xxresponse up to the number of times set in Retry attempts. Any other4xxresponse fails the node immediately, without retrying. When the called service includes aRetry-Afterheader in its response, the node waits that long before the next attempt, up to a maximum of 5 minutes. This wait replaces the delay set by Retry delay and Backoff. -
-
Optional: Select Add options to configure the following settings.
- Timeout & retry
Configure how the node handles execution time limits and failure recovery.
If the timeout is reached, the node fails.
Global timeout vs. local timeout
A timeout for the entire workflow is defined when creating the workflow. When both a node timeout and a workflow-level timeout are defined, the shortest timeout value applies.
Field Description Timeout Maximum allowed execution time for the node, in seconds, minutes, or hours. The minimum value is 30 seconds. Retry attempts Number of times the node is retried on failure. Retry delay Time to wait between retry attempts, in seconds, minutes, or hours. Without a delay, retries run 1 second apart by default. Backoff Coefficient applied to the retry delay to increase the wait time after each failed attempt. Retries and timeouts
If the node includes retry settings, the timeout applies to each attempt, not to the total duration of all attempts.
Each request the node sends stops after 30 seconds, even when the node timeout is longer or not set. A response body larger than 10 MiB, the default limit an administrator can change, fails the node without a retry.
- Execution configuration
Set the Execution mode to control how the node behaves when several branches converge on it.
Mode Behavior Execute once per branch The node runs once for each incoming branch. Applies when this section isn't configured. Wait for all branches The node waits for all incoming branches to complete, then runs once.
Execution outputs
When executed, the node returns the following outputs. Each output is a JSON value:
| Output | Type | Description |
|---|---|---|
body |
object | The response body returned by TheHive API. |
code |
number | The HTTP status code returned by TheHive. |
headers |
object | The response headers returned by TheHive. |
To access outputs, select your TheHive node and then select in the top-right corner of the screen. Hover over each output name to view its details.
You can then reuse these outputs as output variables in subsequent nodes. Select the $var button, or enter $ and select the output from the suggestions. Inserted references appear in the following form:
$<node_name>.body.<field_name>: to get a value from the response body, for example the identifier of a created case$<node_name>.code: to get the HTTP status code, for example to check whether the request succeeded$<node_name>.headers.<header_name>: to get a specific response header
Configure a Splunk integration node#
A Splunk integration node runs operations against the Splunk REST API. It can create and follow search jobs, run searches, list indexes, list fired alerts, submit events, and update Splunk Enterprise Security findings and investigations. Each operation is a dedicated action selected within the node.
-
Go to the Flow view from the sidebar menu.
-
Select a workflow from the list.
-
Drag the previous node connector to an empty area of the canvas.
-
In the What is the next step? drawer, select Integrations.
-
Select Splunk.
-
In the Splunk drawer, enter the following information:
Variables
Insert a variable with the $var button, or enter
$and select a variable from the suggestions. To access a field, select the variable to edit its jq expression, or use the + button to insert the variable and the field together.Inside the expression, jq functions transform the value before it's inserted in the field. The whole expression stays inside the blue reference, for example:
$<node_name>.body.results[0].id: Reads the first identifier of an API response.$<node_name>.body.items | map(.name) | join(", "): Turns a list of objects into a comma-separated text.$<node_name>.body.createdAt / 1000 | todate: Formats a TheHive date, a Unix timestamp in milliseconds, as an ISO 8601 date.$<node_name>.output.title | ascii_upcase: Converts a text to uppercase.
See Jq Functions for the full list of available functions.
Fields marked with * are mandatory.
- Base URL *
The URL of the Splunk management API.
- Authentication *
In the Authentication section, select the Authentication method and provide its credentials. The Splunk node supports two methods:
Authentication method Fields basic_auth Username *, Password bearer_token Bearer token * Use bearer_token with a Splunk authentication token or session key.
- Headers
Extra headers added to every request sent by the node. Select to add a header key and its value.
Header values are stored in plaintext
Header values appear in plaintext in the workflow execution history. Reference a secret global variable instead of pasting a credential directly.
- Action *
The operation to perform in Splunk. Available actions:
Family Actions Search Jobs Create Search Job, Get Search Job Status, Get Search Results, Cancel Search Job Search Run Search (Export), Parse Search Indexes List Indexes Alerts List Fired Alerts Events Submit Event Enterprise Security Edit Finding, Update Investigation, Edit Notable Event (ES 7.x classic) After you select an action, the drawer displays the fields specific to that action. For the meaning and format of each field, see the Splunk REST API reference.
Enterprise Security actions
Edit Finding and Update Investigation target the Splunk Enterprise Security 8.x Mission Control public API. Edit Finding updates a finding, formerly called a notable event, so the change appears in the Analyst Queue.
Edit Notable Event (ES 7.x classic) updates notable events on Splunk Enterprise Security 7.x and earlier. Splunk can reject individual events inside a successful response, so the node succeeds even when an update is rejected. Check the
successfield of thebodyoutput.- Editor mode
For actions that send a request body, select how to provide it:
- Form: Fill in one field per body parameter.
- Raw: Provide the whole request body in the Request body (raw) field.
- Query parameters
Optional query parameters sent with the request, entered as key-value pairs. Select to add a parameter. This section appears only for actions that accept query parameters.
-
Optional: Configure the following settings.
- Proxy
Configure how the node connects to the external service when a proxy is required.
Select a Proxy mode:
-
Do not use a proxy: No proxy is applied. All requests are sent directly. This is the default.
-
Use the platform default proxy configuration: Uses the global proxy settings defined in TheHive
application.conf. See proxy configuration in TheHive. -
Configure a custom proxy: Defines a custom proxy for this node, overriding the global configuration.
When Proxy mode is Configure a custom proxy, provide the following information:
Field Example Protocol httpsAddress * proxy.example.comPort 8080Username $global.proxy_userPassword $secret.proxy_password- SSL/TLS
Configure SSL/TLS settings for secure communication with the external service.
Use this section when the service relies on a private certificate authority (CA), requires client certificate authentication through mutual TLS, or uses a non-standard trust chain.
Field Description Client certificate (mTLS) Whether the node authenticates with a client certificate (mutual TLS). Do not use a client certificate is the default. Select Provide a client certificate and key to fill in the two fields below. Client certificate (PEM) The client certificate to present during the SSL/TLS handshake, in PEM format. Required when Client certificate (mTLS) is Provide a client certificate and key. Client certificate key (PEM) The private key associated with the client certificate, in PEM format. Required when Client certificate (mTLS) is Provide a client certificate and key. Server verification How the node verifies the identity of the server. Uses the system's pre-installed certificate authorities is the default. Provide a custom CA certificate to verify the server uses the certificate in the next field. Do not verify the server's identity (not recommended for production) exposes the connection to security risks. CA certificate (PEM) The CA certificate used to verify the identity of the server, in PEM format. Required when Server verification is set to Provide a custom CA certificate to verify the server. - Error handling
Configure whether the node fails on error responses.
By default, the node fails when the response returns a
4xxor5xxerror status code. Turn on Ignore error status codes to make the node succeed regardless of the response status code. Then handle errors in the workflow, for example with an If flow node evaluating thecodeoutput. Error responses aren't retried when the option is on.Two cases still fail the node:
- A transport failure, such as a DNS, connection, TLS, or timeout error. The node sets no output.
- A response announced as JSON that can't be parsed. The node sets the
codeandheadersoutputs but nobody, and isn't retried.
When Ignore error status codes is off, the node retries a
408,429, or5xxresponse up to the number of times set in Retry attempts. Any other4xxresponse fails the node immediately, without retrying. When the called service includes aRetry-Afterheader in its response, the node waits that long before the next attempt, up to a maximum of 5 minutes. This wait replaces the delay set by Retry delay and Backoff. -
-
Optional: Select Add options to configure the following settings.
- Timeout & retry
Configure how the node handles execution time limits and failure recovery.
If the timeout is reached, the node fails.
Global timeout vs. local timeout
A timeout for the entire workflow is defined when creating the workflow. When both a node timeout and a workflow-level timeout are defined, the shortest timeout value applies.
Field Description Timeout Maximum allowed execution time for the node, in seconds, minutes, or hours. The minimum value is 30 seconds. Retry attempts Number of times the node is retried on failure. Retry delay Time to wait between retry attempts, in seconds, minutes, or hours. Without a delay, retries run 1 second apart by default. Backoff Coefficient applied to the retry delay to increase the wait time after each failed attempt. Retries and timeouts
If the node includes retry settings, the timeout applies to each attempt, not to the total duration of all attempts.
Each request the node sends stops after 30 seconds, even when the node timeout is longer or not set. A response body larger than 10 MiB, the default limit an administrator can change, fails the node without a retry.
- Execution configuration
Set the Execution mode to control how the node behaves when several branches converge on it.
Mode Behavior Execute once per branch The node runs once for each incoming branch. Applies when this section isn't configured. Wait for all branches The node waits for all incoming branches to complete, then runs once.
Execution outputs
When executed, the node returns the following outputs. Each output is a JSON value:
| Output | Type | Description |
|---|---|---|
body |
object | The response body returned by Splunk. For Create Search Job, Run Search (Export), and Parse Search, select json in the Output format field: an XML or CSV body is a single string that downstream nodes can't navigate. The other actions always return JSON. |
code |
number | The HTTP status code returned by Splunk. |
headers |
object | The response headers returned by Splunk. |
To access outputs, select your Splunk node and then select in the top-right corner of the screen. Hover over each output name to view its details.
You can then reuse these outputs as output variables in subsequent nodes. Select the $var button, or enter $ and select the output from the suggestions. Inserted references appear in the following form:
$<node_name>.body.<field_name>: to get a value from the response body, for example the search job identifier returned by Create Search Job$<node_name>.code: to get the HTTP status code, for example to check whether the request succeeded$<node_name>.headers.<header_name>: to get a specific response header
Configure a Microsoft Defender for Endpoint integration node#
A Microsoft Defender for Endpoint integration node runs operations against the Microsoft Defender for Endpoint API. It can list, retrieve, and update alerts, run response actions on devices and follow their status, create indicators, and retrieve file information. Each operation is a dedicated action selected within the node.
Choosing between the two Defender nodes
Use this node for device response actions and indicators, which the Graph security API doesn't cover. For alerts, prefer the Microsoft Defender (Graph Security API) node. It exposes the alerts_v2 surface, which supersedes the alerts endpoint of this node, and incidents, which this node doesn't cover.
-
Go to the Flow view from the sidebar menu.
-
Select a workflow from the list.
-
Drag the previous node connector to an empty area of the canvas.
-
In the What is the next step? drawer, select Integrations.
-
Select Microsoft Defender for Endpoint.
-
In the Microsoft Defender for Endpoint drawer, enter the following information:
Variables
Insert a variable with the $var button, or enter
$and select a variable from the suggestions. To access a field, select the variable to edit its jq expression, or use the + button to insert the variable and the field together.Inside the expression, jq functions transform the value before it's inserted in the field. The whole expression stays inside the blue reference, for example:
$<node_name>.body.results[0].id: Reads the first identifier of an API response.$<node_name>.body.items | map(.name) | join(", "): Turns a list of objects into a comma-separated text.$<node_name>.body.createdAt / 1000 | todate: Formats a TheHive date, a Unix timestamp in milliseconds, as an ISO 8601 date.$<node_name>.output.title | ascii_upcase: Converts a text to uppercase.
See Jq Functions for the full list of available functions.
Fields marked with * are mandatory.
- Base URL *
The URL of the Defender for Endpoint API:
https://api.security.microsoft.com. The legacy hosthttps://api.securitycenter.microsoft.comis also accepted.- Authentication *
In the Authentication section, provide the Microsoft Entra ID application credentials. The node authenticates with the OAuth 2.0 client credentials flow, so Authentication method is set to oauth2_client_credentials:
Field Example Client ID * $global.defender_client_idClient secret * $secret.defender_client_secretToken URL * https://login.microsoftonline.com/<tenant>/oauth2/v2.0/tokenToken scopes https://api.securitycenter.microsoft.com/.defaultThe token scope differs from the base URL
Request the token for the
https://api.securitycenter.microsoft.com/.defaultscope even when the Base URL ishttps://api.security.microsoft.com. Defender rejects tokens issued for another resource with a401or403response.- Headers
Extra headers added to every request sent by the node. Select to add a header key and its value.
Header values are stored in plaintext
Header values appear in plaintext in the workflow execution history. Reference a secret global variable instead of pasting a credential directly.
- Action *
The operation to perform in Defender for Endpoint. Available actions:
Family Actions Alerts List Alerts, Get Alert by ID, Update Alert Machine Actions Isolate Machine, Release Machine from Isolation, Run Antivirus Scan, Stop and Quarantine File, Get Machine Action Indicators Create Indicator Files Get File Information After you select an action, the drawer displays the fields specific to that action. For the meaning and format of each field, see the Microsoft Defender for Endpoint API documentation.
Machine actions require a comment
Every response action in the Machine Actions family requires a Comment, which Defender records with the response action. Run Antivirus Scan also requires a Scan type of
QuickorFull. Response actions run asynchronously in Defender. Use Get Machine Action with the identifier they return to follow their status.- Editor mode
For actions that send a request body, select how to provide it:
- Form: Fill in one field per body parameter.
- Raw: Provide the whole request body in the Request body (raw) field.
- Query parameters
Optional query parameters sent with the request, entered as key-value pairs. Select to add a parameter. This section appears only for actions that accept query parameters.
-
Optional: Configure the following settings.
- Proxy
Configure how the node connects to the external service when a proxy is required.
Select a Proxy mode:
-
Do not use a proxy: No proxy is applied. All requests are sent directly. This is the default.
-
Use the platform default proxy configuration: Uses the global proxy settings defined in TheHive
application.conf. See proxy configuration in TheHive. -
Configure a custom proxy: Defines a custom proxy for this node, overriding the global configuration.
When Proxy mode is Configure a custom proxy, provide the following information:
Field Example Protocol httpsAddress * proxy.example.comPort 8080Username $global.proxy_userPassword $secret.proxy_password- SSL/TLS
Configure SSL/TLS settings for secure communication with the external service.
Use this section when the service relies on a private certificate authority (CA), requires client certificate authentication through mutual TLS, or uses a non-standard trust chain.
Field Description Client certificate (mTLS) Whether the node authenticates with a client certificate (mutual TLS). Do not use a client certificate is the default. Select Provide a client certificate and key to fill in the two fields below. Client certificate (PEM) The client certificate to present during the SSL/TLS handshake, in PEM format. Required when Client certificate (mTLS) is Provide a client certificate and key. Client certificate key (PEM) The private key associated with the client certificate, in PEM format. Required when Client certificate (mTLS) is Provide a client certificate and key. Server verification How the node verifies the identity of the server. Uses the system's pre-installed certificate authorities is the default. Provide a custom CA certificate to verify the server uses the certificate in the next field. Do not verify the server's identity (not recommended for production) exposes the connection to security risks. CA certificate (PEM) The CA certificate used to verify the identity of the server, in PEM format. Required when Server verification is set to Provide a custom CA certificate to verify the server. - Error handling
Configure whether the node fails on error responses.
By default, the node fails when the response returns a
4xxor5xxerror status code. Turn on Ignore error status codes to make the node succeed regardless of the response status code. Then handle errors in the workflow, for example with an If flow node evaluating thecodeoutput. Error responses aren't retried when the option is on.Two cases still fail the node:
- A transport failure, such as a DNS, connection, TLS, or timeout error. The node sets no output.
- A response announced as JSON that can't be parsed. The node sets the
codeandheadersoutputs but nobody, and isn't retried.
When Ignore error status codes is off, the node retries a
408,429, or5xxresponse up to the number of times set in Retry attempts. Any other4xxresponse fails the node immediately, without retrying. When the called service includes aRetry-Afterheader in its response, the node waits that long before the next attempt, up to a maximum of 5 minutes. This wait replaces the delay set by Retry delay and Backoff. -
-
Optional: Select Add options to configure the following settings.
- Timeout & retry
Configure how the node handles execution time limits and failure recovery.
If the timeout is reached, the node fails.
Global timeout vs. local timeout
A timeout for the entire workflow is defined when creating the workflow. When both a node timeout and a workflow-level timeout are defined, the shortest timeout value applies.
Field Description Timeout Maximum allowed execution time for the node, in seconds, minutes, or hours. The minimum value is 30 seconds. Retry attempts Number of times the node is retried on failure. Retry delay Time to wait between retry attempts, in seconds, minutes, or hours. Without a delay, retries run 1 second apart by default. Backoff Coefficient applied to the retry delay to increase the wait time after each failed attempt. Retries and timeouts
If the node includes retry settings, the timeout applies to each attempt, not to the total duration of all attempts.
Each request the node sends stops after 30 seconds, even when the node timeout is longer or not set. A response body larger than 10 MiB, the default limit an administrator can change, fails the node without a retry.
- Execution configuration
Set the Execution mode to control how the node behaves when several branches converge on it.
Mode Behavior Execute once per branch The node runs once for each incoming branch. Applies when this section isn't configured. Wait for all branches The node waits for all incoming branches to complete, then runs once.
Execution outputs
When executed, the node returns the following outputs. Each output is a JSON value:
| Output | Type | Description |
|---|---|---|
body |
object | The response body returned by Defender for Endpoint. |
code |
number | The HTTP status code returned by Defender for Endpoint. |
headers |
object | The response headers returned by Defender for Endpoint. |
To access outputs, select your Microsoft Defender for Endpoint node and then select in the top-right corner of the screen. Hover over each output name to view its details.
You can then reuse these outputs as output variables in subsequent nodes. Select the $var button, or enter $ and select the output from the suggestions. Inserted references appear in the following form:
$<node_name>.body.<field_name>: to get a value from the response body, for example the identifier of a created indicator$<node_name>.code: to get the HTTP status code, for example to check whether the request succeeded$<node_name>.headers.<header_name>: to get a specific response header
Configure a Microsoft Defender (Graph Security API) integration node#
A Microsoft Defender (Graph Security API) integration node runs operations against the Microsoft Graph security API. It can list, retrieve, and update Microsoft Defender XDR alerts and incidents. Each operation is a dedicated action selected within the node.
Choosing between the two Defender nodes
Use this node for the Graph security API, which exposes incidents and the alerts_v2 surface that supersedes the legacy Defender for Endpoint alerts. Use the Microsoft Defender for Endpoint node for device response actions and indicators, which the Graph security API doesn't cover.
-
Go to the Flow view from the sidebar menu.
-
Select a workflow from the list.
-
Drag the previous node connector to an empty area of the canvas.
-
In the What is the next step? drawer, select Integrations.
-
Select Microsoft Defender (Graph Security API).
-
In the Microsoft Defender (Graph Security API) drawer, enter the following information:
Variables
Insert a variable with the $var button, or enter
$and select a variable from the suggestions. To access a field, select the variable to edit its jq expression, or use the + button to insert the variable and the field together.Inside the expression, jq functions transform the value before it's inserted in the field. The whole expression stays inside the blue reference, for example:
$<node_name>.body.results[0].id: Reads the first identifier of an API response.$<node_name>.body.items | map(.name) | join(", "): Turns a list of objects into a comma-separated text.$<node_name>.body.createdAt / 1000 | todate: Formats a TheHive date, a Unix timestamp in milliseconds, as an ISO 8601 date.$<node_name>.output.title | ascii_upcase: Converts a text to uppercase.
See Jq Functions for the full list of available functions.
Fields marked with * are mandatory.
- Base URL *
The URL of Microsoft Graph:
https://graph.microsoft.com. The node targets thev1.0version of Microsoft Graph.- Authentication *
In the Authentication section, provide the Microsoft Entra ID application credentials. The node authenticates with the OAuth 2.0 client credentials flow, so Authentication method is set to oauth2_client_credentials:
Field Example Client ID * $global.graph_client_idClient secret * $secret.graph_client_secretToken URL * https://login.microsoftonline.com/<tenant>/oauth2/v2.0/tokenToken scopes https://graph.microsoft.com/.defaultPrerequisite
Grant the application the Microsoft Graph permissions matching the actions you use:
SecurityAlert.Read.AllorSecurityAlert.ReadWrite.Allfor alerts, andSecurityIncident.Read.AllorSecurityIncident.ReadWrite.Allfor incidents. The read-only permission covers the list and get actions. The update actions need the read-write permission.- Headers
Extra headers added to every request sent by the node. Select to add a header key and its value.
Header values are stored in plaintext
Header values appear in plaintext in the workflow execution history. Reference a secret global variable instead of pasting a credential directly.
- Action *
The operation to perform through the Graph security API. Available actions:
Family Actions Alerts List Alerts, Get Alert by ID, Update Alert Incidents List Incidents, Get Incident by ID, Update Incident After you select an action, the drawer displays the fields specific to that action. For the meaning and format of each field, see the Microsoft Graph security API documentation.
Graph enumeration values are lowercase
The Graph security API uses lowercase values, such as
new,inProgress, andresolvedfor a status, andtruePositiveorfalsePositivefor a classification. The Defender for Endpoint API uses capitalized values for the same concepts. Match the casing of the node you're configuring.- Editor mode
For actions that send a request body, select how to provide it:
- Form: Fill in one field per body parameter.
- Raw: Provide the whole request body in the Request body (raw) field.
- Query parameters
Optional query parameters sent with the request, entered as key-value pairs. Select to add a parameter. This section appears only for actions that accept query parameters.
-
Optional: Configure the following settings.
- Proxy
Configure how the node connects to the external service when a proxy is required.
Select a Proxy mode:
-
Do not use a proxy: No proxy is applied. All requests are sent directly. This is the default.
-
Use the platform default proxy configuration: Uses the global proxy settings defined in TheHive
application.conf. See proxy configuration in TheHive. -
Configure a custom proxy: Defines a custom proxy for this node, overriding the global configuration.
When Proxy mode is Configure a custom proxy, provide the following information:
Field Example Protocol httpsAddress * proxy.example.comPort 8080Username $global.proxy_userPassword $secret.proxy_password- SSL/TLS
Configure SSL/TLS settings for secure communication with the external service.
Use this section when the service relies on a private certificate authority (CA), requires client certificate authentication through mutual TLS, or uses a non-standard trust chain.
Field Description Client certificate (mTLS) Whether the node authenticates with a client certificate (mutual TLS). Do not use a client certificate is the default. Select Provide a client certificate and key to fill in the two fields below. Client certificate (PEM) The client certificate to present during the SSL/TLS handshake, in PEM format. Required when Client certificate (mTLS) is Provide a client certificate and key. Client certificate key (PEM) The private key associated with the client certificate, in PEM format. Required when Client certificate (mTLS) is Provide a client certificate and key. Server verification How the node verifies the identity of the server. Uses the system's pre-installed certificate authorities is the default. Provide a custom CA certificate to verify the server uses the certificate in the next field. Do not verify the server's identity (not recommended for production) exposes the connection to security risks. CA certificate (PEM) The CA certificate used to verify the identity of the server, in PEM format. Required when Server verification is set to Provide a custom CA certificate to verify the server. - Error handling
Configure whether the node fails on error responses.
By default, the node fails when the response returns a
4xxor5xxerror status code. Turn on Ignore error status codes to make the node succeed regardless of the response status code. Then handle errors in the workflow, for example with an If flow node evaluating thecodeoutput. Error responses aren't retried when the option is on.Two cases still fail the node:
- A transport failure, such as a DNS, connection, TLS, or timeout error. The node sets no output.
- A response announced as JSON that can't be parsed. The node sets the
codeandheadersoutputs but nobody, and isn't retried.
When Ignore error status codes is off, the node retries a
408,429, or5xxresponse up to the number of times set in Retry attempts. Any other4xxresponse fails the node immediately, without retrying. When the called service includes aRetry-Afterheader in its response, the node waits that long before the next attempt, up to a maximum of 5 minutes. This wait replaces the delay set by Retry delay and Backoff. -
-
Optional: Select Add options to configure the following settings.
- Timeout & retry
Configure how the node handles execution time limits and failure recovery.
If the timeout is reached, the node fails.
Global timeout vs. local timeout
A timeout for the entire workflow is defined when creating the workflow. When both a node timeout and a workflow-level timeout are defined, the shortest timeout value applies.
Field Description Timeout Maximum allowed execution time for the node, in seconds, minutes, or hours. The minimum value is 30 seconds. Retry attempts Number of times the node is retried on failure. Retry delay Time to wait between retry attempts, in seconds, minutes, or hours. Without a delay, retries run 1 second apart by default. Backoff Coefficient applied to the retry delay to increase the wait time after each failed attempt. Retries and timeouts
If the node includes retry settings, the timeout applies to each attempt, not to the total duration of all attempts.
Each request the node sends stops after 30 seconds, even when the node timeout is longer or not set. A response body larger than 10 MiB, the default limit an administrator can change, fails the node without a retry.
- Execution configuration
Set the Execution mode to control how the node behaves when several branches converge on it.
Mode Behavior Execute once per branch The node runs once for each incoming branch. Applies when this section isn't configured. Wait for all branches The node waits for all incoming branches to complete, then runs once.
Execution outputs
When executed, the node returns the following outputs. Each output is a JSON value:
| Output | Type | Description |
|---|---|---|
body |
object | The response body returned by Microsoft Graph. |
code |
number | The HTTP status code returned by Microsoft Graph. |
headers |
object | The response headers returned by Microsoft Graph. |
To access outputs, select your Microsoft Defender (Graph Security API) node and then select in the top-right corner of the screen. Hover over each output name to view its details.
You can then reuse these outputs as output variables in subsequent nodes. Select the $var button, or enter $ and select the output from the suggestions. Inserted references appear in the following form:
$<node_name>.body.<field_name>: to get a value from the response body, for example the identifier of an incident$<node_name>.code: to get the HTTP status code, for example to check whether the request succeeded$<node_name>.headers.<header_name>: to get a specific response header
Configure a Microsoft Entra ID integration node#
A Microsoft Entra ID integration node runs operations against the Microsoft Graph API. It can look up users and their licenses, group memberships, MFA methods, and directory roles. It can also list sign-ins, directory audit logs, managed devices, and risk detections, and take account actions such as Disable User, Revoke Sign-In Sessions, or Force Password Reset. Each operation is a dedicated action selected within the node.
-
Go to the Flow view from the sidebar menu.
-
Select a workflow from the list.
-
Drag the previous node connector to an empty area of the canvas.
-
In the What is the next step? drawer, select Integrations.
-
Select Microsoft Entra ID.
-
In the Microsoft Entra ID drawer, enter the following information:
Variables
Insert a variable with the $var button, or enter
$and select a variable from the suggestions. To access a field, select the variable to edit its jq expression, or use the + button to insert the variable and the field together.Inside the expression, jq functions transform the value before it's inserted in the field. The whole expression stays inside the blue reference, for example:
$<node_name>.body.results[0].id: Reads the first identifier of an API response.$<node_name>.body.items | map(.name) | join(", "): Turns a list of objects into a comma-separated text.$<node_name>.body.createdAt / 1000 | todate: Formats a TheHive date, a Unix timestamp in milliseconds, as an ISO 8601 date.$<node_name>.output.title | ascii_upcase: Converts a text to uppercase.
See Jq Functions for the full list of available functions.
Fields marked with * are mandatory.
- Base URL *
The URL of Microsoft Graph:
https://graph.microsoft.com. The node targets thev1.0version of Microsoft Graph.- Authentication *
In the Authentication section, provide the Microsoft Entra ID application credentials. The node authenticates with the OAuth 2.0 client credentials flow, so Authentication method is set to oauth2_client_credentials:
Field Example Client ID * $global.entra_client_idClient secret * $secret.entra_client_secretToken URL * https://login.microsoftonline.com/<tenant>/oauth2/v2.0/tokenToken scopes https://graph.microsoft.com/.defaultPrerequisite
Grant the application the Microsoft Graph application permissions matching the actions you use. The required permission varies per action. For example, reading user profiles, sign-in logs, or managed devices each needs its own permission. See the Microsoft Graph permissions reference.
The account actions also need the application assigned an Entra administrator role, such as User Administrator. A Graph permission alone isn't sufficient for Enable User, Disable User, Force Password Reset, and Force Password Reset (with MFA).
- Headers
Extra headers added to every request sent by the node. Select to add a header key and its value.
Header values are stored in plaintext
Header values appear in plaintext in the workflow execution history. Reference a secret global variable instead of pasting a credential directly.
- Action *
The operation to perform in Microsoft Entra ID. Available actions:
Family Actions Users Resolve User GUID, Get User, Get User License Details, Get User Group Memberships, Get User MFA Methods, Get User Directory Roles Sign-Ins List Sign-Ins Audit Logs List Directory Audit Logs Devices List Managed Devices Identity Protection List Risk Detections Account Actions Enable User, Disable User, Revoke Sign-In Sessions, Force Password Reset, Force Password Reset (with MFA) After you select an action, the drawer displays the fields specific to that action. For the meaning and format of each field, see the Microsoft Graph API documentation.
Get User Directory Roles requires a Consistency Level field. Set it to
eventual. The same field is optional on Resolve User GUID and List Directory Audit Logs: set it toeventualwhen the request uses$count,$search,$orderby, or an advanced filter.Identifying users
Actions that take a user identifier accept either the object ID (GUID) or the user principal name (UPN), but not an email address. When a user's email address differs from their UPN, addressing them by email fails with a
404response. Use Resolve User GUID to resolve an email address or alias to the object ID. Run it before List Risk Detections, whose$filterquery parameter matches on the object ID, for exampleuserId eq '<guid>'.- Editor mode
For actions that send a request body, select how to provide it:
- Form: Fill in one field per body parameter.
- Raw: Provide the whole request body in the Request body (raw) field.
- Query parameters
Optional query parameters sent with the request, entered as key-value pairs. Select to add a parameter. This section appears only for actions that accept query parameters.
-
Optional: Configure the following settings.
- Proxy
Configure how the node connects to the external service when a proxy is required.
Select a Proxy mode:
-
Do not use a proxy: No proxy is applied. All requests are sent directly. This is the default.
-
Use the platform default proxy configuration: Uses the global proxy settings defined in TheHive
application.conf. See proxy configuration in TheHive. -
Configure a custom proxy: Defines a custom proxy for this node, overriding the global configuration.
When Proxy mode is Configure a custom proxy, provide the following information:
Field Example Protocol httpsAddress * proxy.example.comPort 8080Username $global.proxy_userPassword $secret.proxy_password- SSL/TLS
Configure SSL/TLS settings for secure communication with the external service.
Use this section when the service relies on a private certificate authority (CA), requires client certificate authentication through mutual TLS, or uses a non-standard trust chain.
Field Description Client certificate (mTLS) Whether the node authenticates with a client certificate (mutual TLS). Do not use a client certificate is the default. Select Provide a client certificate and key to fill in the two fields below. Client certificate (PEM) The client certificate to present during the SSL/TLS handshake, in PEM format. Required when Client certificate (mTLS) is Provide a client certificate and key. Client certificate key (PEM) The private key associated with the client certificate, in PEM format. Required when Client certificate (mTLS) is Provide a client certificate and key. Server verification How the node verifies the identity of the server. Uses the system's pre-installed certificate authorities is the default. Provide a custom CA certificate to verify the server uses the certificate in the next field. Do not verify the server's identity (not recommended for production) exposes the connection to security risks. CA certificate (PEM) The CA certificate used to verify the identity of the server, in PEM format. Required when Server verification is set to Provide a custom CA certificate to verify the server. - Error handling
Configure whether the node fails on error responses.
By default, the node fails when the response returns a
4xxor5xxerror status code. Turn on Ignore error status codes to make the node succeed regardless of the response status code. Then handle errors in the workflow, for example with an If flow node evaluating thecodeoutput. Error responses aren't retried when the option is on.Two cases still fail the node:
- A transport failure, such as a DNS, connection, TLS, or timeout error. The node sets no output.
- A response announced as JSON that can't be parsed. The node sets the
codeandheadersoutputs but nobody, and isn't retried.
When Ignore error status codes is off, the node retries a
408,429, or5xxresponse up to the number of times set in Retry attempts. Any other4xxresponse fails the node immediately, without retrying. When the called service includes aRetry-Afterheader in its response, the node waits that long before the next attempt, up to a maximum of 5 minutes. This wait replaces the delay set by Retry delay and Backoff. -
-
Optional: Select Add options to configure the following settings.
- Timeout & retry
Configure how the node handles execution time limits and failure recovery.
If the timeout is reached, the node fails.
Global timeout vs. local timeout
A timeout for the entire workflow is defined when creating the workflow. When both a node timeout and a workflow-level timeout are defined, the shortest timeout value applies.
Field Description Timeout Maximum allowed execution time for the node, in seconds, minutes, or hours. The minimum value is 30 seconds. Retry attempts Number of times the node is retried on failure. Retry delay Time to wait between retry attempts, in seconds, minutes, or hours. Without a delay, retries run 1 second apart by default. Backoff Coefficient applied to the retry delay to increase the wait time after each failed attempt. Retries and timeouts
If the node includes retry settings, the timeout applies to each attempt, not to the total duration of all attempts.
Each request the node sends stops after 30 seconds, even when the node timeout is longer or not set. A response body larger than 10 MiB, the default limit an administrator can change, fails the node without a retry.
- Execution configuration
Set the Execution mode to control how the node behaves when several branches converge on it.
Mode Behavior Execute once per branch The node runs once for each incoming branch. Applies when this section isn't configured. Wait for all branches The node waits for all incoming branches to complete, then runs once.
Execution outputs
When executed, the node returns the following outputs. Each output is a JSON value:
| Output | Type | Description |
|---|---|---|
body |
object | The response body returned by Microsoft Graph. |
code |
number | The HTTP status code returned by Microsoft Graph. |
headers |
object | The response headers returned by Microsoft Graph. |
To access outputs, select your Microsoft Entra ID node and then select in the top-right corner of the screen. Hover over each output name to view its details.
You can then reuse these outputs as output variables in subsequent nodes. Select the $var button, or enter $ and select the output from the suggestions. Inserted references appear in the following form:
$<node_name>.body.<field_name>: to get a value from the response body, for example a user's object ID$<node_name>.code: to get the HTTP status code, for example to check whether the request succeeded$<node_name>.headers.<header_name>: to get a specific response header
Configure a Microsoft Sentinel integration node#
A Microsoft Sentinel integration node runs operations against the Microsoft Sentinel REST API. It can retrieve, list, and update incidents, and list and add incident comments. It can also list incident relations, entities, and alerts, and list or write watchlists. Each operation is a dedicated action selected within the node.
-
Go to the Flow view from the sidebar menu.
-
Select a workflow from the list.
-
Drag the previous node connector to an empty area of the canvas.
-
In the What is the next step? drawer, select Integrations.
-
Select Microsoft Sentinel.
-
In the Microsoft Sentinel drawer, enter the following information:
Variables
Insert a variable with the $var button, or enter
$and select a variable from the suggestions. To access a field, select the variable to edit its jq expression, or use the + button to insert the variable and the field together.Inside the expression, jq functions transform the value before it's inserted in the field. The whole expression stays inside the blue reference, for example:
$<node_name>.body.results[0].id: Reads the first identifier of an API response.$<node_name>.body.items | map(.name) | join(", "): Turns a list of objects into a comma-separated text.$<node_name>.body.createdAt / 1000 | todate: Formats a TheHive date, a Unix timestamp in milliseconds, as an ISO 8601 date.$<node_name>.output.title | ascii_upcase: Converts a text to uppercase.
See Jq Functions for the full list of available functions.
Fields marked with * are mandatory.
- Base URL *
The URL of the Azure Resource Manager API, which serves the Microsoft Sentinel endpoints:
https://management.azure.com.- Authentication *
In the Authentication section, provide the Microsoft Entra ID application credentials. The node authenticates with the OAuth 2.0 client credentials flow, so Authentication method is set to oauth2_client_credentials:
Field Example Client ID * $global.sentinel_client_idClient secret * $secret.sentinel_client_secretToken URL * https://login.microsoftonline.com/<tenant>/oauth2/v2.0/tokenToken scopes https://management.azure.com/.defaultThe token scope is the Azure Resource Manager resource
Request the token for the
https://management.azure.com/.defaultscope. Microsoft Sentinel rejects a token issued for another Microsoft resource with a401response.Prerequisite
The application registration needs an Azure RBAC role on the Sentinel workspace: Microsoft Sentinel Reader for the get and list actions, Microsoft Sentinel Responder to update incidents or write watchlists.
- Headers
Extra headers added to every request sent by the node. Select to add a header key and its value.
Header values are stored in plaintext
Header values appear in plaintext in the workflow execution history. Reference a secret global variable instead of pasting a credential directly.
- Action *
The operation to perform in Microsoft Sentinel. Available actions:
Family Actions Incidents Get Incident by ID, List Incidents, Update Incident, List Incident Comments, Create or Update Incident Comment, List Incident Relations, List Incident Entities, List Incident Alerts Watchlists List Watchlists, Create or Update Watchlist After you select an action, the drawer displays the fields specific to that action. Every action targets a Sentinel workspace, identified by its subscription ID, resource group, and workspace name. For the meaning and format of each field, see the Microsoft Sentinel REST API documentation.
- Editor mode
For actions that send a request body, select how to provide it:
- Form: Fill in one field per body parameter.
- Raw: Provide the whole request body in the Request body (raw) field.
- Query parameters
Query parameters sent with the request, entered as key-value pairs. Every action requires the
api-versionquery parameter. Select , then add a parameter namedapi-versionwith the value2025-09-01. The node fails when this parameter is missing. Add other query parameters the same way. -
Optional: Configure the following settings.
- Proxy
Configure how the node connects to the external service when a proxy is required.
Select a Proxy mode:
-
Do not use a proxy: No proxy is applied. All requests are sent directly. This is the default.
-
Use the platform default proxy configuration: Uses the global proxy settings defined in TheHive
application.conf. See proxy configuration in TheHive. -
Configure a custom proxy: Defines a custom proxy for this node, overriding the global configuration.
When Proxy mode is Configure a custom proxy, provide the following information:
Field Example Protocol httpsAddress * proxy.example.comPort 8080Username $global.proxy_userPassword $secret.proxy_password- SSL/TLS
Configure SSL/TLS settings for secure communication with the external service.
Use this section when the service relies on a private certificate authority (CA), requires client certificate authentication through mutual TLS, or uses a non-standard trust chain.
Field Description Client certificate (mTLS) Whether the node authenticates with a client certificate (mutual TLS). Do not use a client certificate is the default. Select Provide a client certificate and key to fill in the two fields below. Client certificate (PEM) The client certificate to present during the SSL/TLS handshake, in PEM format. Required when Client certificate (mTLS) is Provide a client certificate and key. Client certificate key (PEM) The private key associated with the client certificate, in PEM format. Required when Client certificate (mTLS) is Provide a client certificate and key. Server verification How the node verifies the identity of the server. Uses the system's pre-installed certificate authorities is the default. Provide a custom CA certificate to verify the server uses the certificate in the next field. Do not verify the server's identity (not recommended for production) exposes the connection to security risks. CA certificate (PEM) The CA certificate used to verify the identity of the server, in PEM format. Required when Server verification is set to Provide a custom CA certificate to verify the server. - Error handling
Configure whether the node fails on error responses.
By default, the node fails when the response returns a
4xxor5xxerror status code. Turn on Ignore error status codes to make the node succeed regardless of the response status code. Then handle errors in the workflow, for example with an If flow node evaluating thecodeoutput. Error responses aren't retried when the option is on.Two cases still fail the node:
- A transport failure, such as a DNS, connection, TLS, or timeout error. The node sets no output.
- A response announced as JSON that can't be parsed. The node sets the
codeandheadersoutputs but nobody, and isn't retried.
When Ignore error status codes is off, the node retries a
408,429, or5xxresponse up to the number of times set in Retry attempts. Any other4xxresponse fails the node immediately, without retrying. When the called service includes aRetry-Afterheader in its response, the node waits that long before the next attempt, up to a maximum of 5 minutes. This wait replaces the delay set by Retry delay and Backoff. -
-
Optional: Select Add options to configure the following settings.
- Timeout & retry
Configure how the node handles execution time limits and failure recovery.
If the timeout is reached, the node fails.
Global timeout vs. local timeout
A timeout for the entire workflow is defined when creating the workflow. When both a node timeout and a workflow-level timeout are defined, the shortest timeout value applies.
Field Description Timeout Maximum allowed execution time for the node, in seconds, minutes, or hours. The minimum value is 30 seconds. Retry attempts Number of times the node is retried on failure. Retry delay Time to wait between retry attempts, in seconds, minutes, or hours. Without a delay, retries run 1 second apart by default. Backoff Coefficient applied to the retry delay to increase the wait time after each failed attempt. Retries and timeouts
If the node includes retry settings, the timeout applies to each attempt, not to the total duration of all attempts.
Each request the node sends stops after 30 seconds, even when the node timeout is longer or not set. A response body larger than 10 MiB, the default limit an administrator can change, fails the node without a retry.
- Execution configuration
Set the Execution mode to control how the node behaves when several branches converge on it.
Mode Behavior Execute once per branch The node runs once for each incoming branch. Applies when this section isn't configured. Wait for all branches The node waits for all incoming branches to complete, then runs once.
Execution outputs
When executed, the node returns the following outputs. Each output is a JSON value:
| Output | Type | Description |
|---|---|---|
body |
object | The response body returned by Microsoft Sentinel. |
code |
number | The HTTP status code returned by Microsoft Sentinel. |
headers |
object | The response headers returned by Microsoft Sentinel. |
To access outputs, select your Microsoft Sentinel node and then select in the top-right corner of the screen. Hover over each output name to view its details.
You can then reuse these outputs as output variables in subsequent nodes. Select the $var button, or enter $ and select the output from the suggestions. Inserted references appear in the following form:
$<node_name>.body.<field_name>: to get a value from the response body, for example the identifier of an incident$<node_name>.code: to get the HTTP status code, for example to check whether the request succeeded$<node_name>.headers.<header_name>: to get a specific response header
Configure a Recorded Future integration node#
A Recorded Future integration node runs operations against the Recorded Future API. It can enrich and triage indicators in bulk, look up domains, IP addresses, hashes, URLs, and entities, search links and analyst notes, and query threat maps and threat actors. Each operation is a dedicated action selected within the node.
-
Go to the Flow view from the sidebar menu.
-
Select a workflow from the list.
-
Drag the previous node connector to an empty area of the canvas.
-
In the What is the next step? drawer, select Integrations.
-
Select Recorded Future.
-
In the Recorded Future drawer, enter the following information:
Variables
Insert a variable with the $var button, or enter
$and select a variable from the suggestions. To access a field, select the variable to edit its jq expression, or use the + button to insert the variable and the field together.Inside the expression, jq functions transform the value before it's inserted in the field. The whole expression stays inside the blue reference, for example:
$<node_name>.body.results[0].id: Reads the first identifier of an API response.$<node_name>.body.items | map(.name) | join(", "): Turns a list of objects into a comma-separated text.$<node_name>.body.createdAt / 1000 | todate: Formats a TheHive date, a Unix timestamp in milliseconds, as an ISO 8601 date.$<node_name>.output.title | ascii_upcase: Converts a text to uppercase.
See Jq Functions for the full list of available functions.
Fields marked with * are mandatory.
- Base URL *
The URL of the Recorded Future API:
https://api.recordedfuture.com.- API Token *
Your Recorded Future API token, sent in the
X-RFTokenrequest header with every request. The token replaces the standard HTTP authentication schemes, so Authentication method is set to None. Reference a secret global variable instead of pasting the token directly.- Headers
Extra headers added to every request sent by the node. Select to add a header key and its value.
Header values are stored in plaintext
Header values appear in plaintext in the workflow execution history. Reference a secret global variable instead of pasting a credential directly.
- Action *
The operation to perform in Recorded Future. Available actions:
Family Actions Enrichment & Triage Enrich Indicators (Bulk), List Risk Contexts, Triage Indicators (Bulk Verdict) Entity Enrichment Lookup Domain, Lookup IP Address, Lookup Hash, Lookup URL Entity Resolution Match Entity by Name, Lookup Entity by ID Links Search Links, List Link Sections, List Link Entity Types, List Link Event Types Analyst Notes Search Analyst Notes, Lookup Analyst Note Threat Intelligence List Available Threat Maps, Threat Actor Threat Map, Malware Threat Map, Search Threat Actors, List Threat Actor Categories After you select an action, the drawer displays the fields specific to that action. For the meaning and format of each field, see the Recorded Future API documentation.
Bulk actions
The bulk enrichment and triage actions accept up to 1,000 indicators per request.
- Editor mode
For actions that send a request body, select how to provide it:
- Form: Fill in one field per body parameter.
- Raw: Provide the whole request body in the Request body (raw) field.
- Query parameters
Optional query parameters sent with the request, entered as key-value pairs. Select to add a parameter. This section appears only for actions that accept query parameters.
-
Optional: Configure the following settings.
- Proxy
Configure how the node connects to the external service when a proxy is required.
Select a Proxy mode:
-
Do not use a proxy: No proxy is applied. All requests are sent directly. This is the default.
-
Use the platform default proxy configuration: Uses the global proxy settings defined in TheHive
application.conf. See proxy configuration in TheHive. -
Configure a custom proxy: Defines a custom proxy for this node, overriding the global configuration.
When Proxy mode is Configure a custom proxy, provide the following information:
Field Example Protocol httpsAddress * proxy.example.comPort 8080Username $global.proxy_userPassword $secret.proxy_password- SSL/TLS
Configure SSL/TLS settings for secure communication with the external service.
Use this section when the service relies on a private certificate authority (CA), requires client certificate authentication through mutual TLS, or uses a non-standard trust chain.
Field Description Client certificate (mTLS) Whether the node authenticates with a client certificate (mutual TLS). Do not use a client certificate is the default. Select Provide a client certificate and key to fill in the two fields below. Client certificate (PEM) The client certificate to present during the SSL/TLS handshake, in PEM format. Required when Client certificate (mTLS) is Provide a client certificate and key. Client certificate key (PEM) The private key associated with the client certificate, in PEM format. Required when Client certificate (mTLS) is Provide a client certificate and key. Server verification How the node verifies the identity of the server. Uses the system's pre-installed certificate authorities is the default. Provide a custom CA certificate to verify the server uses the certificate in the next field. Do not verify the server's identity (not recommended for production) exposes the connection to security risks. CA certificate (PEM) The CA certificate used to verify the identity of the server, in PEM format. Required when Server verification is set to Provide a custom CA certificate to verify the server. - Error handling
Configure whether the node fails on error responses.
By default, the node fails when the response returns a
4xxor5xxerror status code. Turn on Ignore error status codes to make the node succeed regardless of the response status code. Then handle errors in the workflow, for example with an If flow node evaluating thecodeoutput. Error responses aren't retried when the option is on.Two cases still fail the node:
- A transport failure, such as a DNS, connection, TLS, or timeout error. The node sets no output.
- A response announced as JSON that can't be parsed. The node sets the
codeandheadersoutputs but nobody, and isn't retried.
When Ignore error status codes is off, the node retries a
408,429, or5xxresponse up to the number of times set in Retry attempts. Any other4xxresponse fails the node immediately, without retrying. When the called service includes aRetry-Afterheader in its response, the node waits that long before the next attempt, up to a maximum of 5 minutes. This wait replaces the delay set by Retry delay and Backoff. -
-
Optional: Select Add options to configure the following settings.
- Timeout & retry
Configure how the node handles execution time limits and failure recovery.
If the timeout is reached, the node fails.
Global timeout vs. local timeout
A timeout for the entire workflow is defined when creating the workflow. When both a node timeout and a workflow-level timeout are defined, the shortest timeout value applies.
Field Description Timeout Maximum allowed execution time for the node, in seconds, minutes, or hours. The minimum value is 30 seconds. Retry attempts Number of times the node is retried on failure. Retry delay Time to wait between retry attempts, in seconds, minutes, or hours. Without a delay, retries run 1 second apart by default. Backoff Coefficient applied to the retry delay to increase the wait time after each failed attempt. Retries and timeouts
If the node includes retry settings, the timeout applies to each attempt, not to the total duration of all attempts.
Each request the node sends stops after 30 seconds, even when the node timeout is longer or not set. A response body larger than 10 MiB, the default limit an administrator can change, fails the node without a retry.
- Execution configuration
Set the Execution mode to control how the node behaves when several branches converge on it.
Mode Behavior Execute once per branch The node runs once for each incoming branch. Applies when this section isn't configured. Wait for all branches The node waits for all incoming branches to complete, then runs once.
Execution outputs
When executed, the node returns the following outputs. Each output is a JSON value:
| Output | Type | Description |
|---|---|---|
body |
object | The response body returned by Recorded Future. |
code |
number | The HTTP status code returned by Recorded Future. |
headers |
object | The response headers returned by Recorded Future. |
To access outputs, select your Recorded Future node and then select in the top-right corner of the screen. Hover over each output name to view its details.
You can then reuse these outputs as output variables in subsequent nodes. Select the $var button, or enter $ and select the output from the suggestions. Inserted references appear in the following form:
$<node_name>.body.<field_name>: to get a value from the response body, for example an indicator's risk score$<node_name>.code: to get the HTTP status code, for example to check whether the request succeeded$<node_name>.headers.<header_name>: to get a specific response header
Configure a VirusTotal integration node#
A VirusTotal integration node runs operations against the VirusTotal API v3. It can search across VirusTotal, get and scan URLs, get domain, IP address, and file reports, upload and rescan files, and retrieve analysis results. Each operation is a dedicated action selected within the node.
-
Go to the Flow view from the sidebar menu.
-
Select a workflow from the list.
-
Drag the previous node connector to an empty area of the canvas.
-
In the What is the next step? drawer, select Integrations.
-
Select VirusTotal.
-
In the VirusTotal drawer, enter the following information:
Variables
Insert a variable with the $var button, or enter
$and select a variable from the suggestions. To access a field, select the variable to edit its jq expression, or use the + button to insert the variable and the field together.Inside the expression, jq functions transform the value before it's inserted in the field. The whole expression stays inside the blue reference, for example:
$<node_name>.body.results[0].id: Reads the first identifier of an API response.$<node_name>.body.items | map(.name) | join(", "): Turns a list of objects into a comma-separated text.$<node_name>.body.createdAt / 1000 | todate: Formats a TheHive date, a Unix timestamp in milliseconds, as an ISO 8601 date.$<node_name>.output.title | ascii_upcase: Converts a text to uppercase.
See Jq Functions for the full list of available functions.
Fields marked with * are mandatory.
- Base URL *
The URL of the VirusTotal API:
https://www.virustotal.com/api/v3.- API Key *
Your VirusTotal API key, sent in the
x-apikeyrequest header with every request. The key replaces the standard HTTP authentication schemes, so Authentication method is set to None. Reference a secret global variable instead of pasting the key directly.- Headers
Extra headers added to every request sent by the node. Select to add a header key and its value.
Header values are stored in plaintext
Header values appear in plaintext in the workflow execution history. Reference a secret global variable instead of pasting a credential directly.
- Action *
The operation to perform in VirusTotal. Available actions:
Family Actions Search Search URLs Get URL Report, Scan URL, Rescan URL Domains Get Domain Report IP Addresses Get IP Report Files Get File Report, Upload & Scan File, Rescan File Analyses Get Analysis After you select an action, the drawer displays the fields specific to that action. For the meaning and format of each field, see the VirusTotal API documentation.
Scans are asynchronous
The scan and rescan actions return an analysis identifier. Use Get Analysis with that identifier to retrieve the verdict after the analysis completes.
The Upload & Scan File action
The File field takes a file reference produced by an earlier node, such as a file downloaded by an HTTP request action node or uploaded to the Webhook trigger, not literal text content. The field holds one reference and nothing else. Text around the reference or a second reference shows an inline error, because the run would fail. In this field, picking an entry from the Files group of the variable suggestions inserts the file itself, not its metadata.
- Editor mode
For actions that send a request body, select how to provide it:
- Form: Fill in one field per body parameter.
- Raw: Provide the whole request body in the Request body (raw) field.
- Query parameters
Optional query parameters sent with the request, entered as key-value pairs. Select to add a parameter. This section appears only for actions that accept query parameters.
-
Optional: Configure the following settings.
- Proxy
Configure how the node connects to the external service when a proxy is required.
Select a Proxy mode:
-
Do not use a proxy: No proxy is applied. All requests are sent directly. This is the default.
-
Use the platform default proxy configuration: Uses the global proxy settings defined in TheHive
application.conf. See proxy configuration in TheHive. -
Configure a custom proxy: Defines a custom proxy for this node, overriding the global configuration.
When Proxy mode is Configure a custom proxy, provide the following information:
Field Example Protocol httpsAddress * proxy.example.comPort 8080Username $global.proxy_userPassword $secret.proxy_password- SSL/TLS
Configure SSL/TLS settings for secure communication with the external service.
Use this section when the service relies on a private certificate authority (CA), requires client certificate authentication through mutual TLS, or uses a non-standard trust chain.
Field Description Client certificate (mTLS) Whether the node authenticates with a client certificate (mutual TLS). Do not use a client certificate is the default. Select Provide a client certificate and key to fill in the two fields below. Client certificate (PEM) The client certificate to present during the SSL/TLS handshake, in PEM format. Required when Client certificate (mTLS) is Provide a client certificate and key. Client certificate key (PEM) The private key associated with the client certificate, in PEM format. Required when Client certificate (mTLS) is Provide a client certificate and key. Server verification How the node verifies the identity of the server. Uses the system's pre-installed certificate authorities is the default. Provide a custom CA certificate to verify the server uses the certificate in the next field. Do not verify the server's identity (not recommended for production) exposes the connection to security risks. CA certificate (PEM) The CA certificate used to verify the identity of the server, in PEM format. Required when Server verification is set to Provide a custom CA certificate to verify the server. - Error handling
Configure whether the node fails on error responses.
By default, the node fails when the response returns a
4xxor5xxerror status code. Turn on Ignore error status codes to make the node succeed regardless of the response status code. Then handle errors in the workflow, for example with an If flow node evaluating thecodeoutput. Error responses aren't retried when the option is on.Two cases still fail the node:
- A transport failure, such as a DNS, connection, TLS, or timeout error. The node sets no output.
- A response announced as JSON that can't be parsed. The node sets the
codeandheadersoutputs but nobody, and isn't retried.
When Ignore error status codes is off, the node retries a
408,429, or5xxresponse up to the number of times set in Retry attempts. Any other4xxresponse fails the node immediately, without retrying. When the called service includes aRetry-Afterheader in its response, the node waits that long before the next attempt, up to a maximum of 5 minutes. This wait replaces the delay set by Retry delay and Backoff. -
-
Optional: Select Add options to configure the following settings.
- Timeout & retry
Configure how the node handles execution time limits and failure recovery.
If the timeout is reached, the node fails.
Global timeout vs. local timeout
A timeout for the entire workflow is defined when creating the workflow. When both a node timeout and a workflow-level timeout are defined, the shortest timeout value applies.
Field Description Timeout Maximum allowed execution time for the node, in seconds, minutes, or hours. The minimum value is 30 seconds. Retry attempts Number of times the node is retried on failure. Retry delay Time to wait between retry attempts, in seconds, minutes, or hours. Without a delay, retries run 1 second apart by default. Backoff Coefficient applied to the retry delay to increase the wait time after each failed attempt. Retries and timeouts
If the node includes retry settings, the timeout applies to each attempt, not to the total duration of all attempts.
Each request the node sends stops after 30 seconds, even when the node timeout is longer or not set. A response body larger than 10 MiB, the default limit an administrator can change, fails the node without a retry.
- Execution configuration
Set the Execution mode to control how the node behaves when several branches converge on it.
Mode Behavior Execute once per branch The node runs once for each incoming branch. Applies when this section isn't configured. Wait for all branches The node waits for all incoming branches to complete, then runs once.
Execution outputs
When executed, the node returns the following outputs. Each output is a JSON value:
| Output | Type | Description |
|---|---|---|
body |
object | The response body returned by VirusTotal. |
code |
number | The HTTP status code returned by VirusTotal. |
headers |
object | The response headers returned by VirusTotal. |
To access outputs, select your VirusTotal node and then select in the top-right corner of the screen. Hover over each output name to view its details.
You can then reuse these outputs as output variables in subsequent nodes. Select the $var button, or enter $ and select the output from the suggestions. Inserted references appear in the following form:
$<node_name>.body.<field_name>: to get a value from the response body, for example the analysis identifier returned by Scan URL$<node_name>.code: to get the HTTP status code, for example to check whether the request succeeded$<node_name>.headers.<header_name>: to get a specific response header
Configure a CrowdStrike Falcon integration node#
A CrowdStrike Falcon integration node runs operations against the CrowdStrike Falcon APIs. It can query devices and vulnerabilities, run response actions on hosts such as network containment, and query and update alerts. It can also look up threat intelligence indicators, manage custom indicators of compromise (IOCs), and detonate file samples in the Falcon sandbox. Each operation is a dedicated action selected within the node.
-
Go to the Flow view from the sidebar menu.
-
Select a workflow from the list.
-
Drag the previous node connector to an empty area of the canvas.
-
In the What is the next step? drawer, select Integrations.
-
Select CrowdStrike Falcon.
-
In the CrowdStrike Falcon drawer, enter the following information:
Variables
Insert a variable with the $var button, or enter
$and select a variable from the suggestions. To access a field, select the variable to edit its jq expression, or use the + button to insert the variable and the field together.Inside the expression, jq functions transform the value before it's inserted in the field. The whole expression stays inside the blue reference, for example:
$<node_name>.body.results[0].id: Reads the first identifier of an API response.$<node_name>.body.items | map(.name) | join(", "): Turns a list of objects into a comma-separated text.$<node_name>.body.createdAt / 1000 | todate: Formats a TheHive date, a Unix timestamp in milliseconds, as an ISO 8601 date.$<node_name>.output.title | ascii_upcase: Converts a text to uppercase.
See Jq Functions for the full list of available functions.
Fields marked with * are mandatory.
- Base URL *
The URL of the Falcon API for your CrowdStrike cloud:
Cloud Base URL US-1 https://api.crowdstrike.comUS-2 https://api.us-2.crowdstrike.comUS-3 https://api.us-3.crowdstrike.comEU-1 https://api.eu-1.crowdstrike.comUS-GOV-1 https://api.laggar.gcw.crowdstrike.comUS-GOV-2 https://api.us-gov-2.crowdstrike.mil- Authentication *
In the Authentication section, provide the credentials of an API client created in the Falcon console, under API Clients and Keys. The node authenticates with the OAuth 2.0 client credentials flow, so Authentication method is set to oauth2_client_credentials:
Field Example Client ID * $global.crowdstrike_client_idClient secret * $secret.crowdstrike_client_secretToken URL * https://api.crowdstrike.com/oauth2/tokenToken scopes Leave empty: CrowdStrike grants permissions on the API client, not per token request The token URL is the
/oauth2/tokenendpoint on the same host as the Base URL.Each action requires an API scope
CrowdStrike grants permissions per API scope on the API client, not per token. Assign the scopes matching the actions you use:
- Hosts with Read access for the Devices family and Write access for the Host Actions family
- Vulnerabilities with Read access
- Alerts with Read access for lookups and Write access for Update Alert Status
- Indicators: Falcon Intelligence with Read access for the Threat Intel family
- IOC Management with Read access for Search IOCs and Write access for Create IOC and Delete IOC
- Sample Uploads and Sandbox: Falcon Intelligence for the Sandbox family
A missing scope makes the action fail with a
403response.- Headers
Extra headers added to every request sent by the node. Select to add a header key and its value.
Header values are stored in plaintext
Header values appear in plaintext in the workflow execution history. Reference a secret global variable instead of pasting a credential directly.
- Action *
The operation to perform in CrowdStrike Falcon. Available actions:
Family Actions Devices Query Devices by Filter, Get Device Details, Query Hidden Devices Host Actions Contain Host, Lift Containment, Hide Host, Unhide Host, Suppress Detections, Unsuppress Detections Vulnerabilities Query Vulnerabilities, Get Vulnerability Details Alerts Query Alerts, Get Alerts, Update Alert Status Threat Intel Query Threat Intel Indicators IOC Management Create IOC, Search IOCs, Delete IOC Sandbox Upload Sample, Submit Sandbox Analysis, Get Sandbox Submission Status, Get Sandbox Report After you select an action, the drawer displays the fields specific to that action. For the meaning and format of each field, see the CrowdStrike developer documentation.
Sandbox analyses are asynchronous
Detonating a sample chains four actions: Upload Sample, then Submit Sandbox Analysis, then Get Sandbox Submission Status until the state is no longer
running, then Get Sandbox Report. The last two actions take the submission ID returned by Submit Sandbox Analysis in theiridsquery parameter.The Upload Sample action
The File field takes a file reference produced by an earlier node, such as a file downloaded by an HTTP request action node or uploaded to the Webhook trigger, not literal text content. The field holds one reference and nothing else. Text around the reference or a second reference shows an inline error, because the run would fail. In this field, picking an entry from the Files group of the variable suggestions inserts the file itself, not its metadata.
- Editor mode
For actions that send a request body, select how to provide it:
- Form: Fill in one field per body parameter.
- Raw: Provide the whole request body in the Request body (raw) field.
- Query parameters
Query parameters sent with the request, entered as key-value pairs. Select to add a parameter. This section appears only for actions that accept query parameters.
The following actions require query parameters. Add each one with the name listed, or the node fails:
- Query Vulnerabilities:
filter - Get Vulnerability Details:
ids - Delete IOC:
ids - Get Sandbox Submission Status:
ids - Get Sandbox Report:
ids
-
Optional: Configure the following settings.
- Proxy
Configure how the node connects to the external service when a proxy is required.
Select a Proxy mode:
-
Do not use a proxy: No proxy is applied. All requests are sent directly. This is the default.
-
Use the platform default proxy configuration: Uses the global proxy settings defined in TheHive
application.conf. See proxy configuration in TheHive. -
Configure a custom proxy: Defines a custom proxy for this node, overriding the global configuration.
When Proxy mode is Configure a custom proxy, provide the following information:
Field Example Protocol httpsAddress * proxy.example.comPort 8080Username $global.proxy_userPassword $secret.proxy_password- SSL/TLS
Configure SSL/TLS settings for secure communication with the external service.
Use this section when the service relies on a private certificate authority (CA), requires client certificate authentication through mutual TLS, or uses a non-standard trust chain.
Field Description Client certificate (mTLS) Whether the node authenticates with a client certificate (mutual TLS). Do not use a client certificate is the default. Select Provide a client certificate and key to fill in the two fields below. Client certificate (PEM) The client certificate to present during the SSL/TLS handshake, in PEM format. Required when Client certificate (mTLS) is Provide a client certificate and key. Client certificate key (PEM) The private key associated with the client certificate, in PEM format. Required when Client certificate (mTLS) is Provide a client certificate and key. Server verification How the node verifies the identity of the server. Uses the system's pre-installed certificate authorities is the default. Provide a custom CA certificate to verify the server uses the certificate in the next field. Do not verify the server's identity (not recommended for production) exposes the connection to security risks. CA certificate (PEM) The CA certificate used to verify the identity of the server, in PEM format. Required when Server verification is set to Provide a custom CA certificate to verify the server. - Error handling
Configure whether the node fails on error responses.
By default, the node fails when the response returns a
4xxor5xxerror status code. Turn on Ignore error status codes to make the node succeed regardless of the response status code. Then handle errors in the workflow, for example with an If flow node evaluating thecodeoutput. Error responses aren't retried when the option is on.Two cases still fail the node:
- A transport failure, such as a DNS, connection, TLS, or timeout error. The node sets no output.
- A response announced as JSON that can't be parsed. The node sets the
codeandheadersoutputs but nobody, and isn't retried.
When Ignore error status codes is off, the node retries a
408,429, or5xxresponse up to the number of times set in Retry attempts. Any other4xxresponse fails the node immediately, without retrying. When the called service includes aRetry-Afterheader in its response, the node waits that long before the next attempt, up to a maximum of 5 minutes. This wait replaces the delay set by Retry delay and Backoff. -
-
Optional: Select Add options to configure the following settings.
- Timeout & retry
Configure how the node handles execution time limits and failure recovery.
If the timeout is reached, the node fails.
Global timeout vs. local timeout
A timeout for the entire workflow is defined when creating the workflow. When both a node timeout and a workflow-level timeout are defined, the shortest timeout value applies.
Field Description Timeout Maximum allowed execution time for the node, in seconds, minutes, or hours. The minimum value is 30 seconds. Retry attempts Number of times the node is retried on failure. Retry delay Time to wait between retry attempts, in seconds, minutes, or hours. Without a delay, retries run 1 second apart by default. Backoff Coefficient applied to the retry delay to increase the wait time after each failed attempt. Retries and timeouts
If the node includes retry settings, the timeout applies to each attempt, not to the total duration of all attempts.
Each request the node sends stops after 30 seconds, even when the node timeout is longer or not set. A response body larger than 10 MiB, the default limit an administrator can change, fails the node without a retry.
- Execution configuration
Set the Execution mode to control how the node behaves when several branches converge on it.
Mode Behavior Execute once per branch The node runs once for each incoming branch. Applies when this section isn't configured. Wait for all branches The node waits for all incoming branches to complete, then runs once.
Execution outputs
When executed, the node returns the following outputs. Each output is a JSON value:
| Output | Type | Description |
|---|---|---|
body |
object | The response body returned by CrowdStrike Falcon. |
code |
number | The HTTP status code returned by CrowdStrike Falcon. |
headers |
object | The response headers returned by CrowdStrike Falcon. |
To access outputs, select your CrowdStrike Falcon node and then select in the top-right corner of the screen. Hover over each output name to view its details.
You can then reuse these outputs as output variables in subsequent nodes. Select the $var button, or enter $ and select the output from the suggestions. Inserted references appear in the following form:
$<node_name>.body.<field_name>: to get a value from the response body, for example the device identifiers returned by Query Devices by Filter$<node_name>.code: to get the HTTP status code, for example to check whether the request succeeded$<node_name>.headers.<header_name>: to get a specific response header
Configure an Elastic Security integration node#
An Elastic Security integration node runs operations against the Elasticsearch API. It can search and index documents, retrieve a document by identifier, run ES|QL queries, and list detection alerts from Elastic Security. Each operation is a dedicated action selected within the node.
-
Go to the Flow view from the sidebar menu.
-
Select a workflow from the list.
-
Drag the previous node connector to an empty area of the canvas.
-
In the What is the next step? drawer, select Integrations.
-
Select Elastic Security.
-
In the Elastic Security drawer, enter the following information:
Variables
Insert a variable with the $var button, or enter
$and select a variable from the suggestions. To access a field, select the variable to edit its jq expression, or use the + button to insert the variable and the field together.Inside the expression, jq functions transform the value before it's inserted in the field. The whole expression stays inside the blue reference, for example:
$<node_name>.body.results[0].id: Reads the first identifier of an API response.$<node_name>.body.items | map(.name) | join(", "): Turns a list of objects into a comma-separated text.$<node_name>.body.createdAt / 1000 | todate: Formats a TheHive date, a Unix timestamp in milliseconds, as an ISO 8601 date.$<node_name>.output.title | ascii_upcase: Converts a text to uppercase.
See Jq Functions for the full list of available functions.
Fields marked with * are mandatory.
- Base URL *
The URL of the Elasticsearch HTTP endpoint, not the Kibana URL:
https://<elasticsearch_host>:9200.- Authentication *
In the Authentication section, select the Authentication method and provide its credentials. The Elastic Security node supports two methods:
Authentication method Fields basic_auth Username *, Password None No fields To authenticate with an Elasticsearch API key instead, select None and add a header named
Authorizationwith the valueApiKey <base64_key>in the Headers section. Reference a secret global variable instead of pasting the key directly.- Headers
Extra headers added to every request sent by the node. Select to add a header key and its value.
Header values are stored in plaintext
Header values appear in plaintext in the workflow execution history. Reference a secret global variable instead of pasting a credential directly.
- Action *
The operation to perform in Elasticsearch. Available actions:
Family Actions Search Search, Index Document, Get Document by ID, Run ES|QL Query Detection Alerts List Detection Alerts After you select an action, the drawer displays the fields specific to that action. For the meaning and format of each field, see the Elasticsearch API documentation.
Detection alerts are an index search
List Detection Alerts searches the
.alerts-security.alerts-defaultindex, where Elastic Security stores its detection alerts. Filter and sort them with the same Query DSL fields as Search.- Editor mode
For actions that send a request body, select how to provide it:
- Form: Fill in one field per body parameter.
- Raw: Provide the whole request body in the Request body (raw) field.
-
Optional: Configure the following settings.
- Proxy
Configure how the node connects to the external service when a proxy is required.
Select a Proxy mode:
-
Do not use a proxy: No proxy is applied. All requests are sent directly. This is the default.
-
Use the platform default proxy configuration: Uses the global proxy settings defined in TheHive
application.conf. See proxy configuration in TheHive. -
Configure a custom proxy: Defines a custom proxy for this node, overriding the global configuration.
When Proxy mode is Configure a custom proxy, provide the following information:
Field Example Protocol httpsAddress * proxy.example.comPort 8080Username $global.proxy_userPassword $secret.proxy_password- SSL/TLS
Configure SSL/TLS settings for secure communication with the external service.
Use this section when the service relies on a private certificate authority (CA), requires client certificate authentication through mutual TLS, or uses a non-standard trust chain.
Field Description Client certificate (mTLS) Whether the node authenticates with a client certificate (mutual TLS). Do not use a client certificate is the default. Select Provide a client certificate and key to fill in the two fields below. Client certificate (PEM) The client certificate to present during the SSL/TLS handshake, in PEM format. Required when Client certificate (mTLS) is Provide a client certificate and key. Client certificate key (PEM) The private key associated with the client certificate, in PEM format. Required when Client certificate (mTLS) is Provide a client certificate and key. Server verification How the node verifies the identity of the server. Uses the system's pre-installed certificate authorities is the default. Provide a custom CA certificate to verify the server uses the certificate in the next field. Do not verify the server's identity (not recommended for production) exposes the connection to security risks. CA certificate (PEM) The CA certificate used to verify the identity of the server, in PEM format. Required when Server verification is set to Provide a custom CA certificate to verify the server. - Error handling
Configure whether the node fails on error responses.
By default, the node fails when the response returns a
4xxor5xxerror status code. Turn on Ignore error status codes to make the node succeed regardless of the response status code. Then handle errors in the workflow, for example with an If flow node evaluating thecodeoutput. Error responses aren't retried when the option is on.Two cases still fail the node:
- A transport failure, such as a DNS, connection, TLS, or timeout error. The node sets no output.
- A response announced as JSON that can't be parsed. The node sets the
codeandheadersoutputs but nobody, and isn't retried.
When Ignore error status codes is off, the node retries a
408,429, or5xxresponse up to the number of times set in Retry attempts. Any other4xxresponse fails the node immediately, without retrying. When the called service includes aRetry-Afterheader in its response, the node waits that long before the next attempt, up to a maximum of 5 minutes. This wait replaces the delay set by Retry delay and Backoff. -
-
Optional: Select Add options to configure the following settings.
- Timeout & retry
Configure how the node handles execution time limits and failure recovery.
If the timeout is reached, the node fails.
Global timeout vs. local timeout
A timeout for the entire workflow is defined when creating the workflow. When both a node timeout and a workflow-level timeout are defined, the shortest timeout value applies.
Field Description Timeout Maximum allowed execution time for the node, in seconds, minutes, or hours. The minimum value is 30 seconds. Retry attempts Number of times the node is retried on failure. Retry delay Time to wait between retry attempts, in seconds, minutes, or hours. Without a delay, retries run 1 second apart by default. Backoff Coefficient applied to the retry delay to increase the wait time after each failed attempt. Retries and timeouts
If the node includes retry settings, the timeout applies to each attempt, not to the total duration of all attempts.
Each request the node sends stops after 30 seconds, even when the node timeout is longer or not set. A response body larger than 10 MiB, the default limit an administrator can change, fails the node without a retry.
- Execution configuration
Set the Execution mode to control how the node behaves when several branches converge on it.
Mode Behavior Execute once per branch The node runs once for each incoming branch. Applies when this section isn't configured. Wait for all branches The node waits for all incoming branches to complete, then runs once.
Execution outputs
When executed, the node returns the following outputs. Each output is a JSON value:
| Output | Type | Description |
|---|---|---|
body |
object | The response body returned by Elasticsearch. |
code |
number | The HTTP status code returned by Elasticsearch. |
headers |
object | The response headers returned by Elasticsearch. |
To access outputs, select your Elastic Security node and then select in the top-right corner of the screen. Hover over each output name to view its details.
You can then reuse these outputs as output variables in subsequent nodes. Select the $var button, or enter $ and select the output from the suggestions. Inserted references appear in the following form:
$<node_name>.body.<field_name>: to get a value from the response body, for example the hits returned by Search$<node_name>.code: to get the HTTP status code, for example to check whether the request succeeded$<node_name>.headers.<header_name>: to get a specific response header
Configure a HarfangLab EDR integration node#
A HarfangLab EDR integration node runs operations against the HarfangLab API. It can search and isolate endpoints, list and update alerts, and create and follow jobs on agents. It can also search process, network, DNS, event log, and binary telemetry, manage IOC rules, and list Sigma rules. Each operation is a dedicated action selected within the node.
-
Go to the Flow view from the sidebar menu.
-
Select a workflow from the list.
-
Drag the previous node connector to an empty area of the canvas.
-
In the What is the next step? drawer, select Integrations.
-
Select HarfangLab EDR.
-
In the HarfangLab EDR drawer, enter the following information:
Variables
Insert a variable with the $var button, or enter
$and select a variable from the suggestions. To access a field, select the variable to edit its jq expression, or use the + button to insert the variable and the field together.Inside the expression, jq functions transform the value before it's inserted in the field. The whole expression stays inside the blue reference, for example:
$<node_name>.body.results[0].id: Reads the first identifier of an API response.$<node_name>.body.items | map(.name) | join(", "): Turns a list of objects into a comma-separated text.$<node_name>.body.createdAt / 1000 | todate: Formats a TheHive date, a Unix timestamp in milliseconds, as an ISO 8601 date.$<node_name>.output.title | ascii_upcase: Converts a text to uppercase.
See Jq Functions for the full list of available functions.
Fields marked with * are mandatory.
- Base URL *
The URL of the HarfangLab manager:
https://<manager_host>.- Authentication *
The HarfangLab API authenticates with a token in the
Authorization: Token <api_key>scheme. This scheme isn't one of the standard HTTP authentication methods, so Authentication method is set to None. Add a header namedAuthorizationwith the valueToken <api_key>in the Headers section. Reference a secret global variable instead of pasting the key directly.- Headers
Extra headers added to every request sent by the node. Select to add a header key and its value.
Header values are stored in plaintext
Header values appear in plaintext in the workflow execution history. Reference a secret global variable instead of pasting a credential directly.
- Action *
The operation to perform in HarfangLab. Available actions:
Family Actions Health Get Manager Version Endpoints Search Endpoints, Get Endpoint Info, Isolate Endpoints, Deisolate Endpoints Alerts List Alerts, Get Alert, Update Alert Status Jobs Create Job, Get Job Status, List Jobs, Get Job Instances, Get Job Results Telemetry Search Process Telemetry, Search Network Telemetry, Search DNS Telemetry, Search Event Log Telemetry, Search Binary Telemetry, Download Binary, Get Process Graph Threat Intelligence List IOC Sources, List IOC Rules, Create IOC Rule, Delete IOC Rule, List Sigma Rules After you select an action, the drawer displays the fields specific to that action. For the meaning and format of each field, see the HarfangLab API documentation.
Validate the configuration with Get Manager Version
Get Manager Version takes no parameter and validates the base URL, the certificate, and the token in one call. Use it as the first action when setting up the node.
- Editor mode
For actions that send a request body, select how to provide it:
- Form: Fill in one field per body parameter.
- Raw: Provide the whole request body in the Request body (raw) field.
- Query parameters
Query parameters sent with the request, entered as key-value pairs. Select to add a parameter. This section appears only for actions that accept query parameters.
The following actions require query parameters. Add each one with the name listed, or the node fails:
- Get Job Status:
id - Get Job Results:
job_id
-
Optional: Configure the following settings.
- Proxy
Configure how the node connects to the external service when a proxy is required.
Select a Proxy mode:
-
Do not use a proxy: No proxy is applied. All requests are sent directly. This is the default.
-
Use the platform default proxy configuration: Uses the global proxy settings defined in TheHive
application.conf. See proxy configuration in TheHive. -
Configure a custom proxy: Defines a custom proxy for this node, overriding the global configuration.
When Proxy mode is Configure a custom proxy, provide the following information:
Field Example Protocol httpsAddress * proxy.example.comPort 8080Username $global.proxy_userPassword $secret.proxy_password- SSL/TLS
Configure SSL/TLS settings for secure communication with the external service.
Use this section when the service relies on a private certificate authority (CA), requires client certificate authentication through mutual TLS, or uses a non-standard trust chain.
Field Description Client certificate (mTLS) Whether the node authenticates with a client certificate (mutual TLS). Do not use a client certificate is the default. Select Provide a client certificate and key to fill in the two fields below. Client certificate (PEM) The client certificate to present during the SSL/TLS handshake, in PEM format. Required when Client certificate (mTLS) is Provide a client certificate and key. Client certificate key (PEM) The private key associated with the client certificate, in PEM format. Required when Client certificate (mTLS) is Provide a client certificate and key. Server verification How the node verifies the identity of the server. Uses the system's pre-installed certificate authorities is the default. Provide a custom CA certificate to verify the server uses the certificate in the next field. Do not verify the server's identity (not recommended for production) exposes the connection to security risks. CA certificate (PEM) The CA certificate used to verify the identity of the server, in PEM format. Required when Server verification is set to Provide a custom CA certificate to verify the server. On-premises managers often run with an internal certificate authority or a self-signed certificate. Configure the trusted certificate here rather than turning off verification.
- Error handling
Configure whether the node fails on error responses.
By default, the node fails when the response returns a
4xxor5xxerror status code. Turn on Ignore error status codes to make the node succeed regardless of the response status code. Then handle errors in the workflow, for example with an If flow node evaluating thecodeoutput. Error responses aren't retried when the option is on.Two cases still fail the node:
- A transport failure, such as a DNS, connection, TLS, or timeout error. The node sets no output.
- A response announced as JSON that can't be parsed. The node sets the
codeandheadersoutputs but nobody, and isn't retried.
When Ignore error status codes is off, the node retries a
408,429, or5xxresponse up to the number of times set in Retry attempts. Any other4xxresponse fails the node immediately, without retrying. When the called service includes aRetry-Afterheader in its response, the node waits that long before the next attempt, up to a maximum of 5 minutes. This wait replaces the delay set by Retry delay and Backoff. -
-
Optional: Select Add options to configure the following settings.
- Timeout & retry
Configure how the node handles execution time limits and failure recovery.
If the timeout is reached, the node fails.
Global timeout vs. local timeout
A timeout for the entire workflow is defined when creating the workflow. When both a node timeout and a workflow-level timeout are defined, the shortest timeout value applies.
Field Description Timeout Maximum allowed execution time for the node, in seconds, minutes, or hours. The minimum value is 30 seconds. Retry attempts Number of times the node is retried on failure. Retry delay Time to wait between retry attempts, in seconds, minutes, or hours. Without a delay, retries run 1 second apart by default. Backoff Coefficient applied to the retry delay to increase the wait time after each failed attempt. Retries and timeouts
If the node includes retry settings, the timeout applies to each attempt, not to the total duration of all attempts.
Each request the node sends stops after 30 seconds, even when the node timeout is longer or not set. A response body larger than 10 MiB, the default limit an administrator can change, fails the node without a retry.
- Execution configuration
Set the Execution mode to control how the node behaves when several branches converge on it.
Mode Behavior Execute once per branch The node runs once for each incoming branch. Applies when this section isn't configured. Wait for all branches The node waits for all incoming branches to complete, then runs once.
Execution outputs
When executed, the node returns the following outputs. Each output is a JSON value:
| Output | Type | Description |
|---|---|---|
body |
object | The response body returned by HarfangLab. |
code |
number | The HTTP status code returned by HarfangLab. |
headers |
object | The response headers returned by HarfangLab. |
To access outputs, select your HarfangLab EDR node and then select in the top-right corner of the screen. Hover over each output name to view its details.
You can then reuse these outputs as output variables in subsequent nodes. Select the $var button, or enter $ and select the output from the suggestions. Inserted references appear in the following form:
$<node_name>.body.<field_name>: to get a value from the response body, for example the endpoints returned by Search Endpoints$<node_name>.code: to get the HTTP status code, for example to check whether the request succeeded$<node_name>.headers.<header_name>: to get a specific response header
Configure a Jira Cloud integration node#
A Jira Cloud integration node runs operations against the Jira Cloud platform REST API v3. It can create, edit, transition, link, and delete issues, and search issues with Jira Query Language (JQL). It can also manage comments, attachments, worklogs, watchers, and votes, and browse projects, issue types, priorities, and resolutions. Each operation is a dedicated action selected within the node.
-
Go to the Flow view from the sidebar menu.
-
Select a workflow from the list.
-
Drag the previous node connector to an empty area of the canvas.
-
In the What is the next step? drawer, select Integrations.
-
Select Jira Cloud.
-
In the Jira Cloud drawer, enter the following information:
Variables
Insert a variable with the $var button, or enter
$and select a variable from the suggestions. To access a field, select the variable to edit its jq expression, or use the + button to insert the variable and the field together.Inside the expression, jq functions transform the value before it's inserted in the field. The whole expression stays inside the blue reference, for example:
$<node_name>.body.results[0].id: Reads the first identifier of an API response.$<node_name>.body.items | map(.name) | join(", "): Turns a list of objects into a comma-separated text.$<node_name>.body.createdAt / 1000 | todate: Formats a TheHive date, a Unix timestamp in milliseconds, as an ISO 8601 date.$<node_name>.output.title | ascii_upcase: Converts a text to uppercase.
See Jq Functions for the full list of available functions.
Fields marked with * are mandatory.
- Base URL *
The URL of your Jira Cloud site:
https://<site_name>.atlassian.net.- Authentication *
In the Authentication section, select the Authentication method and provide its credentials. The Jira Cloud node supports two methods:
Authentication method Fields basic_auth Username *, Password bearer_token Bearer token * With basic_auth, the username is the Atlassian account email and the password is an Atlassian API token. Use bearer_token with an OAuth 2.0 access token.
- Headers
Extra headers added to every request sent by the node. Select to add a header key and its value.
Header values are stored in plaintext
Header values appear in plaintext in the workflow execution history. Reference a secret global variable instead of pasting a credential directly.
- Action *
The operation to perform in Jira. Available actions:
Family Actions Issues Create Issue, Get Issue, Edit Issue, Transition Issue, Get Transitions, Assign Issue, Bulk Create Issues, Bulk Fetch Issues, Delete Issue Issue Search Search Issues (JQL), Search Issues (JQL POST), Count Issues, Match Issues to JQL, Parse JQL Queries, Get Issue Picker Suggestions Issue Comments Add Comment, Get Comments, Get Comment, Update Comment, Get Comments by IDs, Delete Comment Issue Attachments Get Attachment Metadata, Get Attachment Content, Get Attachment Settings, Get Attachment Thumbnail, Expand Attachment for Humans, Expand Attachment for Machines, Delete Attachment Issue Links Create Issue Link, Get Issue Link Types, Get Issue Link Type, Get Issue Link, Delete Issue Link Issue Remote Links Create or Update Remote Issue Link, Get Remote Issue Links, Get Remote Issue Link, Update Remote Issue Link, Delete Remote Issue Link, Delete Remote Issue Link by Global ID Issue Watchers Notify Issue, Get Issue Watchers, Remove Watcher, Get Is Watching Issue Bulk Issue History Get Changelogs, Bulk Fetch Changelogs, Get Changelogs by IDs Issue Metadata Get Create Issue Metadata, Get Create Issue Metadata Issue Types, Get Create Issue Metadata Issue Type, Get Edit Issue Metadata, Get Events Issue Types Get Issue Types, Get Issue Type, Get Issue Types for Project Issue Priorities Get Priorities, Get Priority, Search Priorities Issue Resolutions Get Resolutions, Get Resolution, Search Resolutions Issue Worklogs Add Worklog, Get Issue Worklogs, Update Worklog, Delete Worklog Issue Votes Get Votes, Add Vote, Remove Vote Projects Get All Projects, Search Projects, Get Project, Get Project Statuses, Get Project Versions, Get Project Components User Search Find Users, Find Assignable Users Tasks Get Task, Cancel Task After you select an action, the drawer displays the fields specific to that action. For the meaning and format of each field, see the Jira Cloud REST API v3 documentation.
- Editor mode
For actions that send a request body, select how to provide it:
- Form: Fill in one field per body parameter.
- Raw: Provide the whole request body in the Request body (raw) field.
- Query parameters
Query parameters sent with the request, entered as key-value pairs. Select to add a parameter. This section appears only for actions that accept query parameters.
The following actions require query parameters. Add each one with the name listed, or the node fails:
- Delete Remote Issue Link by Global ID:
globalId - Get Issue Types for Project:
projectId
-
Optional: Configure the following settings.
- Proxy
Configure how the node connects to the external service when a proxy is required.
Select a Proxy mode:
-
Do not use a proxy: No proxy is applied. All requests are sent directly. This is the default.
-
Use the platform default proxy configuration: Uses the global proxy settings defined in TheHive
application.conf. See proxy configuration in TheHive. -
Configure a custom proxy: Defines a custom proxy for this node, overriding the global configuration.
When Proxy mode is Configure a custom proxy, provide the following information:
Field Example Protocol httpsAddress * proxy.example.comPort 8080Username $global.proxy_userPassword $secret.proxy_password- SSL/TLS
Configure SSL/TLS settings for secure communication with the external service.
Use this section when the service relies on a private certificate authority (CA), requires client certificate authentication through mutual TLS, or uses a non-standard trust chain.
Field Description Client certificate (mTLS) Whether the node authenticates with a client certificate (mutual TLS). Do not use a client certificate is the default. Select Provide a client certificate and key to fill in the two fields below. Client certificate (PEM) The client certificate to present during the SSL/TLS handshake, in PEM format. Required when Client certificate (mTLS) is Provide a client certificate and key. Client certificate key (PEM) The private key associated with the client certificate, in PEM format. Required when Client certificate (mTLS) is Provide a client certificate and key. Server verification How the node verifies the identity of the server. Uses the system's pre-installed certificate authorities is the default. Provide a custom CA certificate to verify the server uses the certificate in the next field. Do not verify the server's identity (not recommended for production) exposes the connection to security risks. CA certificate (PEM) The CA certificate used to verify the identity of the server, in PEM format. Required when Server verification is set to Provide a custom CA certificate to verify the server. - Error handling
Configure whether the node fails on error responses.
By default, the node fails when the response returns a
4xxor5xxerror status code. Turn on Ignore error status codes to make the node succeed regardless of the response status code. Then handle errors in the workflow, for example with an If flow node evaluating thecodeoutput. Error responses aren't retried when the option is on.Two cases still fail the node:
- A transport failure, such as a DNS, connection, TLS, or timeout error. The node sets no output.
- A response announced as JSON that can't be parsed. The node sets the
codeandheadersoutputs but nobody, and isn't retried.
When Ignore error status codes is off, the node retries a
408,429, or5xxresponse up to the number of times set in Retry attempts. Any other4xxresponse fails the node immediately, without retrying. When the called service includes aRetry-Afterheader in its response, the node waits that long before the next attempt, up to a maximum of 5 minutes. This wait replaces the delay set by Retry delay and Backoff. -
-
Optional: Select Add options to configure the following settings.
- Timeout & retry
Configure how the node handles execution time limits and failure recovery.
If the timeout is reached, the node fails.
Global timeout vs. local timeout
A timeout for the entire workflow is defined when creating the workflow. When both a node timeout and a workflow-level timeout are defined, the shortest timeout value applies.
Field Description Timeout Maximum allowed execution time for the node, in seconds, minutes, or hours. The minimum value is 30 seconds. Retry attempts Number of times the node is retried on failure. Retry delay Time to wait between retry attempts, in seconds, minutes, or hours. Without a delay, retries run 1 second apart by default. Backoff Coefficient applied to the retry delay to increase the wait time after each failed attempt. Retries and timeouts
If the node includes retry settings, the timeout applies to each attempt, not to the total duration of all attempts.
Each request the node sends stops after 30 seconds, even when the node timeout is longer or not set. A response body larger than 10 MiB, the default limit an administrator can change, fails the node without a retry.
- Execution configuration
Set the Execution mode to control how the node behaves when several branches converge on it.
Mode Behavior Execute once per branch The node runs once for each incoming branch. Applies when this section isn't configured. Wait for all branches The node waits for all incoming branches to complete, then runs once.
Execution outputs
When executed, the node returns the following outputs. Each output is a JSON value:
| Output | Type | Description |
|---|---|---|
body |
object | The response body returned by Jira. |
code |
number | The HTTP status code returned by Jira. |
headers |
object | The response headers returned by Jira. |
To access outputs, select your Jira Cloud node and then select in the top-right corner of the screen. Hover over each output name to view its details.
You can then reuse these outputs as output variables in subsequent nodes. Select the $var button, or enter $ and select the output from the suggestions. Inserted references appear in the following form:
$<node_name>.body.<field_name>: to get a value from the response body, for example the issue key returned by Create Issue$<node_name>.code: to get the HTTP status code, for example to check whether the request succeeded$<node_name>.headers.<header_name>: to get a specific response header
Configure a Slack integration node#
A Slack integration node runs operations against the Slack Web API. It can post, update, and delete messages, manage reactions, read thread replies and channel history, create and manage channels, open direct messages, and look up channels and users. Each operation is a dedicated action selected within the node.
-
Go to the Flow view from the sidebar menu.
-
Select a workflow from the list.
-
Drag the previous node connector to an empty area of the canvas.
-
In the What is the next step? drawer, select Integrations.
-
Select Slack.
-
In the Slack drawer, enter the following information:
Variables
Insert a variable with the $var button, or enter
$and select a variable from the suggestions. To access a field, select the variable to edit its jq expression, or use the + button to insert the variable and the field together.Inside the expression, jq functions transform the value before it's inserted in the field. The whole expression stays inside the blue reference, for example:
$<node_name>.body.results[0].id: Reads the first identifier of an API response.$<node_name>.body.items | map(.name) | join(", "): Turns a list of objects into a comma-separated text.$<node_name>.body.createdAt / 1000 | todate: Formats a TheHive date, a Unix timestamp in milliseconds, as an ISO 8601 date.$<node_name>.output.title | ascii_upcase: Converts a text to uppercase.
See Jq Functions for the full list of available functions.
Fields marked with * are mandatory.
- Base URL *
The URL of the Slack Web API:
https://slack.com/api.- Authentication *
In the Authentication section, Authentication method is set to bearer_token. Provide a Slack bot token, starting with
xoxb-, in the Bearer token field. The token must carry the OAuth scopes required by the actions you use, such aschat:writefor the Messages family. Reference a secret global variable instead of pasting the token directly.- Headers
Extra headers added to every request sent by the node. Select to add a header key and its value.
Header values are stored in plaintext
Header values appear in plaintext in the workflow execution history. Reference a secret global variable instead of pasting a credential directly.
- Action *
The operation to perform in Slack. Available actions:
Family Actions Messages Post Message, Update Message, Delete Message Reactions Get Reactions, Add Reaction, Remove Reaction Threads Get Thread Replies, Get Channel History Channels Create Channel, Get Channel Info, List Channels, Invite Users to Channel, Archive Channel, Set Channel Topic, Set Channel Purpose Direct Messages Open Direct Message Users Get User Info, Lookup User by Email, List Users After you select an action, the drawer displays the fields specific to that action. For the meaning and format of each field, see the Slack Web API documentation.
Slack reports errors in the response body
The Slack Web API returns most errors with a
200status code, so the node succeeds even when the operation fails. Check theokfield of thebodyoutput, for example with an If flow node. Theokfield isfalsewhen the operation failed, and theerrorfield carries the reason.- Editor mode
For actions that send a request body, select how to provide it:
- Form: Fill in one field per body parameter.
- Raw: Provide the whole request body in the Request body (raw) field.
- Query parameters
Query parameters sent with the request, entered as key-value pairs. Select to add a parameter. This section appears only for actions that accept query parameters.
The following actions require query parameters. Add each one with the name listed, or the node fails:
- Get Reactions:
channelandtimestamp - Get Thread Replies:
channelandts - Get Channel History:
channel - Get Channel Info:
channel - Get User Info:
user - Lookup User by Email:
email
-
Optional: Configure the following settings.
- Proxy
Configure how the node connects to the external service when a proxy is required.
Select a Proxy mode:
-
Do not use a proxy: No proxy is applied. All requests are sent directly. This is the default.
-
Use the platform default proxy configuration: Uses the global proxy settings defined in TheHive
application.conf. See proxy configuration in TheHive. -
Configure a custom proxy: Defines a custom proxy for this node, overriding the global configuration.
When Proxy mode is Configure a custom proxy, provide the following information:
Field Example Protocol httpsAddress * proxy.example.comPort 8080Username $global.proxy_userPassword $secret.proxy_password- SSL/TLS
Configure SSL/TLS settings for secure communication with the external service.
Use this section when the service relies on a private certificate authority (CA), requires client certificate authentication through mutual TLS, or uses a non-standard trust chain.
Field Description Client certificate (mTLS) Whether the node authenticates with a client certificate (mutual TLS). Do not use a client certificate is the default. Select Provide a client certificate and key to fill in the two fields below. Client certificate (PEM) The client certificate to present during the SSL/TLS handshake, in PEM format. Required when Client certificate (mTLS) is Provide a client certificate and key. Client certificate key (PEM) The private key associated with the client certificate, in PEM format. Required when Client certificate (mTLS) is Provide a client certificate and key. Server verification How the node verifies the identity of the server. Uses the system's pre-installed certificate authorities is the default. Provide a custom CA certificate to verify the server uses the certificate in the next field. Do not verify the server's identity (not recommended for production) exposes the connection to security risks. CA certificate (PEM) The CA certificate used to verify the identity of the server, in PEM format. Required when Server verification is set to Provide a custom CA certificate to verify the server. - Error handling
Configure whether the node fails on error responses.
By default, the node fails when the response returns a
4xxor5xxerror status code. Turn on Ignore error status codes to make the node succeed regardless of the response status code. Then handle errors in the workflow, for example with an If flow node evaluating thecodeoutput. Error responses aren't retried when the option is on.Two cases still fail the node:
- A transport failure, such as a DNS, connection, TLS, or timeout error. The node sets no output.
- A response announced as JSON that can't be parsed. The node sets the
codeandheadersoutputs but nobody, and isn't retried.
When Ignore error status codes is off, the node retries a
408,429, or5xxresponse up to the number of times set in Retry attempts. Any other4xxresponse fails the node immediately, without retrying. When the called service includes aRetry-Afterheader in its response, the node waits that long before the next attempt, up to a maximum of 5 minutes. This wait replaces the delay set by Retry delay and Backoff. -
-
Optional: Select Add options to configure the following settings.
- Timeout & retry
Configure how the node handles execution time limits and failure recovery.
If the timeout is reached, the node fails.
Global timeout vs. local timeout
A timeout for the entire workflow is defined when creating the workflow. When both a node timeout and a workflow-level timeout are defined, the shortest timeout value applies.
Field Description Timeout Maximum allowed execution time for the node, in seconds, minutes, or hours. The minimum value is 30 seconds. Retry attempts Number of times the node is retried on failure. Retry delay Time to wait between retry attempts, in seconds, minutes, or hours. Without a delay, retries run 1 second apart by default. Backoff Coefficient applied to the retry delay to increase the wait time after each failed attempt. Retries and timeouts
If the node includes retry settings, the timeout applies to each attempt, not to the total duration of all attempts.
Each request the node sends stops after 30 seconds, even when the node timeout is longer or not set. A response body larger than 10 MiB, the default limit an administrator can change, fails the node without a retry.
- Execution configuration
Set the Execution mode to control how the node behaves when several branches converge on it.
Mode Behavior Execute once per branch The node runs once for each incoming branch. Applies when this section isn't configured. Wait for all branches The node waits for all incoming branches to complete, then runs once.
Execution outputs
When executed, the node returns the following outputs. Each output is a JSON value:
| Output | Type | Description |
|---|---|---|
body |
object | The response body returned by Slack. |
code |
number | The HTTP status code returned by Slack. |
headers |
object | The response headers returned by Slack. |
To access outputs, select your Slack node and then select in the top-right corner of the screen. Hover over each output name to view its details.
You can then reuse these outputs as output variables in subsequent nodes. Select the $var button, or enter $ and select the output from the suggestions. Inserted references appear in the following form:
$<node_name>.body.<field_name>: to get a value from the response body, for example the message timestamptsreturned by Post Message, used to update or delete the message or fetch its replies$<node_name>.code: to get the HTTP status code, for example to check whether the request succeeded$<node_name>.headers.<header_name>: to get a specific response header
Configure a Microsoft Teams integration node#
A Microsoft Teams integration node runs operations against the Microsoft Graph API. It can send, reply to, update, and delete channel messages, send chat messages, and create chats and channels. It can also add team and channel members, and list or retrieve teams, channels, chats, messages, and replies. Each operation is a dedicated action selected within the node.
-
Go to the Flow view from the sidebar menu.
-
Select a workflow from the list.
-
Drag the previous node connector to an empty area of the canvas.
-
In the What is the next step? drawer, select Integrations.
-
Select Microsoft Teams.
-
In the Microsoft Teams drawer, enter the following information:
Variables
Insert a variable with the $var button, or enter
$and select a variable from the suggestions. To access a field, select the variable to edit its jq expression, or use the + button to insert the variable and the field together.Inside the expression, jq functions transform the value before it's inserted in the field. The whole expression stays inside the blue reference, for example:
$<node_name>.body.results[0].id: Reads the first identifier of an API response.$<node_name>.body.items | map(.name) | join(", "): Turns a list of objects into a comma-separated text.$<node_name>.body.createdAt / 1000 | todate: Formats a TheHive date, a Unix timestamp in milliseconds, as an ISO 8601 date.$<node_name>.output.title | ascii_upcase: Converts a text to uppercase.
See Jq Functions for the full list of available functions.
Fields marked with * are mandatory.
- Base URL *
The URL of Microsoft Graph:
https://graph.microsoft.com. The node targets thev1.0version of Microsoft Graph.- Authentication *
In the Authentication section, select the Authentication method and provide the credentials of an application registered in Microsoft Entra ID. The Microsoft Teams node supports two methods:
Authentication method Fields oauth2 Access token, Client ID, Client secret, Refresh token, Token URL. Authorization URL and Token scopes have no effect oauth2_client_credentials Client ID *, Client secret *, Token URL *, Token scopes Both methods use the token URL of your Microsoft Entra ID tenant,
https://login.microsoftonline.com/<tenant>/oauth2/v2.0/token. oauth2 acts on behalf of a user, typically a service account. oauth2_client_credentials fetches an application token with the client ID and secret: set its token scope tohttps://graph.microsoft.com/.default. Reference secret global variables instead of pasting credentials directly.With oauth2, fill in the fields of one of the two cases:
Field With an access token With a refresh token Example Client ID Not used Required $global.teams_client_idClient secret Not used Optional, for a confidential client $secret.teams_client_secretAccess token Required Not used $secret.teams_access_tokenRefresh token Not used Required $secret.teams_refresh_tokenToken URL Not used Required https://login.microsoftonline.com/<tenant>/oauth2/v2.0/tokenThe node sends an access token as is and never renews it: once it expires, calls fail until it's replaced, so it suits a quick test. A refresh token suits a workflow that runs over time: each step execution gets a fresh access token from it. Microsoft Entra ID issues a refresh token only when the application requests the
offline_accessscope at sign-in.Sending messages requires the oauth2 method
Microsoft Graph doesn't let an application post messages on its own behalf. The Send Channel Message, Reply to Channel Message, Update Channel Message, Delete Channel Message, and Send Chat Message actions fail with oauth2_client_credentials. Use the oauth2 method for them. The node then posts messages as the user the tokens belong to. All other actions work with both methods.
Prerequisite
Grant the application the Microsoft Graph permissions matching the actions and the authentication method you use: delegated permissions for oauth2, application permissions for oauth2_client_credentials. The required permission varies per action, for example
ChannelMessage.Sendto send a channel message,ChatMessage.Sendto send a chat message,Channel.Createto create a channel, orChannelMember.ReadWrite.Allto add a channel member. See the Microsoft Graph permissions reference.- Headers
Extra headers added to every request sent by the node. Select to add a header key and its value.
Header values are stored in plaintext
Header values appear in plaintext in the workflow execution history. Reference a secret global variable instead of pasting a credential directly.
- Action *
The operation to perform in Microsoft Teams. Available actions:
Family Actions Messages Send Channel Message, Reply to Channel Message, Update Channel Message, Delete Channel Message, Get Channel Message, List Channel Messages, List Message Replies Chats Send Chat Message, Create Chat, List Chats Teams & Channels List Joined Teams, Get Team, List Channels, Get Channel, Create Channel, Add Channel Member, Add Team Member After you select an action, the drawer displays the fields specific to that action. For the meaning and format of each field, see the Microsoft Graph API documentation.
Identifying teams, channels, and chats
Actions take the identifiers Microsoft Graph uses, not display names. The Team ID field takes the ID of the team's Microsoft 365 group, and the Channel ID and Chat ID fields take identifiers starting with
19:. To find them, use List Joined Teams with a user's object ID or user principal name, then List Channels or List Chats. The User ID and User fields accept either the object ID or the user principal name of a user.Message body format
The Message body field takes a JSON object with the
contentTypeandcontentof the message, for example{"contentType": "html", "content": "<b>New alert</b> raised in TheHive"}. SetcontentTypetotextfor plain text orhtmlto format the message. To mention users, usehtmland add an<at id="0">Name</at>tag for each entry of the Mentions field. Delete Channel Message performs a soft delete.Adding members
Create Chat, Create Channel, Add Channel Member, and Add Team Member describe each member with the Microsoft Graph member format:
- The Member type field or the
@odata.typeproperty is#microsoft.graph.aadUserConversationMember - The User field or the
user@odata.bindproperty is the Graph URL of the user, such ashttps://graph.microsoft.com/v1.0/users('jdoe@contoso.com') - Roles is
["owner"]for an owner or[]for a member
Add Channel Member applies only to private and shared channels.
- Editor mode
For actions that send a request body, select how to provide it:
- Form: Fill in one field per body parameter.
- Raw: Provide the whole request body in the Request body (raw) field.
- Query parameters
Optional query parameters sent with the request, entered as key-value pairs. Select to add a parameter. This section appears only for actions that accept query parameters.
-
Optional: Configure the following settings.
- Proxy
Configure how the node connects to the external service when a proxy is required.
Select a Proxy mode:
-
Do not use a proxy: No proxy is applied. All requests are sent directly. This is the default.
-
Use the platform default proxy configuration: Uses the global proxy settings defined in TheHive
application.conf. See proxy configuration in TheHive. -
Configure a custom proxy: Defines a custom proxy for this node, overriding the global configuration.
When Proxy mode is Configure a custom proxy, provide the following information:
Field Example Protocol httpsAddress * proxy.example.comPort 8080Username $global.proxy_userPassword $secret.proxy_password- SSL/TLS
Configure SSL/TLS settings for secure communication with the external service.
Use this section when the service relies on a private certificate authority (CA), requires client certificate authentication through mutual TLS, or uses a non-standard trust chain.
Field Description Client certificate (mTLS) Whether the node authenticates with a client certificate (mutual TLS). Do not use a client certificate is the default. Select Provide a client certificate and key to fill in the two fields below. Client certificate (PEM) The client certificate to present during the SSL/TLS handshake, in PEM format. Required when Client certificate (mTLS) is Provide a client certificate and key. Client certificate key (PEM) The private key associated with the client certificate, in PEM format. Required when Client certificate (mTLS) is Provide a client certificate and key. Server verification How the node verifies the identity of the server. Uses the system's pre-installed certificate authorities is the default. Provide a custom CA certificate to verify the server uses the certificate in the next field. Do not verify the server's identity (not recommended for production) exposes the connection to security risks. CA certificate (PEM) The CA certificate used to verify the identity of the server, in PEM format. Required when Server verification is set to Provide a custom CA certificate to verify the server. - Error handling
Configure whether the node fails on error responses.
By default, the node fails when the response returns a
4xxor5xxerror status code. Turn on Ignore error status codes to make the node succeed regardless of the response status code. Then handle errors in the workflow, for example with an If flow node evaluating thecodeoutput. Error responses aren't retried when the option is on.Two cases still fail the node:
- A transport failure, such as a DNS, connection, TLS, or timeout error. The node sets no output.
- A response announced as JSON that can't be parsed. The node sets the
codeandheadersoutputs but nobody, and isn't retried.
When Ignore error status codes is off, the node retries a
408,429, or5xxresponse up to the number of times set in Retry attempts. Any other4xxresponse fails the node immediately, without retrying. When the called service includes aRetry-Afterheader in its response, the node waits that long before the next attempt, up to a maximum of 5 minutes. This wait replaces the delay set by Retry delay and Backoff. -
-
Optional: Select Add options to configure the following settings.
- Timeout & retry
Configure how the node handles execution time limits and failure recovery.
If the timeout is reached, the node fails.
Global timeout vs. local timeout
A timeout for the entire workflow is defined when creating the workflow. When both a node timeout and a workflow-level timeout are defined, the shortest timeout value applies.
Field Description Timeout Maximum allowed execution time for the node, in seconds, minutes, or hours. The minimum value is 30 seconds. Retry attempts Number of times the node is retried on failure. Retry delay Time to wait between retry attempts, in seconds, minutes, or hours. Without a delay, retries run 1 second apart by default. Backoff Coefficient applied to the retry delay to increase the wait time after each failed attempt. Retries and timeouts
If the node includes retry settings, the timeout applies to each attempt, not to the total duration of all attempts.
Each request the node sends stops after 30 seconds, even when the node timeout is longer or not set. A response body larger than 10 MiB, the default limit an administrator can change, fails the node without a retry.
- Execution configuration
Set the Execution mode to control how the node behaves when several branches converge on it.
Mode Behavior Execute once per branch The node runs once for each incoming branch. Applies when this section isn't configured. Wait for all branches The node waits for all incoming branches to complete, then runs once.
Execution outputs
When executed, the node returns the following outputs. Each output is a JSON value:
| Output | Type | Description |
|---|---|---|
body |
object | The response body returned by Microsoft Graph. |
code |
number | The HTTP status code returned by Microsoft Graph. |
headers |
object | The response headers returned by Microsoft Graph. |
To access outputs, select your Microsoft Teams node and then select in the top-right corner of the screen. Hover over each output name to view its details.
You can then reuse these outputs as output variables in subsequent nodes. Select the $var button, or enter $ and select the output from the suggestions. Inserted references appear in the following form:
$<node_name>.body.<field_name>: to get a value from the response body, for example theidof the message returned by Send Channel Message, used to reply to, update, or delete the message or list its replies. Update Channel Message and Delete Channel Message return a204status code with an empty body.$<node_name>.code: to get the HTTP status code, for example to check whether the request succeeded$<node_name>.headers.<header_name>: to get a specific response header
Configure a ServiceNow integration node#
A ServiceNow integration node runs operations against the ServiceNow Table and Attachment APIs. It can create, retrieve, and update incidents and change requests, and search configuration items, users, and user groups. It can also manage record attachments, and read, create, update, and delete records in any table. Each operation is a dedicated action selected within the node.
-
Go to the Flow view from the sidebar menu.
-
Select a workflow from the list.
-
Drag the previous node connector to an empty area of the canvas.
-
In the What is the next step? drawer, select Integrations.
-
Select ServiceNow.
-
In the ServiceNow drawer, enter the following information:
Variables
Insert a variable with the $var button, or enter
$and select a variable from the suggestions. To access a field, select the variable to edit its jq expression, or use the + button to insert the variable and the field together.Inside the expression, jq functions transform the value before it's inserted in the field. The whole expression stays inside the blue reference, for example:
$<node_name>.body.results[0].id: Reads the first identifier of an API response.$<node_name>.body.items | map(.name) | join(", "): Turns a list of objects into a comma-separated text.$<node_name>.body.createdAt / 1000 | todate: Formats a TheHive date, a Unix timestamp in milliseconds, as an ISO 8601 date.$<node_name>.output.title | ascii_upcase: Converts a text to uppercase.
See Jq Functions for the full list of available functions.
Fields marked with * are mandatory.
- Base URL *
The URL of your ServiceNow instance:
https://<instance_name>.service-now.com.- Authentication *
In the Authentication section, select the Authentication method and provide its credentials. The ServiceNow node supports four methods:
Authentication method Fields basic_auth Username *, Password bearer_token Bearer token * oauth2 Access token, Client ID, Client secret, Refresh token, Token URL. Authorization URL and Token scopes have no effect oauth2_client_credentials Client ID *, Client secret *, Token URL *, Token scopes With basic_auth, provide the credentials of a ServiceNow user whose roles cover the tables the actions use. With bearer_token, provide an OAuth 2.0 access token obtained outside the workflow. The two OAuth 2.0 methods authenticate with an OAuth API client registered in ServiceNow, and their token URL is
https://<instance_name>.service-now.com/oauth_token.do. oauth2_client_credentials fetches the token with the client ID and secret. Reference secret global variables instead of pasting credentials directly.With oauth2, fill in the fields of one of the two cases:
Field With an access token With a refresh token Example Client ID Not used Required $global.servicenow_client_idClient secret Not used Optional, for a confidential client $secret.servicenow_client_secretAccess token Required Not used $secret.servicenow_access_tokenRefresh token Not used Required $secret.servicenow_refresh_tokenToken URL Not used Required https://<instance_name>.service-now.com/oauth_token.doThe node sends an access token as is and never renews it: once it expires, calls fail until it's replaced, so it suits a quick test. A refresh token suits a workflow that runs over time: each step execution gets a fresh access token from it. ServiceNow returns a refresh token with the access token, and the OAuth API client registered in ServiceNow sets how long it stays valid.
- Headers
Extra headers added to every request sent by the node. Select to add a header key and its value.
Header values are stored in plaintext
Header values appear in plaintext in the workflow execution history. Reference a secret global variable instead of pasting a credential directly.
- Action *
The operation to perform in ServiceNow. Available actions:
Family Actions Incidents List Incidents, Get Incident, Create Incident, Update Incident Change Requests List Change Requests, Get Change Request, Create Change Request, Update Change Request CMDB Search Configuration Item, Get Configuration Item Users & Groups Search User, Search User Group Attachments List Attachments, Get Attachment, Add Attachment, Delete Attachment Custom Tables List Records, Get Record, Create Record, Replace Record, Update Record, Delete Record After you select an action, the drawer displays the fields specific to that action. For the meaning and format of each field, see the ServiceNow REST API documentation.
Records are addressed by sys_id
The get, update, replace, and delete actions identify a record by its
sys_id, a 32-character identifier, not by its number such asINC0010001. To resolve a number to asys_id, use the matching list or search action with an encoded query. In Query parameters, add a parameter namedsysparm_querywith a value such asnumber=INC0010001. Encoded queries chain conditions with^and sort withORDERBYorORDERBYDESC, for exampleactive=true^urgency=1^ORDERBYDESCsys_created_on.The Custom Tables actions
The Custom Tables actions read and write any ServiceNow table by its name, such as
sc_request, including custom tables. Their write actions take the record fields as a single Fields field holding a JSON object, sent verbatim as the request body, for example{"short_description": "Ransomware detected on FIN-DB-01", "urgency": "1"}.The Add Attachment action
Add Attachment attaches a file to a record. The File field takes a file reference produced by an earlier node, such as a file downloaded by an HTTP request action node or uploaded to the Webhook trigger, not literal text content. The field holds one reference and nothing else. Text around the reference or a second reference shows an inline error, because the run would fail. In this field, picking an entry from the Files group of the variable suggestions inserts the file itself, not its metadata.
- Editor mode
For actions that send a request body, select how to provide it:
- Form: Fill in one field per body parameter.
- Raw: Provide the whole request body in the Request body (raw) field.
- Query parameters
Query parameters sent with the request, entered as key-value pairs. Select to add a parameter. This section appears only for actions that accept query parameters.
The following actions require query parameters. Add each one with the name listed, or the node fails:
- Search Configuration Item:
sysparm_query - Search User:
sysparm_query - Search User Group:
sysparm_query
-
Optional: Configure the following settings.
- Proxy
Configure how the node connects to the external service when a proxy is required.
Select a Proxy mode:
-
Do not use a proxy: No proxy is applied. All requests are sent directly. This is the default.
-
Use the platform default proxy configuration: Uses the global proxy settings defined in TheHive
application.conf. See proxy configuration in TheHive. -
Configure a custom proxy: Defines a custom proxy for this node, overriding the global configuration.
When Proxy mode is Configure a custom proxy, provide the following information:
Field Example Protocol httpsAddress * proxy.example.comPort 8080Username $global.proxy_userPassword $secret.proxy_password- SSL/TLS
Configure SSL/TLS settings for secure communication with the external service.
Use this section when the service relies on a private certificate authority (CA), requires client certificate authentication through mutual TLS, or uses a non-standard trust chain.
Field Description Client certificate (mTLS) Whether the node authenticates with a client certificate (mutual TLS). Do not use a client certificate is the default. Select Provide a client certificate and key to fill in the two fields below. Client certificate (PEM) The client certificate to present during the SSL/TLS handshake, in PEM format. Required when Client certificate (mTLS) is Provide a client certificate and key. Client certificate key (PEM) The private key associated with the client certificate, in PEM format. Required when Client certificate (mTLS) is Provide a client certificate and key. Server verification How the node verifies the identity of the server. Uses the system's pre-installed certificate authorities is the default. Provide a custom CA certificate to verify the server uses the certificate in the next field. Do not verify the server's identity (not recommended for production) exposes the connection to security risks. CA certificate (PEM) The CA certificate used to verify the identity of the server, in PEM format. Required when Server verification is set to Provide a custom CA certificate to verify the server. - Error handling
Configure whether the node fails on error responses.
By default, the node fails when the response returns a
4xxor5xxerror status code. Turn on Ignore error status codes to make the node succeed regardless of the response status code. Then handle errors in the workflow, for example with an If flow node evaluating thecodeoutput. Error responses aren't retried when the option is on.Two cases still fail the node:
- A transport failure, such as a DNS, connection, TLS, or timeout error. The node sets no output.
- A response announced as JSON that can't be parsed. The node sets the
codeandheadersoutputs but nobody, and isn't retried.
When Ignore error status codes is off, the node retries a
408,429, or5xxresponse up to the number of times set in Retry attempts. Any other4xxresponse fails the node immediately, without retrying. When the called service includes aRetry-Afterheader in its response, the node waits that long before the next attempt, up to a maximum of 5 minutes. This wait replaces the delay set by Retry delay and Backoff. -
-
Optional: Select Add options to configure the following settings.
- Timeout & retry
Configure how the node handles execution time limits and failure recovery.
If the timeout is reached, the node fails.
Global timeout vs. local timeout
A timeout for the entire workflow is defined when creating the workflow. When both a node timeout and a workflow-level timeout are defined, the shortest timeout value applies.
Field Description Timeout Maximum allowed execution time for the node, in seconds, minutes, or hours. The minimum value is 30 seconds. Retry attempts Number of times the node is retried on failure. Retry delay Time to wait between retry attempts, in seconds, minutes, or hours. Without a delay, retries run 1 second apart by default. Backoff Coefficient applied to the retry delay to increase the wait time after each failed attempt. Retries and timeouts
If the node includes retry settings, the timeout applies to each attempt, not to the total duration of all attempts.
Each request the node sends stops after 30 seconds, even when the node timeout is longer or not set. A response body larger than 10 MiB, the default limit an administrator can change, fails the node without a retry.
- Execution configuration
Set the Execution mode to control how the node behaves when several branches converge on it.
Mode Behavior Execute once per branch The node runs once for each incoming branch. Applies when this section isn't configured. Wait for all branches The node waits for all incoming branches to complete, then runs once.
Execution outputs
When executed, the node returns the following outputs. Each output is a JSON value:
| Output | Type | Description |
|---|---|---|
body |
object | The response body returned by ServiceNow. |
code |
number | The HTTP status code returned by ServiceNow. |
headers |
object | The response headers returned by ServiceNow. |
To access outputs, select your ServiceNow node and then select in the top-right corner of the screen. Hover over each output name to view its details.
You can then reuse these outputs as output variables in subsequent nodes. Select the $var button, or enter $ and select the output from the suggestions. Inserted references appear in the following form:
$<node_name>.body.<field_name>: to get a value from the response body. ServiceNow wraps the response in aresultfield, for example$<node_name>.body.result.sys_idfor the identifier of a created incident.$<node_name>.code: to get the HTTP status code, for example to check whether the request succeeded$<node_name>.headers.<header_name>: to get a specific response header
Configure an OpenCTI integration node#
An OpenCTI integration node runs operations against the OpenCTI GraphQL and TAXII 2.1 APIs. It can search entities, observables, indicators, and relationships, and create observables, indicators, reports, incidents, incident response cases, relationships, and sightings. It can also manage labels, markings, and notes, request enrichment from connectors, and read STIX objects through TAXII. Each operation is a dedicated action selected within the node.
-
Go to the Flow view from the sidebar menu.
-
Select a workflow from the list.
-
Drag the previous node connector to an empty area of the canvas.
-
In the What is the next step? drawer, select Integrations.
-
Select OpenCTI.
-
In the OpenCTI drawer, enter the following information:
Variables
Insert a variable with the $var button, or enter
$and select a variable from the suggestions. To access a field, select the variable to edit its jq expression, or use the + button to insert the variable and the field together.Inside the expression, jq functions transform the value before it's inserted in the field. The whole expression stays inside the blue reference, for example:
$<node_name>.body.results[0].id: Reads the first identifier of an API response.$<node_name>.body.items | map(.name) | join(", "): Turns a list of objects into a comma-separated text.$<node_name>.body.createdAt / 1000 | todate: Formats a TheHive date, a Unix timestamp in milliseconds, as an ISO 8601 date.$<node_name>.output.title | ascii_upcase: Converts a text to uppercase.
See Jq Functions for the full list of available functions.
Fields marked with * are mandatory.
- Base URL *
The root URL of your OpenCTI platform, for example
https://opencti.example.com. Don't add/graphql: the node appends the path of each action.- Authentication *
In the Authentication section, select bearer_token as the Authentication method, then enter the API key of an OpenCTI user in the Bearer token field. Users find their API key in Profile > API access in OpenCTI. Reference a secret global variable instead of pasting the key directly.
- Headers
Extra headers added to every request sent by the node. Select to add a header key and its value.
Header values are stored in plaintext
Header values appear in plaintext in the workflow execution history. Reference a secret global variable instead of pasting a credential directly.
- Action *
The operation to perform in OpenCTI. Available actions:
Family Actions GraphQL Execute GraphQL Operation Search Search Entities, Search Observables, Search Indicators, Search Relationships Observables Get Observable, Create Observable, Update Observable Fields, Promote Observable to Indicator, Delete Observable Indicators Get Indicator, Create Indicator Entities Get Entity, Export Entity as STIX, Delete Entity Containers Create Report, Create Incident, Create Incident Response Case, Add Entity to Container Relationships Create Relationship, Create Sighting Labels & Markings List Labels, Create Label, Add Label to Entity, List Marking Definitions, Add Marking to Entity Notes Add Note to Entity Enrichment List Connectors, List Enrichment Connectors for Type, Ask Enrichment Schema Get Schema (SDL), Introspect Types, Get Relationship Mapping System Who Am I, Get Platform Info, Health Check TAXII 2.1 TAXII Discovery, TAXII API Root, TAXII List Collections, TAXII Get Collection, TAXII Get Objects, TAXII Get Object, TAXII Get Object Versions, TAXII Get Manifest After you select an action, the drawer displays the fields specific to that action. For the meaning and format of each field, see the OpenCTI API documentation.
GraphQL actions
Except for the TAXII 2.1 actions, Get Schema (SDL), and Health Check, every action sends a GraphQL operation. Copy the operation of the action from the GraphQL operations of each action list below, paste it in the GraphQL Query or GraphQL Mutation field. Then fill in the fields of its variables, such as Search or Value. Each field fills the variable of the same name, so keep the variable names when you adapt the operation. An optional field left empty isn't sent. To run an operation no dedicated action covers, use Execute GraphQL Operation and enter the variables as a JSON object in the Variables field.
The Create Observable action
The operation of Create Observable creates an IPv4 address. For another observable type, replace the
IPv4Addrargument with the one matching the Observable Type field, for exampleDomainName: {value: $value}forDomain-Name. If an observable with the same value already exists, OpenCTI updates and returns it.GraphQL operations of each action
Each operation matches the placeholder of the GraphQL Query or GraphQL Mutation field of the action.
Search Entities
query SearchEntities($search: String!, $first: Int, $types: [String]) {
  stixCoreObjects(search: $search, first: $first, types: $types) {
    edges {
      node {
        id
        standard_id
        entity_type
        representative {
          main
          secondary
        }
        created_at
        updated_at
        objectLabel {
          value
          color
        }
        createdBy {
          ... on Identity {
            name
          }
        }
      }
    }
  }
}
Search Observables
query SearchObservables($search: String!, $first: Int) {
  stixCyberObservables(search: $search, first: $first) {
    edges {
      node {
        id
        standard_id
        entity_type
        observable_value
        x_opencti_score
        x_opencti_description
        createdBy {
          ... on Identity {
            name
          }
        }
        objectLabel {
          value
          color
        }
        indicators {
          edges {
            node {
              id
              name
              pattern
              pattern_type
              indicator_types
              x_opencti_score
              confidence
              valid_from
              valid_until
              revoked
              killChainPhases {
                phase_name
              }
            }
          }
        }
      }
    }
  }
}
Search Indicators
query SearchIndicators($search: String!, $first: Int) {
  indicators(search: $search, first: $first) {
    edges {
      node {
        id
        standard_id
        name
        pattern
        pattern_type
        indicator_types
        x_opencti_score
        confidence
        valid_from
        valid_until
        revoked
        killChainPhases {
          phase_name
        }
        createdBy {
          ... on Identity {
            name
          }
        }
        objectLabel {
          value
          color
        }
      }
    }
  }
}
Search Relationships
query SearchRelationships($fromOrToId: [String], $relationship_type: [String], $first: Int) {
  stixCoreRelationships(
    fromOrToId: $fromOrToId
    relationship_type: $relationship_type
    first: $first
  ) {
    edges {
      node {
        id
        relationship_type
        confidence
        description
        start_time
        stop_time
        from {
          ... on StixCoreObject {
            id
            entity_type
          }
        }
        to {
          ... on StixCoreObject {
            id
            entity_type
          }
        }
      }
    }
  }
}
Get Observable
query GetObservable($id: String!) {
  stixCyberObservable(id: $id) {
    id
    standard_id
    entity_type
    observable_value
    x_opencti_score
    x_opencti_description
    created_at
    updated_at
    objectLabel {
      id
      value
      color
    }
    objectMarking {
      id
      definition
      definition_type
    }
    createdBy {
      ... on Identity {
        name
      }
    }
    indicators {
      edges {
        node {
          id
          name
          pattern
          valid_until
          revoked
        }
      }
    }
  }
}
Create Observable
mutation CreateObservable($type: String!, $value: String!, $x_opencti_score: Int, $createIndicator: Boolean, $objectLabel: [String], $objectMarking: [String]) {
  stixCyberObservableAdd(
    type: $type
    IPv4Addr: {value: $value}
    x_opencti_score: $x_opencti_score
    createIndicator: $createIndicator
    objectLabel: $objectLabel
    objectMarking: $objectMarking
  ) {
    id
    standard_id
    entity_type
    observable_value
  }
}
Update Observable Fields
mutation PatchObservable($id: ID!, $input: [EditInput]!) {
  stixCyberObservableEdit(id: $id) {
    fieldPatch(input: $input) {
      id
      observable_value
      x_opencti_score
      x_opencti_description
    }
  }
}
Promote Observable to Indicator
mutation PromoteObservable($id: ID!) {
  stixCyberObservableEdit(id: $id) {
    promoteToIndicator {
      id
      standard_id
      name
      pattern
      pattern_type
      valid_from
      valid_until
    }
  }
}
Delete Observable
mutation DeleteObservable($id: ID!) {
  stixCyberObservableEdit(id: $id) {
    delete
  }
}
Get Indicator
query GetIndicator($id: String!) {
  indicator(id: $id) {
    id
    standard_id
    name
    description
    pattern
    pattern_type
    indicator_types
    x_opencti_score
    confidence
    valid_from
    valid_until
    revoked
    created_at
    objectLabel {
      id
      value
      color
    }
    objectMarking {
      id
      definition
    }
    killChainPhases {
      kill_chain_name
      phase_name
    }
    createdBy {
      ... on Identity {
        name
      }
    }
    observables {
      edges {
        node {
          id
          entity_type
          observable_value
        }
      }
    }
  }
}
Create Indicator
mutation CreateIndicator($input: IndicatorAddInput!) {
  indicatorAdd(input: $input) {
    id
    standard_id
    name
    pattern
    valid_from
    valid_until
  }
}
Get Entity
query GetEntity($id: String!) {
  stixCoreObject(id: $id) {
    id
    standard_id
    entity_type
    representative {
      main
      secondary
    }
    created_at
    updated_at
    objectLabel {
      id
      value
      color
    }
    objectMarking {
      id
      definition
      definition_type
    }
    createdBy {
      ... on Identity {
        name
      }
    }
    externalReferences {
      edges {
        node {
          source_name
          url
          external_id
        }
      }
    }
    ... on StixCyberObservable {
      observable_value
    }
  }
}
Export Entity as STIX
query GetStix($id: String!) {
  stix(id: $id)
}
Delete Entity
mutation DeleteEntity($id: ID!) {
  stixCoreObjectEdit(id: $id) {
    delete
  }
}
Create Report
mutation CreateReport($input: ReportAddInput!) {
  reportAdd(input: $input) {
    id
    standard_id
    name
    published
  }
}
Create Incident
mutation CreateIncident($input: IncidentAddInput!) {
  incidentAdd(input: $input) {
    id
    standard_id
    name
    first_seen
  }
}
Create Incident Response Case
mutation CreateCaseIncident($input: CaseIncidentAddInput!) {
  caseIncidentAdd(input: $input) {
    id
    standard_id
    name
    created
  }
}
Add Entity to Container
mutation AddToContainer($id: ID!, $input: StixRefRelationshipAddInput!) {
  containerEdit(id: $id) {
    relationAdd(input: $input) {
      id
    }
  }
}
Create Relationship
mutation CreateRelationship($input: StixCoreRelationshipAddInput) {
  stixCoreRelationshipAdd(input: $input) {
    id
    relationship_type
    start_time
    stop_time
  }
}
Create Sighting
mutation CreateSighting($input: StixSightingRelationshipAddInput!) {
  stixSightingRelationshipAdd(input: $input) {
    id
    first_seen
    last_seen
    attribute_count
  }
}
List Labels
query ListLabels($search: String, $first: Int) {
  labels(search: $search, first: $first) {
    edges {
      node {
        id
        value
        color
      }
    }
  }
}
Create Label
mutation CreateLabel($input: LabelAddInput!) {
  labelAdd(input: $input) {
    id
    value
    color
  }
}
Add Label to Entity
mutation AddLabel($id: ID!, $input: StixRefRelationshipAddInput!) {
  stixCoreObjectEdit(id: $id) {
    relationAdd(input: $input) {
      id
    }
  }
}
List Marking Definitions
query ListMarkings($first: Int) {
  markingDefinitions(first: $first) {
    edges {
      node {
        id
        definition_type
        definition
        x_opencti_order
        x_opencti_color
      }
    }
  }
}
Add Marking to Entity
mutation AddMarking($id: ID!, $input: StixRefRelationshipAddInput!) {
  stixCoreObjectEdit(id: $id) {
    relationAdd(input: $input) {
      id
    }
  }
}
Add Note to Entity
mutation CreateNote($input: NoteAddInput!) {
  noteAdd(input: $input) {
    id
    standard_id
    attribute_abstract
    content
    created
  }
}
List Connectors
query ListConnectors {
  connectors {
    id
    name
    active
    auto
    connector_type
    connector_scope
    connector_state
    updated_at
  }
}
List Enrichment Connectors for Type
query EnrichmentConnectors($type: String!) {
  enrichmentConnectors(type: $type) {
    id
    name
    active
    connector_scope
  }
}
Ask Enrichment
mutation AskEnrichment($id: ID!, $connectorId: ID!) {
  stixCoreObjectEdit(id: $id) {
    askEnrichment(connectorId: $connectorId) {
      id
      name
      status
    }
  }
}
Introspect Types
query IntrospectType($name: String!) {
  __type(name: $name) {
    name
    kind
    fields(includeDeprecated: false) {
      name
      type {
        name
        kind
        ofType {
          name
          kind
        }
      }
    }
  }
}
Get Relationship Mapping
query RelationshipsMapping {
  schemaRelationsTypesMapping {
    key
    values
  }
}
Who Am I
query Me {
  me {
    id
    name
    user_email
    firstname
    lastname
    capabilities {
      name
    }
    objectOrganization {
      edges {
        node {
          id
          name
        }
      }
    }
  }
}
Get Platform Info
query About {
  about {
    version
    dependencies {
      name
      version
    }
  }
}
Failed operations return a 200 status code
OpenCTI answers a failed GraphQL operation, for example because of an invalid token, an invalid input, or a missing right, with a
200status code and anerrorsarray in the response body. The node then succeeds. Checkbody.errorsin a later node, for example with an If flow node.- Editor mode
For actions that send a request body, select how to provide it:
- Form: Fill in one field per body parameter.
- Raw: Provide the whole request body in the Request body (raw) field.
- Query parameters
Query parameters sent with the request, entered as key-value pairs. Select to add a parameter. This section appears only for actions that accept query parameters.
-
Optional: Configure the following settings.
- Proxy
Configure how the node connects to the external service when a proxy is required.
Select a Proxy mode:
-
Do not use a proxy: No proxy is applied. All requests are sent directly. This is the default.
-
Use the platform default proxy configuration: Uses the global proxy settings defined in TheHive
application.conf. See proxy configuration in TheHive. -
Configure a custom proxy: Defines a custom proxy for this node, overriding the global configuration.
When Proxy mode is Configure a custom proxy, provide the following information:
Field Example Protocol httpsAddress * proxy.example.comPort 8080Username $global.proxy_userPassword $secret.proxy_password- SSL/TLS
Configure SSL/TLS settings for secure communication with the external service.
Use this section when the service relies on a private certificate authority (CA), requires client certificate authentication through mutual TLS, or uses a non-standard trust chain.
Field Description Client certificate (mTLS) Whether the node authenticates with a client certificate (mutual TLS). Do not use a client certificate is the default. Select Provide a client certificate and key to fill in the two fields below. Client certificate (PEM) The client certificate to present during the SSL/TLS handshake, in PEM format. Required when Client certificate (mTLS) is Provide a client certificate and key. Client certificate key (PEM) The private key associated with the client certificate, in PEM format. Required when Client certificate (mTLS) is Provide a client certificate and key. Server verification How the node verifies the identity of the server. Uses the system's pre-installed certificate authorities is the default. Provide a custom CA certificate to verify the server uses the certificate in the next field. Do not verify the server's identity (not recommended for production) exposes the connection to security risks. CA certificate (PEM) The CA certificate used to verify the identity of the server, in PEM format. Required when Server verification is set to Provide a custom CA certificate to verify the server. - Error handling
Configure whether the node fails on error responses.
By default, the node fails when the response returns a
4xxor5xxerror status code. Turn on Ignore error status codes to make the node succeed regardless of the response status code. Then handle errors in the workflow, for example with an If flow node evaluating thecodeoutput. Error responses aren't retried when the option is on.Two cases still fail the node:
- A transport failure, such as a DNS, connection, TLS, or timeout error. The node sets no output.
- A response announced as JSON that can't be parsed. The node sets the
codeandheadersoutputs but nobody, and isn't retried.
When Ignore error status codes is off, the node retries a
408,429, or5xxresponse up to the number of times set in Retry attempts. Any other4xxresponse fails the node immediately, without retrying. When the called service includes aRetry-Afterheader in its response, the node waits that long before the next attempt, up to a maximum of 5 minutes. This wait replaces the delay set by Retry delay and Backoff. -
-
Optional: Select Add options to configure the following settings.
- Timeout & retry
Configure how the node handles execution time limits and failure recovery.
If the timeout is reached, the node fails.
Global timeout vs. local timeout
A timeout for the entire workflow is defined when creating the workflow. When both a node timeout and a workflow-level timeout are defined, the shortest timeout value applies.
Field Description Timeout Maximum allowed execution time for the node, in seconds, minutes, or hours. The minimum value is 30 seconds. Retry attempts Number of times the node is retried on failure. Retry delay Time to wait between retry attempts, in seconds, minutes, or hours. Without a delay, retries run 1 second apart by default. Backoff Coefficient applied to the retry delay to increase the wait time after each failed attempt. Retries and timeouts
If the node includes retry settings, the timeout applies to each attempt, not to the total duration of all attempts.
Each request the node sends stops after 30 seconds, even when the node timeout is longer or not set. A response body larger than 10 MiB, the default limit an administrator can change, fails the node without a retry.
- Execution configuration
Set the Execution mode to control how the node behaves when several branches converge on it.
Mode Behavior Execute once per branch The node runs once for each incoming branch. Applies when this section isn't configured. Wait for all branches The node waits for all incoming branches to complete, then runs once.
Execution outputs
When executed, the node returns the following outputs. Each output is a JSON value:
| Output | Type | Description |
|---|---|---|
body |
object | The response body returned by OpenCTI. |
code |
number | The HTTP status code returned by OpenCTI. |
headers |
object | The response headers returned by OpenCTI. |
To access outputs, select your OpenCTI node and then select in the top-right corner of the screen. Hover over each output name to view its details.
You can then reuse these outputs as output variables in subsequent nodes. Select the $var button, or enter $ and select the output from the suggestions. Inserted references appear in the following form:
$<node_name>.body.<field_name>: to get a value from the response body. A GraphQL response holds its result in adatafield and its errors in anerrorsfield.$<node_name>.code: to get the HTTP status code$<node_name>.headers.<header_name>: to get a specific response header
Configure a Wazuh integration node#
A Wazuh integration node runs operations against the Wazuh server API. It can list, add, restart, and delete agents, assign agents to groups, run active responses, and run file integrity monitoring scans. It can also read file integrity monitoring findings, security configuration assessment results, rules, CDB lists, manager status and logs, and task status. Each operation is a dedicated action selected within the node.
-
Go to the Flow view from the sidebar menu.
-
Select a workflow from the list.
-
Drag the previous node connector to an empty area of the canvas.
-
In the What is the next step? drawer, select Integrations.
-
Select Wazuh.
-
In the Wazuh drawer, enter the following information:
Variables
Insert a variable with the $var button, or enter
$and select a variable from the suggestions. To access a field, select the variable to edit its jq expression, or use the + button to insert the variable and the field together.Inside the expression, jq functions transform the value before it's inserted in the field. The whole expression stays inside the blue reference, for example:
$<node_name>.body.results[0].id: Reads the first identifier of an API response.$<node_name>.body.items | map(.name) | join(", "): Turns a list of objects into a comma-separated text.$<node_name>.body.createdAt / 1000 | todate: Formats a TheHive date, a Unix timestamp in milliseconds, as an ISO 8601 date.$<node_name>.output.title | ascii_upcase: Converts a text to uppercase.
See Jq Functions for the full list of available functions.
Fields marked with * are mandatory.
- Base URL *
The URL of your Wazuh server API, for example
https://<wazuh_server>:55000.- Authentication *
In the Authentication section, select the Authentication method and provide its credentials. The Wazuh node supports two methods:
Authentication method Fields basic_auth Username *, Password bearer_token Bearer token * The Wazuh server API accepts a username and password only to issue a token. Use basic_auth with the Authenticate action, and bearer_token with every other action. In the Bearer token field, insert the
body.data.tokenoutput of the Authenticate node with the $var button. By default, a token expires after 900 seconds. Reference secret global variables instead of pasting credentials directly.- Headers
Extra headers added to every request sent by the node. Select to add a header key and its value.
Header values are stored in plaintext
Header values appear in plaintext in the workflow execution history. Reference a secret global variable instead of pasting a credential directly.
- Action *
The operation to perform in Wazuh. Available actions:
Family Actions Authentication Authenticate Agents List Agents, Add Agent, Insert Agent with ID and Key, Delete Agents, Get Agent Key, Restart Agent, Get Agents Status Summary, Assign Agent to Group Active Response Run Active Response File Integrity Monitoring Get FIM Findings, Run FIM Scan Security Configuration Assessment Get SCA Results, Get SCA Policy Checks Rules Get Rules CDB Lists Get CDB Lists, Get CDB List File Manager Get Manager Status, Get Manager Logs Tasks List Tasks Status After you select an action, the drawer displays the fields specific to that action. For the meaning and format of each field, see the Wazuh server API reference.
The Run Active Response action
The Command field takes the name of a command declared in a
<command>block of the managerossec.conffile. To call an active response script by its file name instead, prefix it with!, for example!firewall-drop. Enter the target IP address in the Source IP field forfirewall-drop,host-deny,route-null, andnetsh, and the target user account in the Target User field fordisable-account.Failures on agents return a 200 status code
Delete Agents, Restart Agent, Run Active Response, and Run FIM Scan return a
200status code even when the operation fails for some or all agents. Checkbody.errorin a later node:0means done,1failed, and2partial. The agents the operation failed on are listed inbody.data.failed_items.- Editor mode
For actions that send a request body, select how to provide it:
- Form: Fill in one field per body parameter.
- Raw: Provide the whole request body in the Request body (raw) field.
- Query parameters
Query parameters sent with the request, entered as key-value pairs. Select to add a parameter. This section appears only for actions that accept query parameters.
The following actions require query parameters. Add each one with the name listed, or the node fails:
- Delete Agents:
agents_listandstatus - Run Active Response:
agents_list
agents_listtakes a comma-separated list of agent IDs, such as003,004. Without it, Run Active Response would run the command on every agent. -
Optional: Configure the following settings.
- Proxy
Configure how the node connects to the external service when a proxy is required.
Select a Proxy mode:
-
Do not use a proxy: No proxy is applied. All requests are sent directly. This is the default.
-
Use the platform default proxy configuration: Uses the global proxy settings defined in TheHive
application.conf. See proxy configuration in TheHive. -
Configure a custom proxy: Defines a custom proxy for this node, overriding the global configuration.
When Proxy mode is Configure a custom proxy, provide the following information:
Field Example Protocol httpsAddress * proxy.example.comPort 8080Username $global.proxy_userPassword $secret.proxy_password- SSL/TLS
Configure SSL/TLS settings for secure communication with the external service.
Use this section when the service relies on a private certificate authority (CA), requires client certificate authentication through mutual TLS, or uses a non-standard trust chain.
Field Description Client certificate (mTLS) Whether the node authenticates with a client certificate (mutual TLS). Do not use a client certificate is the default. Select Provide a client certificate and key to fill in the two fields below. Client certificate (PEM) The client certificate to present during the SSL/TLS handshake, in PEM format. Required when Client certificate (mTLS) is Provide a client certificate and key. Client certificate key (PEM) The private key associated with the client certificate, in PEM format. Required when Client certificate (mTLS) is Provide a client certificate and key. Server verification How the node verifies the identity of the server. Uses the system's pre-installed certificate authorities is the default. Provide a custom CA certificate to verify the server uses the certificate in the next field. Do not verify the server's identity (not recommended for production) exposes the connection to security risks. CA certificate (PEM) The CA certificate used to verify the identity of the server, in PEM format. Required when Server verification is set to Provide a custom CA certificate to verify the server. - Error handling
Configure whether the node fails on error responses.
By default, the node fails when the response returns a
4xxor5xxerror status code. Turn on Ignore error status codes to make the node succeed regardless of the response status code. Then handle errors in the workflow, for example with an If flow node evaluating thecodeoutput. Error responses aren't retried when the option is on.Two cases still fail the node:
- A transport failure, such as a DNS, connection, TLS, or timeout error. The node sets no output.
- A response announced as JSON that can't be parsed. The node sets the
codeandheadersoutputs but nobody, and isn't retried.
When Ignore error status codes is off, the node retries a
408,429, or5xxresponse up to the number of times set in Retry attempts. Any other4xxresponse fails the node immediately, without retrying. When the called service includes aRetry-Afterheader in its response, the node waits that long before the next attempt, up to a maximum of 5 minutes. This wait replaces the delay set by Retry delay and Backoff. -
-
Optional: Select Add options to configure the following settings.
- Timeout & retry
Configure how the node handles execution time limits and failure recovery.
If the timeout is reached, the node fails.
Global timeout vs. local timeout
A timeout for the entire workflow is defined when creating the workflow. When both a node timeout and a workflow-level timeout are defined, the shortest timeout value applies.
Field Description Timeout Maximum allowed execution time for the node, in seconds, minutes, or hours. The minimum value is 30 seconds. Retry attempts Number of times the node is retried on failure. Retry delay Time to wait between retry attempts, in seconds, minutes, or hours. Without a delay, retries run 1 second apart by default. Backoff Coefficient applied to the retry delay to increase the wait time after each failed attempt. Retries and timeouts
If the node includes retry settings, the timeout applies to each attempt, not to the total duration of all attempts.
Each request the node sends stops after 30 seconds, even when the node timeout is longer or not set. A response body larger than 10 MiB, the default limit an administrator can change, fails the node without a retry.
- Execution configuration
Set the Execution mode to control how the node behaves when several branches converge on it.
Mode Behavior Execute once per branch The node runs once for each incoming branch. Applies when this section isn't configured. Wait for all branches The node waits for all incoming branches to complete, then runs once.
Execution outputs
When executed, the node returns the following outputs. Each output is a JSON value:
| Output | Type | Description |
|---|---|---|
body |
object | The response body returned by Wazuh. |
code |
number | The HTTP status code returned by Wazuh. |
headers |
object | The response headers returned by Wazuh. |
To access outputs, select your Wazuh node and then select in the top-right corner of the screen. Hover over each output name to view its details.
You can then reuse these outputs as output variables in subsequent nodes. Select the $var button, or enter $ and select the output from the suggestions. Inserted references appear in the following form:
$<node_name>.body.<field_name>: to get a value from the response body. Wazuh wraps the result in adatafield, for example$<node_name>.body.data.tokenfor the token returned by Authenticate.$<node_name>.code: to get the HTTP status code$<node_name>.headers.<header_name>: to get a specific response header