Configure an Action Node#
6.0 One
Action nodes perform operations that interact with TheHive or external systems in TheHive Flow. They produce the workflow output by making changes in the environment or triggering downstream processes.
Configure an HTTP request action node#
An HTTP request action node sends HTTP requests to any API accessible from your TheHive instance:
- ITSM tools
- Threat intelligence platforms
- Cloud services
- Another TheHive Flow workflow with its Webhook trigger
- TheHive API, for endpoints not covered by the TheHive integration node
Working with TheHive
To create, update, or query objects in TheHive, use the TheHive integration node, which exposes TheHive operations directly. Use an HTTP request node for TheHive API endpoints that the TheHive node doesn't cover, or for any other external API.
Targets on a private network
An HTTP request node can't reach non-public addresses, such as private, loopback, or link-local ranges: the step fails with an egress guard error. An administrator must first add the target range to the egress allowlist.
-
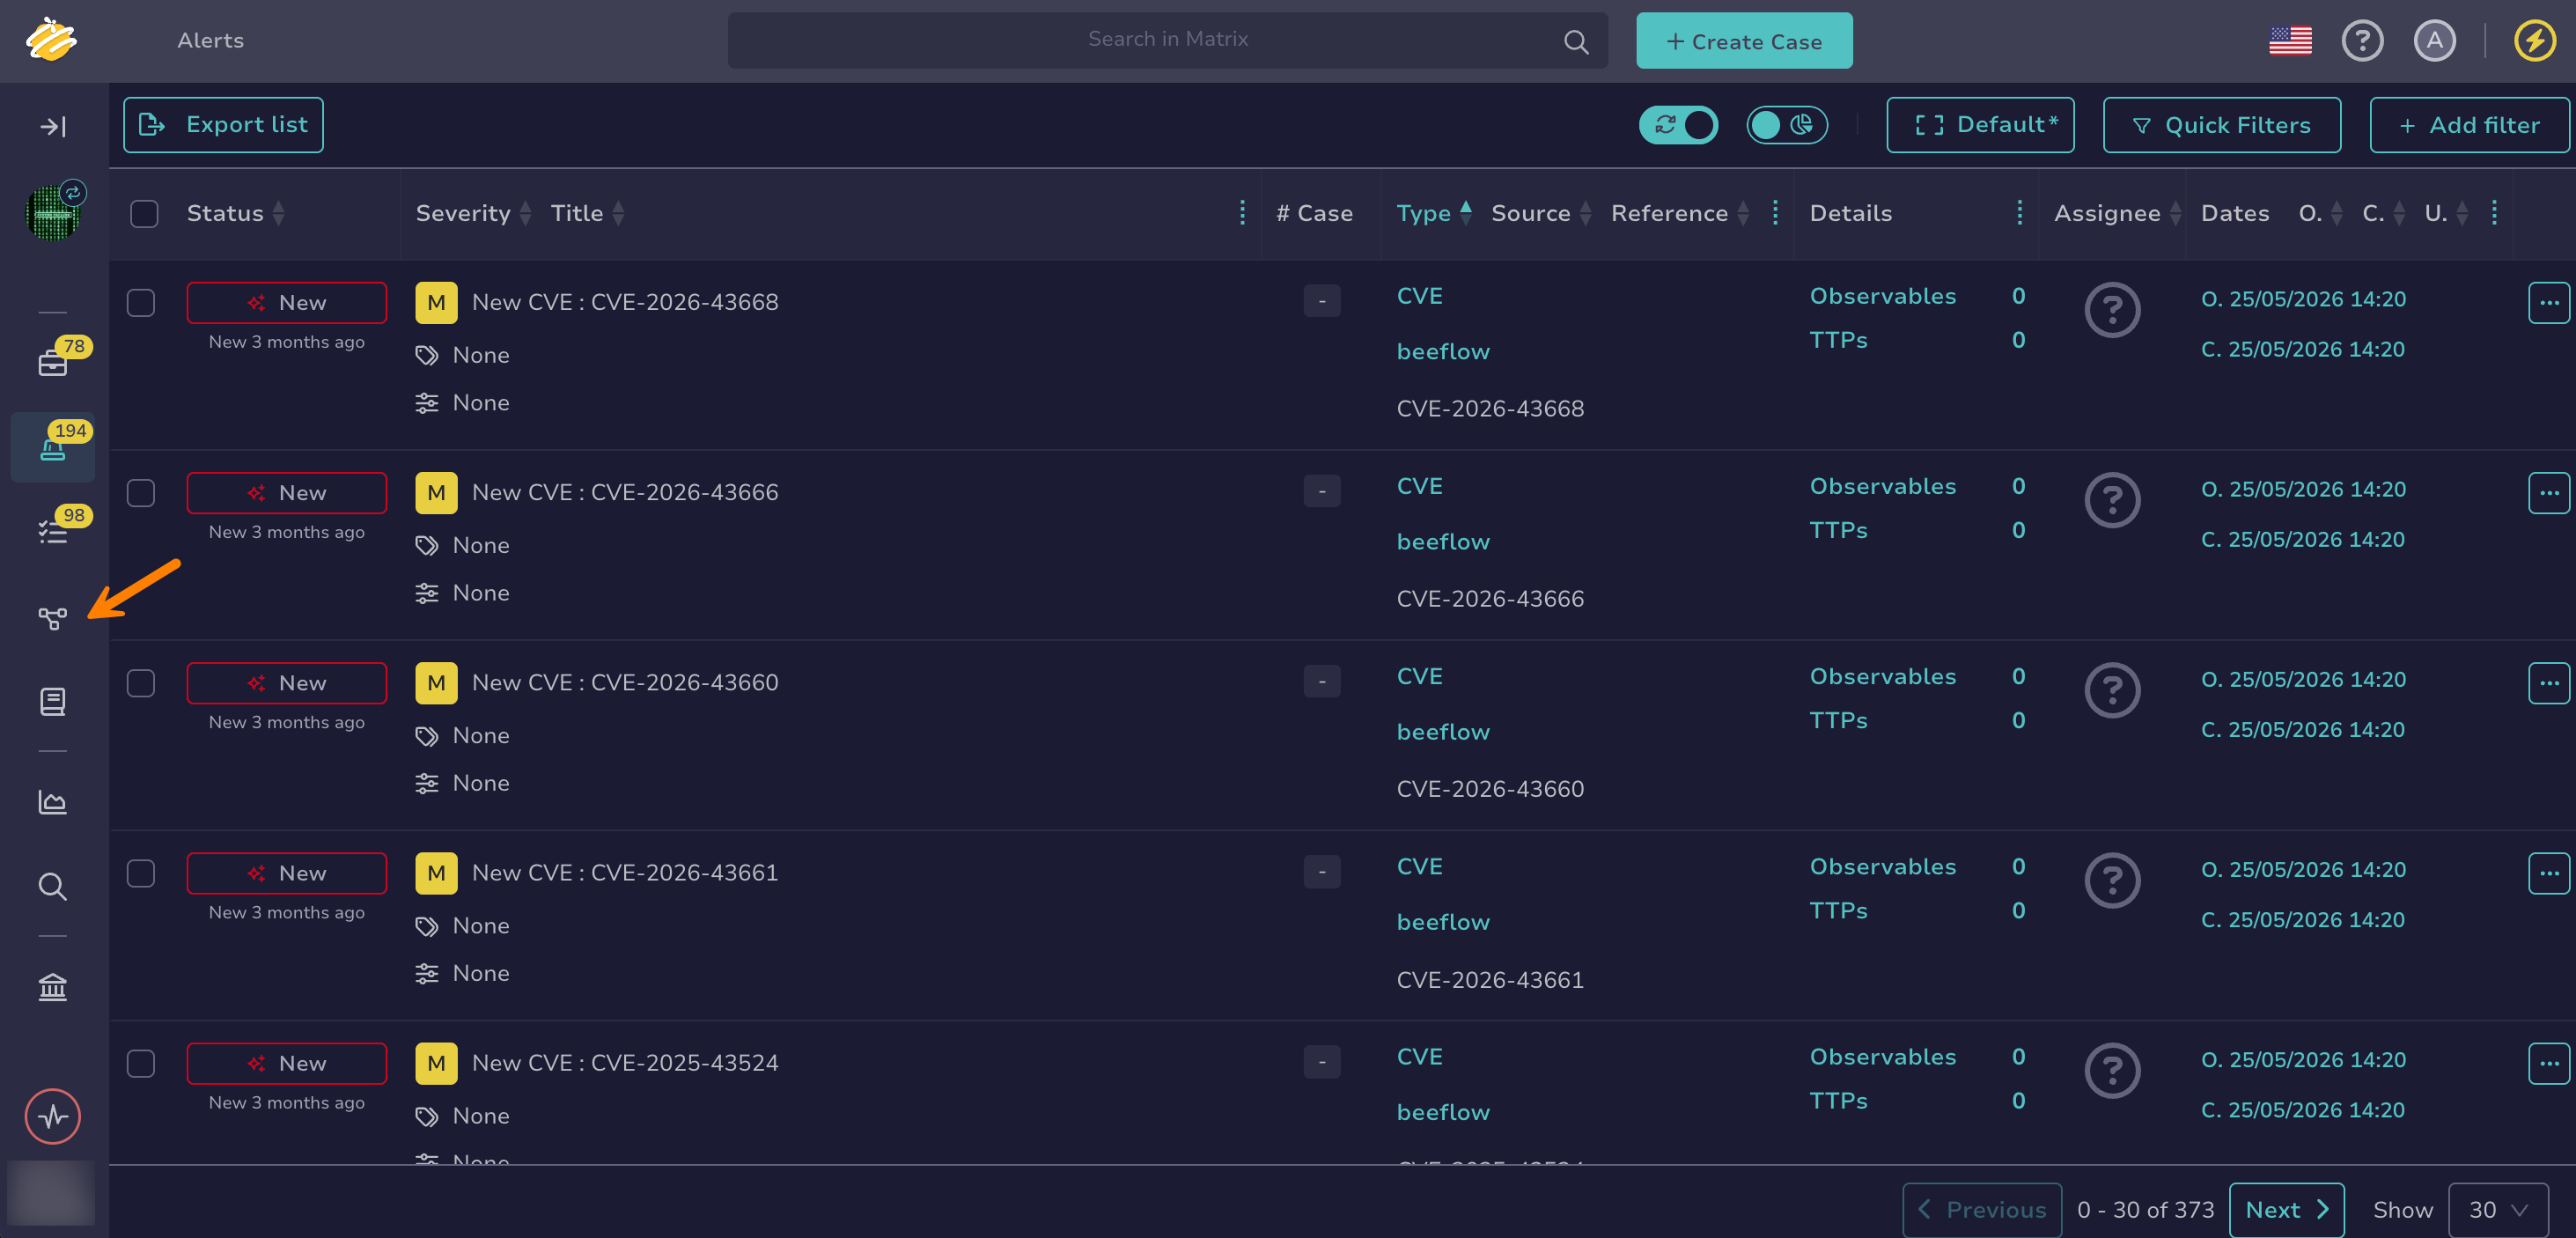
Go to the Flow view from the sidebar menu.
-
Select a workflow from the list.
-
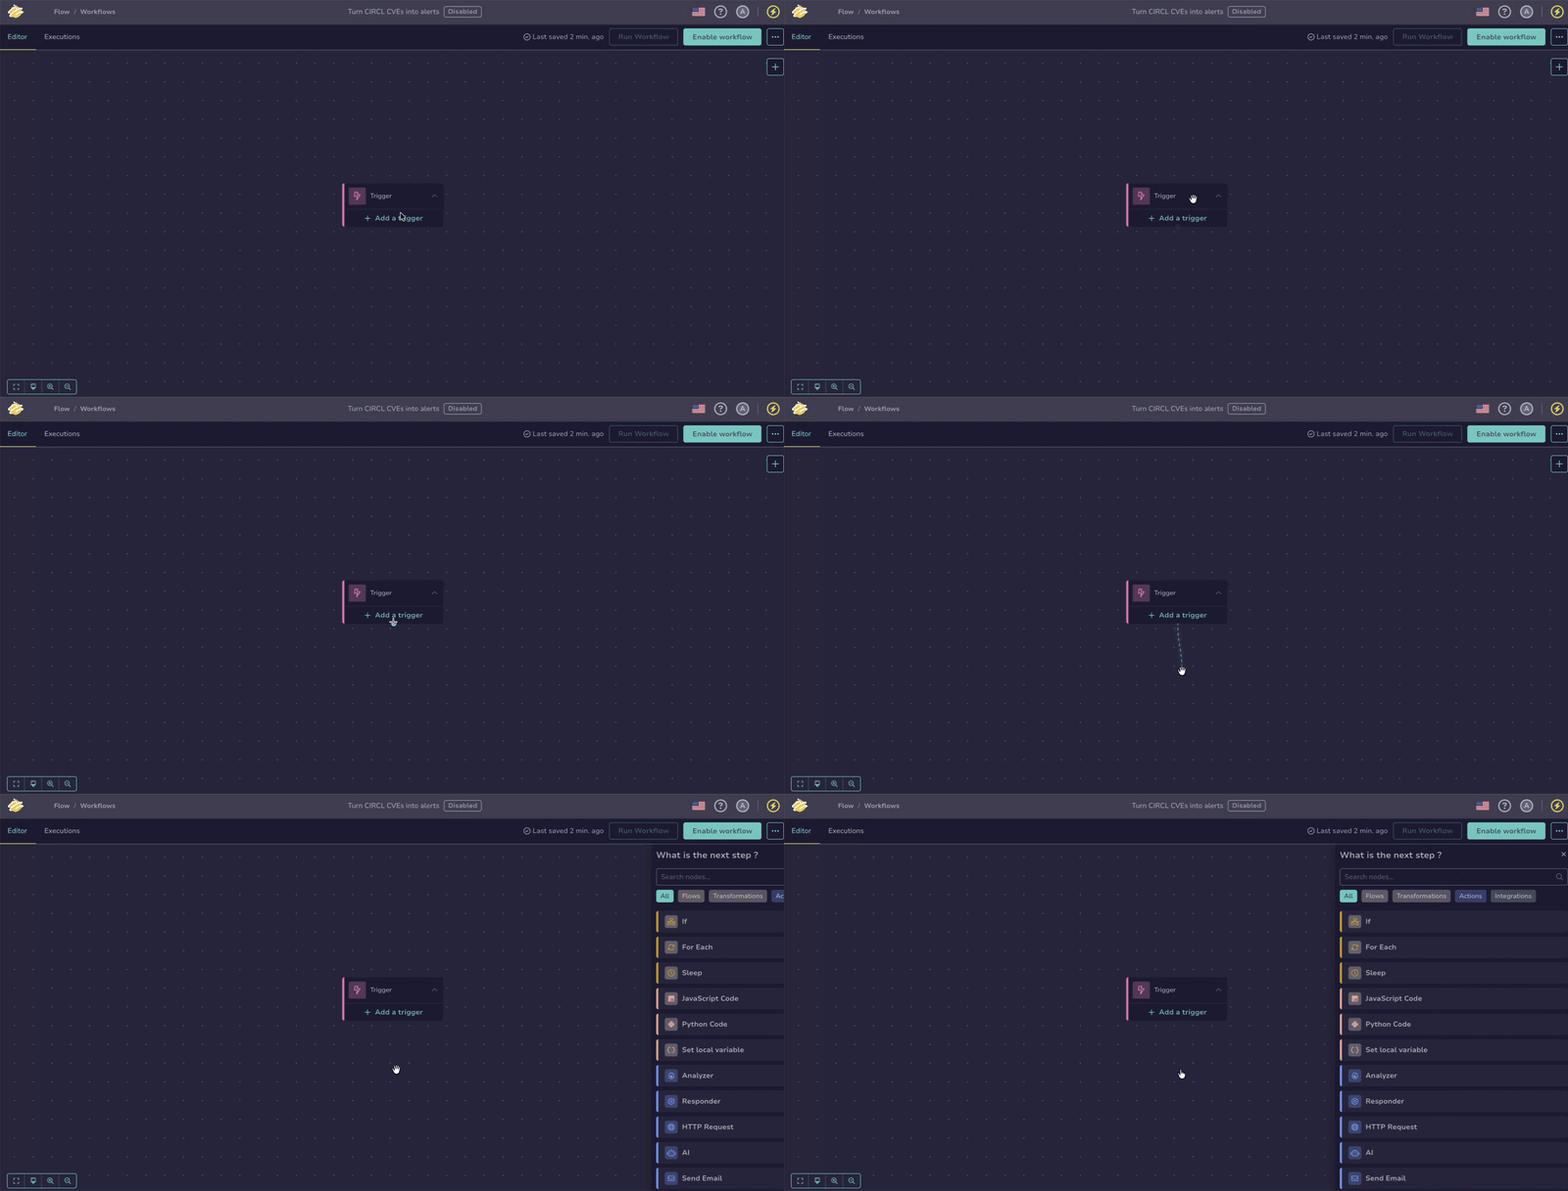
Drag the previous node connector to an empty area of the canvas.
-
In the What is the next step? drawer, select Actions.
-
Select HTTP request.
-
In the HTTP request drawer, enter the following information:
Variables
Insert a variable with the $var button, or enter
$and select a variable from the suggestions. To access a field, select the variable to edit its jq expression, or use the + button to insert the variable and the field together.Inside the expression, jq functions transform the value before it's inserted in the field. The whole expression stays inside the blue reference, for example:
$<node_name>.body.results[0].id: Reads the first identifier of an API response.$<node_name>.body.items | map(.name) | join(", "): Turns a list of objects into a comma-separated text.$<node_name>.body.createdAt / 1000 | todate: Formats a TheHive date, a Unix timestamp in milliseconds, as an ISO 8601 date.$<node_name>.output.title | ascii_upcase: Converts a text to uppercase.
See Jq Functions for the full list of available functions.
Fields marked with * are mandatory.
- Method *
The HTTP method used for the request.
- URL *
The full endpoint URL.
Examples:
https://<thehive_host>/api/v1/userhttps://api.abuseipdb.com/api/v2/check?ipAddress=<ip_address>
- Headers
Select in the Headers section to add headers.
Enter a header key and its corresponding value to include in the HTTP request. Use headers to define content types, expected response formats, or to include custom metadata required by the external system.- Body
Variables
Insert a variable with the $var button, or enter
$and select a variable from the suggestions. To access a field, select the variable to edit its jq expression, or use the + button to insert the variable and the field together.Inside the expression, jq functions transform the value before it's inserted in the field. The whole expression stays inside the blue reference, for example:
$<node_name>.body.results[0].id: Reads the first identifier of an API response.$<node_name>.body.items | map(.name) | join(", "): Turns a list of objects into a comma-separated text.$<node_name>.body.createdAt / 1000 | todate: Formats a TheHive date, a Unix timestamp in milliseconds, as an ISO 8601 date.$<node_name>.output.title | ascii_upcase: Converts a text to uppercase.
See Jq Functions for the full list of available functions.
The request body. Available for the
POST,PUT,PATCH, andDELETEmethods.- Multipart parts
Key-value pairs sent as a
multipart/form-datarequest, one part per pair. Leave Body empty when using this field. The node streams a value that's a file reference as a file part, and sends any other value as a plain form field. Available for thePOST,PUT,PATCH, andDELETEmethods. -
Optional: Select Add options to configure the following settings.
- Authentication
Configure how the node authenticates when calling the target API.
Calling TheHive API
If the HTTP request targets TheHive itself, make sure your TheHive authentication settings are compatible with the method you select in this node.
Supported methods:
-
None: No authentication is added to the request.
-
Basic auth: Sends a username and password encoded in the
Authorizationheader using the HTTP Basic scheme.
Field Example Username * emma@example.comPassword * $secret.api_password- Bearer token: Sends an access token in the
Authorizationheader using the Bearer scheme.
Field Example Token * $secret.api_token- OAuth 2.0: Authenticates with an access token, provided directly or obtained by exchanging a refresh token.
Field With an access token With a refresh token Example Client ID Not used Required $global.oauth_client_idClient secret Not used Optional, for a confidential client $secret.oauth_client_secretAccess token Required Not used $secret.oauth_access_tokenRefresh token Not used Required $secret.oauth_refresh_tokenToken URL Not used Required https://auth.example.com/oauth/tokenAccess token or refresh token
An access token is the short-lived key sent with each call to the service. A refresh token only serves to get new access tokens, and not every provider issues one.
- Access token: Never renewed. Once it expires, calls fail until it's replaced. Suits a quick test.
- Refresh token: Each node execution gets a fresh access token. Suits a workflow that runs over time. A new refresh token sent back by the provider isn't saved, so a provider that accepts each refresh token only once rejects the next execution.
The form also shows Authorization URL and Token scopes, which have no effect: leave them empty.
- Proxy
Configure how the node connects to external services when a proxy is required.
Nodes support three modes:
-
Disabled: No proxy is applied. All requests are sent directly.
-
Default: Uses the global proxy settings defined in TheHive
application.conf. See proxy configuration in TheHive. -
Enabled: Defines a custom proxy for this node, overriding the global configuration.
Field Example Protocol httpsAddress * proxy.example.comPort 8080Proxy username $global.proxy_userProxy password $secret.proxy_passwordProtocol defaults to
https, and Port defaults to8080.A custom proxy on a non-public address must first be added to the egress allowlist.
- SSL
Configure SSL settings for secure SSL/TLS communication with external services.
Use this section when the external service relies on a private certificate authority (CA), requires client certificate authentication through mutual TLS, or uses a non-standard trust chain.
Field Description Client certificate (mTLS) Turn on to authenticate with a client certificate (mutual TLS). Turned off by default. SSL key (PEM) The private key associated with the client certificate, in PEM format. Required only when Client certificate (mTLS) is turned on. SSL certificate (PEM) The client certificate to present during the SSL/TLS handshake, in PEM format. Required only when Client certificate (mTLS) is turned on. Certificate Authorities Server certificate verification mode. Default: uses the system's pre-installed certificate authorities. Custom: provide a CA certificate to verify the server. Disabled: skips server identity verification. Not recommended in production, as it exposes the connection to security risks. SSL CA certificate (PEM) The CA certificate used to verify the server's identity, in PEM format. Required only when Certificate Authorities is set to Custom. - Request timeout
Maximum time for the HTTP call itself. When a node timeout is also set in Timeout & retry, the shorter of the two applies. The value can't exceed the node timeout or the workflow timeout. The node retries when it reaches the node timeout and retries are configured, but not when it reaches the request timeout.
- Timeout & retry
Configure how the node handles execution time limits and failure recovery.
If the timeout is reached, the node fails.
Global timeout vs. local timeout
A timeout for the entire workflow is defined when creating the workflow. When both a node timeout and a workflow-level timeout are defined, the shortest timeout value applies.
Field Description Timeout Maximum allowed execution time for the node, in seconds, minutes, or hours. The minimum value is 30 seconds. Retry attempts Number of times the node is retried on failure. Retry delay Time to wait between retry attempts, in seconds, minutes, or hours. Without a delay, retries run 1 second apart by default. Backoff Coefficient applied to the retry delay to increase the wait time after each failed attempt. Retries and timeouts
If the node includes retry settings, the timeout applies to each attempt, not to the total duration of all attempts.
Even without a node timeout, the HTTP call itself stops after the Request timeout, 30 seconds by default.
- Execution configuration
Set the Execution mode to control how the node behaves when several branches converge on it.
Mode Behavior Execute once per branch The node runs once for each incoming branch. Applies when this section isn't configured. Wait for all branches The node waits for all incoming branches to complete, then runs once. -
-
Optional: Turn on Ignore HTTP errors to make the node succeed regardless of the response status code.
By default, the node fails when the response returns a
4xxor5xxerror status code. With the option on, handle errors in the workflow, for example with an If flow node evaluating thecodeoutput.Two cases still fail the node:
- A transport failure, such as a DNS, connection, TLS, or timeout error. The node sets no output.
- A response announced as JSON that can't be parsed. The node sets the
codeandheadersoutputs but nobody, and doesn't retry.
When Ignore HTTP errors is off, the node retries a
408,429, or5xxresponse up to the number of times set in Retry attempts, under Timeout & retry. Any other4xxresponse fails the node immediately, without retrying. When the called service includes aRetry-Afterheader in its response, the node waits that long before the next attempt, up to a maximum of 5 minutes. This wait replaces the delay set by Retry delay and Backoff.
Execution outputs
When executed, the node returns the following outputs. Each output is a JSON value:
| Output | Type | Description |
|---|---|---|
body |
any | The response body returned by the target API. The node parses a response with a JSON content type to its value, and returns any other response as text. Not set for a multipart response: use parts instead. |
code |
number | The HTTP status code returned by the server. |
headers |
object | The response headers returned by the server. |
parts |
object | The parts of a multipart response body, keyed by part name. Each part carries its filename, content_type, size, and content. Empty when the response isn't multipart. |
A body that is large or binary, and a part content that is large or not JSON, are stored as files and returned as file references. A part stored as a file also carries a sha256sum field, and a part name reused across parts is suffixed with _2, _3, and so on.
To access outputs, select your HTTP request node and then select in the top-right corner of the screen. Hover over each output name to view its details.
These outputs can then be reused as output variables in subsequent nodes, using the $var button or by entering $ and selecting the output from the suggestions. Inserted references are displayed in the following form:
$<node_name>.body.<field_name>: to get a nested value from the response body$<node_name>.code: to get the HTTP status code, for example to check whether the request succeeded$<node_name>.headers.<header_name>: to get a specific response header$<node_name>.parts.<part_name>.content: to get the content of one part of a multipart response
Configure a Send email action node#
A Send email action node sends an email using the SMTP configuration defined in TheHive, unless TheHive Flow has an email server override.
Prerequisite
Before using a Send email action node, you must configure an SMTP server in TheHive or set an email server override. The node can't send emails without a working SMTP configuration.
-
Go to the Flow view from the sidebar menu.
-
Select a workflow from the list.
-
Drag the previous node connector to an empty area of the canvas.
-
In the What is the next step? drawer, select Actions.
-
Select Send email.
-
In the Send email drawer, enter the following information:
Variables
Insert a variable with the $var button, or enter
$and select a variable from the suggestions. To access a field, select the variable to edit its jq expression, or use the + button to insert the variable and the field together.Inside the expression, jq functions transform the value before it's inserted in the field. The whole expression stays inside the blue reference, for example:
$<node_name>.body.results[0].id: Reads the first identifier of an API response.$<node_name>.body.items | map(.name) | join(", "): Turns a list of objects into a comma-separated text.$<node_name>.body.createdAt / 1000 | todate: Formats a TheHive date, a Unix timestamp in milliseconds, as an ISO 8601 date.$<node_name>.output.title | ascii_upcase: Converts a text to uppercase.
See Jq Functions for the full list of available functions.
Fields marked with * are mandatory.
- From *
The email address used as the sender.
- To *
One or more recipient addresses, separated by commas.
- Cc
Additional recipients.
- Bcc
Hidden recipients.
- Subject
The email subject.
- Body format
Select how the message body is sent:
- Text
- HTML
- Both: Sends both versions. This is the default, and it's recommended for maximum compatibility with email clients.
- Text body
The plain text content of the email.
- HTML body
The HTML content of the email.
-
Optional: Select Add options to configure the following settings.
- Timeout & retry
Configure how the node handles execution time limits and failure recovery.
If the timeout is reached, the node fails.
Global timeout vs. local timeout
A timeout for the entire workflow is defined when creating the workflow. When both a node timeout and a workflow-level timeout are defined, the shortest timeout value applies.
Field Description Timeout Maximum allowed execution time for the node, in seconds, minutes, or hours. The minimum value is 30 seconds. Retry attempts Number of times the node is retried on failure. Retry delay Time to wait between retry attempts, in seconds, minutes, or hours. Without a delay, retries run 1 second apart by default. Backoff Coefficient applied to the retry delay to increase the wait time after each failed attempt. Retries and timeouts
If the node includes retry settings, the timeout applies to each attempt, not to the total duration of all attempts.
- Execution configuration
Set the Execution mode to control how the node behaves when several branches converge on it.
Mode Behavior Execute once per branch The node runs once for each incoming branch. Applies when this section isn't configured. Wait for all branches The node waits for all incoming branches to complete, then runs once.
Configure an Analyzer action node#
An Analyzer action node triggers a Cortex analyzer on a specific observable and makes the resulting report available as an output variable for use in subsequent workflow steps.
Prerequisite
To use an Analyzer action node, a Cortex server must already be connected to TheHive. If no Cortex instance is configured, follow the instructions in Add a Cortex Server before proceeding.
-
Go to the Flow view from the sidebar menu.
-
Select a workflow from the list.
-
Drag the previous node connector to an empty area of the canvas.
-
In the What is the next step? drawer, select Actions.
-
Select Analyzer.
-
In the Analyzer drawer, enter the following information:
Variables
Insert a variable with the $var button, or enter
$and select a variable from the suggestions. To access a field, select the variable to edit its jq expression, or use the + button to insert the variable and the field together.Inside the expression, jq functions transform the value before it's inserted in the field. The whole expression stays inside the blue reference, for example:
$<node_name>.body.results[0].id: Reads the first identifier of an API response.$<node_name>.body.items | map(.name) | join(", "): Turns a list of objects into a comma-separated text.$<node_name>.body.createdAt / 1000 | todate: Formats a TheHive date, a Unix timestamp in milliseconds, as an ISO 8601 date.$<node_name>.output.title | ascii_upcase: Converts a text to uppercase.
See Jq Functions for the full list of available functions.
Fields marked with * are mandatory.
- Observable type *
The type of observable to analyze. Two input modes are available:
- Form: Select the type from a list.
- Raw: Provide the type with a variable, when it's only known at runtime from a previous node's output.
- Observable ID *
The identifier of the observable to analyze.
- Analyzer *
Select the Cortex analyzer to run.
The list shows only analyzers compatible with the selected observable type. Cortex checks the Traffic Light Protocol (TLP) and Permissible Actions Protocol (PAP) levels of the observable at execution time: if they aren't compatible with the analyzer, it returns an error and the node fails.
The list covers the analyzers of every Cortex instance connected to the organization. You don't select the instance: the node derives it from the analyzer you choose. When several instances host the same analyzer, the node uses the first one and gives no way to choose another. To target a specific instance, use the TheHive integration node with the Run Analyzer on Observable action, which takes the Cortex instance identifier as a value.
-
Optional: Select Add options to configure the following settings.
- Timeout & retry
Configure how the node handles execution time limits and failure recovery.
If the timeout is reached, the node fails.
Global timeout vs. local timeout
A timeout for the entire workflow is defined when creating the workflow. When both a node timeout and a workflow-level timeout are defined, the shortest timeout value applies.
Field Description Timeout Maximum allowed execution time for the node, in seconds, minutes, or hours. The minimum value is 30 seconds. Retry attempts Number of times the node is retried on failure. Retry delay Time to wait between retry attempts, in seconds, minutes, or hours. Without a delay, retries run 1 second apart by default. Backoff Coefficient applied to the retry delay to increase the wait time after each failed attempt. Retries and timeouts
If the node includes retry settings, the timeout applies to each attempt, not to the total duration of all attempts.
- Execution configuration
Set the Execution mode to control how the node behaves when several branches converge on it.
Mode Behavior Execute once per branch The node runs once for each incoming branch. Applies when this section isn't configured. Wait for all branches The node waits for all incoming branches to complete, then runs once.
Execution output
When executed, the node runs the selected analyzer on the observable. The analyzer's report is available as an output object.
To access the output, select your Analyzer node and then select in the top-right corner of the screen. Hover over the output name to view its details.
This output can then be reused as an output variable in subsequent nodes, using the $var button or by entering $ and selecting the output from the suggestions. The inserted reference is displayed as $<node_name>.analyzer_report.
It contains the full report returned by Cortex, in the format specific to the analyzer that was run. Use a Set local variable node, a JavaScript code node, or a Python code node to extract specific fields from it.
Configure a Responder action node#
A Responder action node triggers a Cortex responder on a specific alert, case, observable, task, or task log. When the node runs, it executes the selected responder and makes the resulting report available as an output variable for use in subsequent workflow steps.
Prerequisite
To use a Responder action node, a Cortex server must already be connected to TheHive. If no Cortex instance is configured, follow the instructions in Add a Cortex Server before proceeding.
-
Go to the Flow view from the sidebar menu.
-
Select a workflow from the list.
-
Drag the previous node connector to an empty area of the canvas.
-
In the What is the next step? drawer, select Actions.
-
Select Responder.
-
In the Responder drawer, enter the following information:
Variables
Insert a variable with the $var button, or enter
$and select a variable from the suggestions. To access a field, select the variable to edit its jq expression, or use the + button to insert the variable and the field together.Inside the expression, jq functions transform the value before it's inserted in the field. The whole expression stays inside the blue reference, for example:
$<node_name>.body.results[0].id: Reads the first identifier of an API response.$<node_name>.body.items | map(.name) | join(", "): Turns a list of objects into a comma-separated text.$<node_name>.body.createdAt / 1000 | todate: Formats a TheHive date, a Unix timestamp in milliseconds, as an ISO 8601 date.$<node_name>.output.title | ascii_upcase: Converts a text to uppercase.
See Jq Functions for the full list of available functions.
Fields marked with * are mandatory.
- Entity type *
The type of entity on which the responder runs. Each entity type has its own value:
alertfor an alert,casefor a case,case_artifactfor an observable,case_taskfor a task, andcase_task_logfor a task log.Two input modes are available:
- Form: Select the type from a list. The list is built from the entity types declared by the responders of the connected Cortex instances, so a type appears only when at least one enabled responder supports it.
- Raw: Enter the type directly or provide it with a variable, when it's only known at runtime from a previous node's output or missing from the list.
- Entity ID *
The identifier of the entity to process.
- Responder *
Select the Cortex responder to execute.
The list shows only responders compatible with the selected entity type. Cortex checks the TLP and PAP levels of the entity at execution time: if they aren't compatible with the responder, it returns an error and the node fails.
-
Optional: Select Add options to configure the following settings.
- Timeout & retry
Configure how the node handles execution time limits and failure recovery.
If the timeout is reached, the node fails.
Global timeout vs. local timeout
A timeout for the entire workflow is defined when creating the workflow. When both a node timeout and a workflow-level timeout are defined, the shortest timeout value applies.
Field Description Timeout Maximum allowed execution time for the node, in seconds, minutes, or hours. The minimum value is 30 seconds. Retry attempts Number of times the node is retried on failure. Retry delay Time to wait between retry attempts, in seconds, minutes, or hours. Without a delay, retries run 1 second apart by default. Backoff Coefficient applied to the retry delay to increase the wait time after each failed attempt. Retries and timeouts
If the node includes retry settings, the timeout applies to each attempt, not to the total duration of all attempts.
- Execution configuration
Set the Execution mode to control how the node behaves when several branches converge on it.
Mode Behavior Execute once per branch The node runs once for each incoming branch. Applies when this section isn't configured. Wait for all branches The node waits for all incoming branches to complete, then runs once.
Execution output
When executed, the node runs the selected responder on the selected alert, case, observable, or task. The responder's report is available as an output object.
To access the output, select your Responder node and then select in the top-right corner of the screen. Hover over the output name to view its details.
This output can then be reused as an output variable in subsequent nodes, using the $var button or by entering $ and selecting the output from the suggestions. The inserted reference is displayed as $<node_name>.responder_report.
It contains the full report returned by Cortex, in the format specific to the responder that was run. Use a Set local variable node, a JavaScript code node, or a Python code node to extract specific fields from it.
Configure an AI action node#
An AI action node sends a message to a large language model (LLM) and returns its response. Use it to triage alerts, summarize case data, classify observables, or draft content as part of a workflow. The node calls an OpenAI-compatible LLM provider configured by your administrator.
Prerequisite
An administrator must configure at least one LLM provider before using an AI action node.
Locally hosted LLM providers
An AI node can't reach a provider on a non-public address: the step fails with an egress guard error. For a provider hosted on your internal network, an administrator must first add its address range to the egress allowlist.
-
Go to the Flow view from the sidebar menu.
-
Select a workflow from the list.
-
Drag the previous node connector to an empty area of the canvas.
-
In the What is the next step? drawer, select Actions.
-
Select AI.
-
In the AI drawer, enter the following information:
Variables
Insert a variable with the $var button, or enter
$and select a variable from the suggestions. To access a field, select the variable to edit its jq expression, or use the + button to insert the variable and the field together.Inside the expression, jq functions transform the value before it's inserted in the field. The whole expression stays inside the blue reference, for example:
$<node_name>.body.results[0].id: Reads the first identifier of an API response.$<node_name>.body.items | map(.name) | join(", "): Turns a list of objects into a comma-separated text.$<node_name>.body.createdAt / 1000 | todate: Formats a TheHive date, a Unix timestamp in milliseconds, as an ISO 8601 date.$<node_name>.output.title | ascii_upcase: Converts a text to uppercase.
See Jq Functions for the full list of available functions.
Fields marked with * are mandatory.
- Role and context
Defines the posture and context the AI adopts. For example:
You are a security analyst specialized in alert triage.- Message *
The concrete instruction to execute. Phrase the request here and inject the data to analyze from upstream nodes, for example
Analyze this alert and decide whether to escalate or discard: $input.alert.- Provider *
The LLM provider to use. Available providers depend on the configuration set by your administrator.
- Model *
The model that generates the response, selected from the models available for the chosen provider.
- Output schema
A JSON schema describing the expected output structure. When set, the AI constrains its response to match the schema, so downstream nodes can consume the fields individually. The field opens pre-filled with a schema declaring a single
messagestring field. You can clear it: when the field is empty, the node produces noresultoutput and only the rawresponsetext is available. -
Optional: Select Add options to configure the following sections.
- Model parameters
Temperature: Controls how random the response is, from
0to2. Lower values make the response more focused and deterministic. Higher values make it more varied. Leave empty to use the model default.Max tokens: The maximum number of tokens in the response. Leave empty to use the provider default.
Reasoning effort: How much reasoning the model spends before answering: None, Minimal, Low, Medium, High, Extra high, or Max. None turns reasoning off, and the levels a model accepts depend on the provider. Leave empty to use the configuration default, then the provider default.
- Timeout & retry
Configure how the node handles execution time limits and failure recovery.
If the timeout is reached, the node fails.
Global timeout vs. local timeout
A timeout for the entire workflow is defined when creating the workflow. When both a node timeout and a workflow-level timeout are defined, the shortest timeout value applies.
Field Description Timeout Maximum allowed execution time for the node, in seconds, minutes, or hours. The minimum value is 30 seconds. Retry attempts Number of times the node is retried on failure. Retry delay Time to wait between retry attempts, in seconds, minutes, or hours. Without a delay, retries run 1 second apart by default. Backoff Coefficient applied to the retry delay to increase the wait time after each failed attempt. Retries and timeouts
If the node includes retry settings, the timeout applies to each attempt, not to the total duration of all attempts.
- Execution configuration
Set the Execution mode to control how the node behaves when several branches converge on it.
Mode Behavior Execute once per branch The node runs once for each incoming branch. Applies when this section isn't configured. Wait for all branches The node waits for all incoming branches to complete, then runs once.
Execution outputs
When executed, the node returns the following outputs. Each output is a JSON value:
| Output | Type | Description |
|---|---|---|
response |
string | The raw text response from the LLM. |
result |
object | The parsed structured output. Present only when an output schema is set. |
message |
object | The raw assistant message returned by the LLM, including reasoning content when the model provides it. |
finish_reason |
string | The reason the LLM stopped generating, for example stop, length, tool_calls, or content_filter. |
usage |
object | Token usage for the call: prompt_tokens, completion_tokens, and total_tokens. |
To access outputs, select your AI node and then select in the top-right corner of the screen. Hover over each output name to view its details.
These outputs can then be reused as output variables in subsequent nodes, using the $var button or by entering $ and selecting the output from the suggestions. Inserted references are displayed in the following form:
$<node_name>.response: to get the text response$<node_name>.result.<field_name>: to get a field from the structured output when an output schema is set$<node_name>.finish_reason: to check why the LLM stopped generating, for example in an If condition$<node_name>.usage.total_tokens: to get the total token usage of the call